Quantcast
Channel: l think, therefore l am
Viewing all 25 articles
Browse latest View live

Mac book pro 11.3 Linux customization (4): keyboard under X windows

$
0
0
Linux Console is a dinosaur and a stone age relics.  There isn't  too much you can do for its keyboard driver. But under X windows, since the new Linux Input framework (evdev) is utilized, you have full-fledged customization capability, with the  corresponding complexity. Here are some background materials. Read them before we got lost during our keyboard customization:

http://www.x.org/releases/current/doc/kbproto/xkbproto.pdf
http://www.linuxjournal.com/article/6396
http://www.linuxjournal.com/article/6429
https://wiki.archlinux.org/index.php/X_KeyBoard_extension
http://en.wikipedia.org/wiki/Evdev
http://www.x.org/archive/X11R7.5/doc/input/XKB-Config.html
http://www.charvolant.org/~doug/xkb/
http://who-t.blogspot.com/


1. Packages:KeyRelease event, serial 32, synthetic NO, window 0x1800001,
    root 0xb4, subw 0x0, time 30859749, (380,920), root:(1344,1036),
    state 0x0, keycode 111 (keysym 0xff52, Up), same_screen YES,
    XLookupString gives 0 bytes:
    XFilterEvent returns: False

KeyPress event, serial 32, synthetic NO, window 0x1800001,
    root 0xb4, subw 0x0, time 31122837, (410,486), root:(1374,602),
    state 0x1, keycode 38 (keysym 0x41, A), same_screen YES,
    XLookupString gives 1 bytes: (41) "A"
    XmbLookupString gives 1 bytes: (41) "A"
    XFilterEvent returns: False

Compiler and loader:

extra/xkeyboard-config:  all the configurable keymap data

extra/xorg-xkbcomp: xkb configuration file compiler. You need it to compile you customized keymap. It can also load your keymap. The top gun for xkb configuration.

extra/xorg-setxkbmap:  a convenient tool to load xkb configuration.  A subset of xorg-xkbcomp.
extra/xorg-xmodmap:  a legacy tool to modify current keymap.  Not recommended.  Use xorg-setxkbmap/xorg-xkbcomp instead.
extra/xorg-xset:  set keyboard repeat rate, repeat delay, dpms, screen saver, misc stuff

systemd localectl:  it also load and change keymap.  Since systemd-localed is a service, it is the best place to put your default keymap configuration, both for console and X;


Monitoring tools:

When you are dealing with keyboard, it is critical to have a good monitoring tool, since you will mess up every easily and have to reboot machine to gain your keboard back.

extra/xorg-xinput:  keyboard/mouse/trackpad event capture, from the level of X Windows application programmer;
extra/xorg-xev:  similiar to xorg-xinput, also from the X application perspective. The most suitable tool for our current job.

aur/evtest:  event tracker from xorg driver/device perspective. It report events from kernel, through device node under /dev/input/eventX, before they are hanled by Xorg input evdev driver;
aur/evemu:  upgraded version of "evtest".  can capture and replay event.  The top gun test suite, overkill for our current job.

aur/xkbprint: print out a keyboard image per your current configuration so you know "visually" how your keyboard look like. Good if you got so lost and don't know what you have done to your keyboard configuration.

xorg keyboard input driver:
   xf86-input-evdev: all internal and external keyboards all use driver.  It also handle mouse input of external usb mouse.  The apple trackpad is handled by another driver xf86-input-synaptics. We will discuss touchpad tuning in later post.


2. status quo

[luke@rmbp ~]$ localectl
   System Locale: LANG=en_US.UTF-8
       VC Keymap: us
      X11 Layout: us


[luke@rmbp ~]$ setxkbmap -print 
xkb_keymap {
xkb_keycodes  { include "evdev+aliases(qwerty)"};
xkb_types     { include "complete"};
xkb_compat    { include "complete"};
xkb_symbols   { include "pc+us+inet(evdev)"};
xkb_geometry  { include "pc(pc104)"};
};


A complete and functional xkb configuration consists of 5 components, as told by "setxkbmap -print": keycodes,types,compat,symbols,geometry.  All these components reside under "/usr/share/X11/xkb":

[luke@rmbp xkb]$ ll /usr/share/X11/xkb
total 24
drwxr-xr-x  2 root root 4096 Feb  4 20:11 compat
drwxr-xr-x  4 root root 4096 Feb  4 20:11 geometry
drwxr-xr-x  4 root root 4096 Feb  4 20:11 keycodes
drwxr-xr-x  2 root root 4096 Feb  4 20:11 rules
drwxr-xr-x 13 root root 4096 Feb  4 20:11 symbols
drwxr-xr-x  2 root root 4096 Feb  4 20:11 types

You should already known what "keycodes" are.  Under xkb,  keycode are all equipped with  symbolic names. We should stick to symbolic names instead of numeric values for compatibility issue.   All files under "/keycodes" are about assigning symbolic name to keycode. Keycode symbolic names can have aliases name.   Please be reminded that keycode values for the same physical key are different between linux console and xkb.  In our case, keycodes are defined by "evdev+aliases(qwerty)". We can checkout "keycodes/evdev" and "keycodes/aliases" to see what keycodes are available under current configuration. We can see the keycode ranges from 8 to 255 under "evdev" too. 

[luke@rmbp keycodes]$ cat evdev 
// translation from evdev scancodes to something resembling xfree86 keycodes.

default xkb_keycodes "evdev" {
minimum = 8;
maximum = 255;

        # Added for pc105 compatibility
        <LSGT> = 94;

<TLDE> = 49;
<AE01> = 10;
<AE02> = 11;
..............................

[luke@rmbp keycodes]$  cat aliases
http://www.x.org/releases/current/doc/kbproto/xkbproto.pdf
// keycode aliases for phonetic keyboard maps

default
xkb_keycodes "qwerty" {

   alias <LatQ> = <AD01>;
   alias <LatW> = <AD02>;
   alias <LatE> = <AD03>;
   alias <LatR> = <AD04>;
   alias <LatT> = <AD05>;
................................

It is time to use "xev" to get some feeling on the "keycodes". Check the output of evdev with the definition in "evdev" file. Make sure that they match:


KeyRelease event, serial 32, synthetic NO, window 0x1800001,
    root 0xb4, subw 0x0, time 30859749, (380,920), root:(1344,1036),
    state 0x0, keycode 111 (keysym 0xff52, Up), same_screen YES,
    XLookupString gives 0 bytes: 
    XFilterEvent returns: False

KeyPress event, serial 32, synthetic NO, window 0x1800001,
    root 0xb4, subw 0x0, time 31122837, (410,486), root:(1374,602),
    state 0x1, keycode 38 (keysym 0x41, A), same_screen YES,
    XLookupString gives 1 bytes: (41) "A"
    XmbLookupString gives 1 bytes: (41) "A"
    XFilterEvent returns: False


"state" reflects the which modifier key(s) are pressed.  For "1" it is "shift", for "2" is "capslock", "4" is "control", "8" is "alt", "0x10" is "numlock", "0x40" is "command", etc.  If multiple modifier keys are pressed, then "state" is the sum of all modifier state codes.  keycode should match difinition in "./keycodes/evdev", and "keysym" should match "./symbols/pc+us+inet(evdev)". 

Geometry reflect the physical shape/dimension of a specific keyboard model.  Let us print a keyboard image of current keymap configuration:

[luke@rmbp kbd]$ xkbcomp -xkm :0 pc104.xkm
[luke@rmbp kbd]$ xkbprint pc104.xkm pc104.pshttp://www.x.org/releases/current/doc/kbproto/xkbproto.pdfhttp://www.x.org/releases/current/doc/kbproto/xkbproto.pdfhttp://www.x.org/releases/current/doc/kbproto/xkbproto.pdf
[luke@rmbp kbd]$ file pc104.ps
pc104.ps: PostScript document text conforming DSC level 2.0
[luke@rmbp kbd]$ gv pc104.ps


Clearly, this is not a Macbook Pro keyboard.  Let us change the Geometry via "setxkbmap".  Under "./geometry", there is a file named "macintosh". Within it, there is a geometry section called "macbook78".  "setxkbmap" can set all five components directly via command line options "-geometry -compat -keycodes -symbols -types".  But these five components are correlated together and you just can not set them separately or "setxkbmap" will refuse to take your change.  It is hopless for end user to figure out how to choose correct configuration options for all 5 components. 

xkb has a solution for this.  For end user, they generally know the model of their keyboard, generally inscribed on the keyboard; and they will know which language they will input via keyboard.  xkb provide two parameters named "model" and "layout", and provide all common options of these two parameters. Under directory "./rules", we have files named "*.lst", which is used to provide selectable options for front end application.  xkb also provide corresponding rules to map "model/layout/variation/option" into 5 componetns of keymapping. 

[luke@rmbp rules]$ ls -l *.lst
-rw-r--r-- 1 root root 41775 Feb  4 20:11 base.lst
-rw-r--r-- 1 root root 41775 Feb  4 20:11 evdev.lst
lrwxrwxrwx 1 root root     8 Feb  4 20:11 xorg.lst -> base.lst

Within xorg.lst(base.lst), we have keyboard model named "macbook78", and layout "us". 


 ! model
    pc101           Generic 101-key PC
    pc102           Generic 102-key (Intl) PC
    pc104           Generic 104-key PC
...........................
   tm2030USB-102   TypeMatrix EZ-Reach 2030 USB (102/105:EU mode)
   tm2030USB-106   TypeMatrix EZ-Reach 2030 USB (106:JP mode)
   yahoo           Yahoo! Internet Keyboard
   macbook78       MacBook/MacBook Pro
   macbook79       MacBook/MacBook Pro (Intl)
   macintosh       Macintosh
.............................

! layout
  us              English (US)
  af              Afghani
  ara             Arabic
  al              Albanian
....................


Within a general layout, you can specify small variations, like:

! variant
  chr             us: Cherokee
  euro            us: English (US, with euro on 5)
  intl            us: English (US, international with dead keys)
  alt-intl        us: English (US, alternative international)
  colemak         us: English (Colemak)
..................


If you want to assign some specific functions to pre-defined key combination, for examle, "ctrl+alt+bksp" will terminate X server,  you can use the "options" list:

! option
  grp                  Switching to another layout
  grp:switch           Right Alt (while pressed)
.................
solaris:sun_compat   Sun Key compatibility
  terminate            Key sequence to kill the X server
  terminate:ctrl_alt_bksp Ctrl + Alt + Backspace


I have external USB logitech keyboard. Let us do some experiments with logitech plugged in.

[luke@rmbp ~]$ xinput list
⎡ Virtual core pointer                    id=2[master pointer  (3)]
⎜   ↳ Virtual core XTEST pointer              id=4[slave  pointer  (2)]
⎜   ↳ bcm5974                                 id=10[slave  pointer  (2)]
⎜   ↳ Logitech USB Receiver                   id=12[slave  pointer  (2)]
⎣ Virtual core keyboard                   id=3[master keyboard (2)]
    ↳ Virtual core XTEST keyboard             id=5[slave  keyboard (3)]
    ↳ Power Button                            id=6[slave  keyboard (3)]
    ↳ Power Button                            id=7[slave  keyboard (3)]
    ↳ Sleep Button                            id=8[slave  keyboard (3)]
    ↳ Apple Inc. Apple Internal Keyboard / Trackpadid=9[slave  keyboard (3)]
    ↳ Logitech USB Receiver                   id=11[slave  keyboard (3)]

[luke@rmbp ~]$ setxkbmap -device 9 -print
xkb_keymap {
xkb_keycodes  { include "evdev+aliases(qwerty)"};
xkb_types     { include "complete"};
xkb_compat    { include "complete"};
xkb_symbols   { include "pc+us+inet(evdev)"};
xkb_geometry  { include "pc(pc104)"};
};
[luke@rmbp ~]$ setxkbmap -device 11 -print
xkb_keymap {
xkb_keycodes  { include "evdev+aliases(qwerty)"};
xkb_types     { include "complete"};
xkb_compat    { include "complete"};
xkb_symbols   { include "pc+us+inet(evdev)"};
xkb_geometry  { include "pc(pc104)"};
};


At this time, we can see two keyboards have identical keymap.

[luke@rmbp ~]$ setxkbmap -device 9 -model macbook78 
[luke@rmbp ~]$ setxkbmap -device 9 -print
xkb_keymap {
xkb_keycodes  { include "evdev+aliases(qwerty)"};
xkb_types     { include "complete+numpad(mac)"};
xkb_compat    { include "complete"};
xkb_symbols   { include "pc+macintosh_vndr/us+inet(evdev)"};# first compile into text form, check if it is correct
[luke@rmbp xkb]$ xkbcomp -xkb -I./ keymap/macbook78 macbook78.xkb

# then compile into binary form
[luke@rmbp xkb]$ xkbcomp -xkm -I./ keymap/macbook78 macbook78.xkm

# then load it into current X to test

[luke@rmbp xkb]$ xkbcomp macbook78.xkm $DISPLAY

xkb_geometry  { include "macintosh(macbook78)"};
};

Now we can see the "geometry/symbols/types" have changed. Now let us print a picture of this new layout :


Some thing unhappy happened at this time. While I check keymap of logitech keyboard, I find it get changed to "macbook78" too:

[luke@rmbp kbd]$ setxkbmap -device 11 -print
xkb_keymap {
xkb_keycodes  { include "evdev+aliases(qwerty)"};
xkb_types     { include "complete+numpad(mac)"};
xkb_compat    { include "complete"};
xkb_symbols   { include "pc+macintosh_vndr/us+inet(evdev)"};
xkb_geometry  { include "macintosh(macbook78)"};
};

This is a shock for me at first sight.  After a serach on google, here is why:

https://bugs.launchpad.net/ubuntu/+source/x11proto-core/+bug/120788/+activity

Quote: "
The X.org XKB protocol has a limitation in that it can map only one keyboard model and a max of 4 layouts (bug #56912) in a given X session. The data type used to communicate keyboard mappings between the server and client apps simply doesn't provide room for the data needed for multiple keyboards. So a proper solution requires updating the X11 protocol to X12 (or at least X11.1), which is something that must be done upstream (further, there is risk that changing the protocol could cause widespread breakage in client applications if not done carefully.) So, in other words, this is not something that can be trivially fixed, but it's a known issue and will hopefully be dealt with some day. "

This bug was listed in Ubuntu for more that 2 years.  What can I say? Sigh...  X really is aging,  and it seems few people cares....

We can not have  two  different keymaps for different physical keyboards at the same time.   So let us focus on our macbook78 keyboard. Before that, let us show an example of "variant" and "option":

http://dry.sailingissues.com/us-international-keyboard-layout.html


When "us intl" layout is in effect, "AltGr" modifier will produce the "blue characters".
We will also enable options  "ctl+alt+backspace" to terminate X server.

[luke@rmbp kbd]$ setxkbmap -model pc105 -layout us -variant intl -option "terminate:ctrl_alt_bksp"
[luke@rmbp kbd]$ setxkbmap -print 
xkb_keymap {
xkb_keycodes  { include "evdev+aliases(qwerty)"};
xkb_types     { include "complete"};
xkb_compat    { include "complete"};
xkb_symbols   { include "pc+us(intl)+inet(evdev)+terminate(ctrl_alt_bksp)"};
xkb_geometry  { include "pc(pc105)"};
};
[luke@rmbp kbd]$ ¡²³¤€¼½¾‘’×  äåé®þüúíóö«»¬  áßðfghjœ


our variant and options actually take places  within (xkb_symbols).  We can produce the "international" chars now. When I hit "ctrl+alt+backspace", my X server get killed and I am back to linux console.

Standard xkb setting could be done with xkbsetmap in ".xinitrc", or via systemd localectl, or via Xorg.conf.  For xorg.conf, we are actually configuring the options of input driver xf86-input-evdev. For all the parameters of xf86-input-evdev, do "man evdev" and "man xkb". Install "extra/xf86-input-keyboard" so you can have "man xkb", although this driver won't get used for keyboard. evdev is the default driver for X keyboard and mouse now.


[luke@rmbp ~]$ man kbd
....................
      Option "XkbRules""rules"
              specifies  which  XKB rules file to use for interpreting the XkbModel, XkbLayout, XkbVariant, and XkbOptions settings.  Default: "base" for most platforms.  If you use the "base" value
              then you can find listing of all valid values for these four options in the /usr/share/X11/xkb/rules/base.lst file.

       Option "XkbModel""modelname"
              specifies the XKB keyboard model name.  Default: "pc105" for most platforms.

       Option "XkbLayout""layoutname"
              specifies the XKB keyboard layout name.  This is usually the country or language type of the keyboard.  Default: "us" for most platforms.

       Option "XkbVariant""variants"
              specifies the XKB keyboard variant components.  These can be used to enhance the keyboard layout details.  Default: not set.

       Option "XkbOptions""options"
              specifies the XKB keyboard option components.  These can be used to enhance the keyboard behaviour.  Default: not set.
.............................

I am not very fond of "xorg.conf" from the first day.  Nowaday, if not for very specific reason, you should not provide a "xorg.conf", since X server most of time will work out the details most of the time.  Check "/var/log/Xorg.0.log" and you can see X server most of time will choose correct setting for you.

l like systemd and I would like to put all system level setting into systemd.  So :

[luke@rmbp ~]$ localectl set-x11-keymap us macbook78 "" terminate:ctrl_alt_bksp
[luke@rmbp ~]$ localectl status
   System Locale: LANG=en_US.UTF-8
       VC Keymap: us
      X11 Layout: us
       X11 Model: macbook78
     X11 Variant: terminate:ctrl_alt_bksp

localectl actually write a X keyboard config file into "/etc/X11/xorg.conf.d/00-keyboard.conf".

I can also add just add a line into my .xinitrc:

setxkbmap -model macbook78 -layout us -option "terminate:ctrl_alt_bksp"


3.  "command" key customization

It is finally time to add my humble customization of "command" key, based on selected macbook78 configuration.  Under X, I can not simply remap "command" to "control", since "command" key is well defined under X, as can be seen from the output of "xev":


KeyRelease event, serial 32, synthetic NO, window 0x1800001,
    root 0xb4, subw 0x0, time 7870193, (455,915), root:(2379,955),
    state 0x40, keycode 133 (keysym 0xffeb, Super_L), same_screen YES,
    XLookupString gives 0 bytes: 
    XFilterEvent returns: False


KeyRelease event, serial 32, synthetic NO, window 0x1800001,
    root 0xb4, subw 0x0, time 7870689, (455,915), root:(2379,955),
    state 0x40, keycode 134 (keysym 0xffec, Super_R), same_screen YES,
    XLookupString gives 0 bytes: 
    XFilterEvent returns: False

Within the keymap source file generate via "xkbcomp -xkb :0", we have:

#keycode    
    <LWIN> = 133;
    <RWIN> = 134;

    alias <LMTA> = <LWIN>;

    alias <RMTA> = <RWIN>;

   modifier_map Mod4 { <LWIN> };
   modifier_map Mod4 { <RWIN> };


# symbols

  key <LWIN> {         [         Super_L ] }; 
  key <RWIN> {         [         Super_R ] }; 

# types

virtual_modifiers NumLock,Alt,LevelThree,LAlt,RAlt,RControl,LControl,ScrollLock,LevelFive,AltGr,Meta,Super,Hyper;

# compatibility
http://www.x.org/releases/current/doc/kbproto/xkbproto.pdf
 interpret Super_L+AnyOf(all) {
        virtualModifier= Super;
        action= SetMods(modifiers=modMapMods,clearLocks);
    };
    interpret Super_R+AnyOf(all) {
        virtualModifier= Super;
        action= SetMods(modifiers=modMapMods,clearLocks);
    };

These definitions basically says: " Keycode of  Commnad/L/R are 133/134, with alias "LMTA/RMTA";  bothhttp://www.x.org/releases/current/doc/kbproto/xkbproto.pdf command keys are mapped to "physical" modifier key "Mod4";  the key symbols for command/L/R are "Super_L" and "Super_R";  Both "Super_L" and "Super_R" are mapped to "virtualModifier Super".

Under Xkb,  the mapping between keycode and key symbols are affected by the  "type" of a keycode.  A type basically defines how many "levels" of mappings could one keycode has, and with what modifiers to represent which level.  Types are defined in xkb_types, for example:

   type "ONE_LEVEL" {
        modifiers= none;
        level_name[Level1]= "Any";
    };
    type "TWO_LEVEL" {
        modifiers= Shift;
        map[Shift]= Level2;
        level_name[Level1]= "Base";
        level_name[Level2]= "Shift";
    };
    type "ALPHABETIC" {
        modifiers= Shift+Lock;
        map[Shift]= Level2;
        map[Lock]= Level2;
        level_name[Level1]= "Base";
        level_name[Level2]= "Caps";
    };
   type "CTRL+ALT" {
        modifiers= Shift+Control+Alt+LevelThree;
        map[Shift]= Level2;
        preserve[Shift]= Shift;
        map[LevelThree]= Level3;
        map[Shift+LevelThree]= Level4;
        preserve[Shift+LevelThree]= Shift;
        map[Control+Alt]= Level5;
        level_name[Level1]= "Base";
        level_name[Level2]= "Shift";
        level_name[Level3]= "Alt Base";
        level_name[Level4]= "Shift Alt";
        level_name[Level5]= "Ctrl+Alt";

    };


"ONE_LEVEL" key code is the key code only produce one key symbol, irrespective of what modifier keys are pressed/locked.  For example, shift/control and other modifier keys often belongs to "LEVEL_ONE". 
"TWO_LEVEL" key code  are affected by "Shift" modifier, with two kind/level of key symbols for one keycode. 

"ALPHABETIC" type encompass all the noremal keycodes, which are affected by whether "SHITF" or "CAPLOCK" are pressed. They all have two corresponing key symbols. 
If a keycode belongs to "TWO_LEVEL",you must specifiy two key symbols for it in "xkb_sysmbols" section. 

Some examples:

 key <AD05> {
        type= "ALPHABETIC",
        symbols[Group1]= [               t,               T ]
    };

  key <RALT> {
        type= "TWO_LEVEL",
        symbols[Group1]= [           Alt_R,          Meta_R ]
    };

Besides from type/level, Xkb also have the concept of "group".  One keycode could have at most 4 groups of key mapping, with levels within each group.  Specific key combinations are defined to switch among groups. We only need Group 1.  All physical modifiers are defined in current keyboard configuration as:

   modifier_map Control { <LCTL> };
    modifier_map Shift { <LFSH> };
    modifier_map Shift { <RTSH> };
    modifier_map Mod1 { <LALT> };
    modifier_map Lock { <CAPS> };
    modifier_map Mod2 { <NMLK> };
    modifier_map Mod5 { <LVL3> };
    modifier_map Control { <RCTL> };
    modifier_map Mod1 { <RALT> };
    modifier_map Mod4 { <LWIN> };
    modifier_map Mod4 { <RWIN> };
    modifier_map Mod5 { <MDSW> };
    modifier_map Mod1 { <META> };
    modifier_map Mod4 { <SUPR> };
    modifier_map Mod4 { <HYPR> };


"commandL/R" have been both defined as physical modifier (Mod4) and virtual modifier (Super).  But there no existing types involves "Super".  Since we will only modify mapping for "up/down/left/right/delete/". The original mapping is as follows:


 key <UP>   {         [              Up ] };
 key <LEFT>   {         [            Left ] };
 key <RGHT>  {         [           Right ] };
 key <DOWN> {         [            Down ] };
 key <BKSP> {
        type= "CTRL+ALT",
        symbols[Group1]= [       BackSpace,       BackSpace,        NoSymbol,        NoSymbol, Terminate_Server ]
    };
UP/down/left/right does not have any type associated with them. The best way to add "command" combination with them is to define a new two level "type", add modified the original mapping accordingly:

[luke@rmbp xkb]$ cat types/macbook78 
partial default xkb_types 
{
virtual_modifiers Super;

    type "PC_SUPER_LEVEL2" {
        modifiers= Super;
        map[Super]= Level2;
        level_name[Level1]= "Base";
        level_name[Level2]= "Super";
    };
};

[luke@rmbp xkb]$ cat symbols/macbook78 
partial default xkb_symbols "basic"
{
    name[Group1] = "mac super";
    key <LEFT>  { [ Left, Home ], type[Group1] = "PC_SUPER_LEVEL2" };
    key <RGHT> { [ Right, End ], type[Group1] = "PC_SUPER_LEVEL2" };
    key <UP>    { [ Up, Prior ], type[Group1] = "PC_SUPER_LEVEL2" };
    key <DOWN>  { [ Down, Next ], type[Group1] = "PC_SUPER_LEVEL2" };

};

Since <BKSP> has type "CTRL+ALT" already, with level 1 modifier as "SHIFT". We will change the "CTRL+ALT" type definition and let "Super" act as its level 2 modifier.

  type "CTRL+ALT" {SuperSuper
        modifiers= Super+Shift+Control+Alt+LevelThree;
        map[Super]= Level2;
        preserve[Super]= Super;
        map[LevelThree]= Level3;
        map[Shift+LevelThree]= Level4;
        preserve[Shift+LevelThree]= Shift;
        map[Control+Alt]= Level5;
        level_name[Level1]= "Base";
        level_name[Level2]= "Super";
        level_name[Level3]= "Alt Base";
        level_name[Level4]= "Shift Alt";
        level_name[Level5]= "Ctrl+Alt";
    };   

 Next we will map "BKSP" level 2 symbol as "delete". 

key <BKSP> {
        type= "CTRL+ALT",
        symbols[Group1]= [       BackSpace,       Delete,        NoSymbol,        NoSymbol, Terminate_Server ]
    };

Now we have all mapping already, we need to combine our customized "type" and "symbols" into current key mapping, so we have a complete key mapping. 


[luke@rmbp xkb]$ cat ./keymap/macbook78 
xkb_keymap {
xkb_keycodes  { include "evdev+aliases(qwerty)"};
xkb_types     { include "complete+numpad(mac)+macbook78"};
xkb_compat    { include "complete"};
xkb_symbols   { include "pc+macintosh_vndr/us+inet(evdev)+terminate(ctrl_alt_bksp)+macbook78"};
xkb_geometry  { include "macintosh(macbook78)"};
};

You can find all source codes under Github, follow below links:

https://github.com/lukeluo/linux-debian7-admin/tree/master/archlinux/home/luke/xkb

Now we have all the modification, we need to compile our keymap:


# first compile into text form, check if it is correct
[luke@rmbp xkb]$ xkbcomp -xkb -I./ keymap/macbook78 macbook78.xkb

# then compile into binary form
[luke@rmbp xkb]$ xkbcomp -xkm -I./ keymap/macbook78 macbook78.xkm

# then load it into current X to test

[luke@rmbp xkb]$ xkbcomp macbook78.xkm $DISPLAY

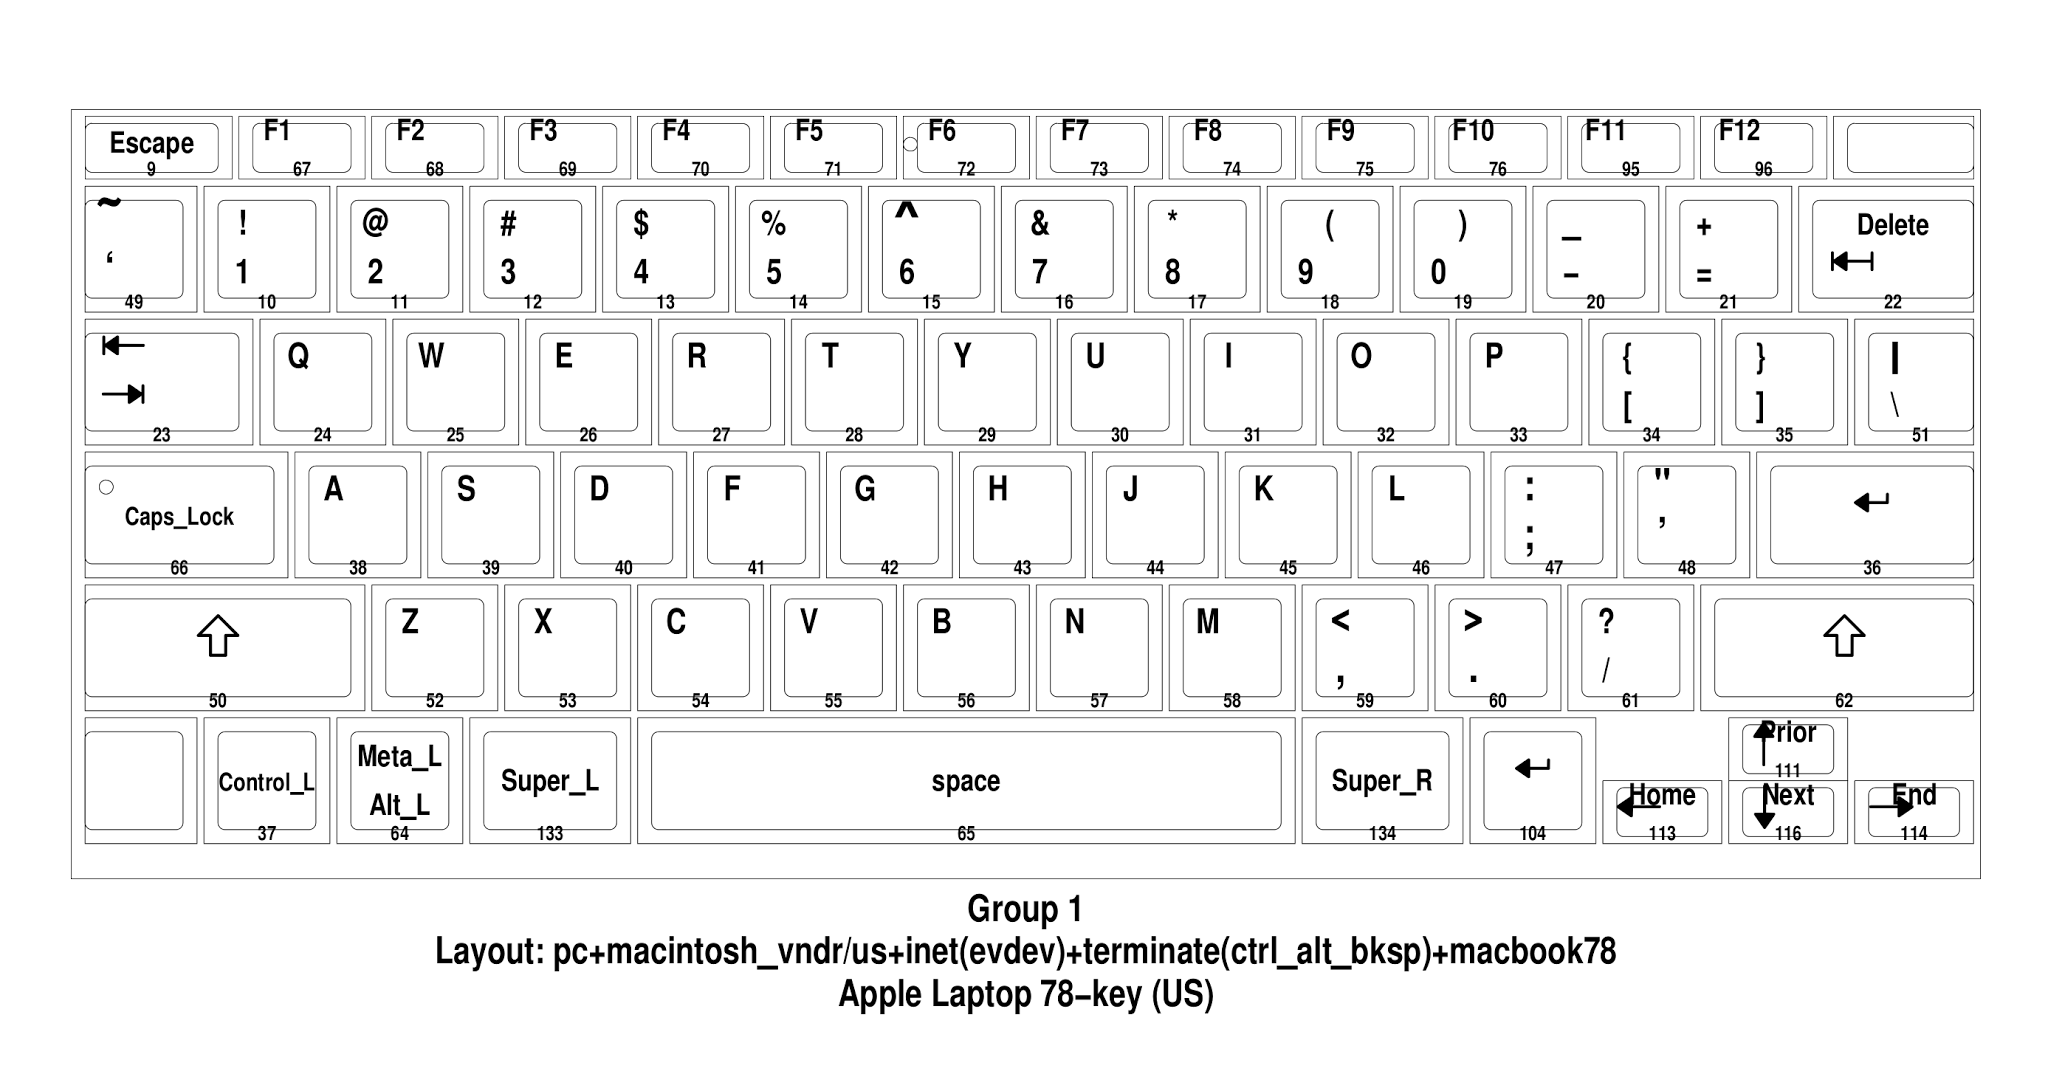
Here is the modified keymap image:
You can see "Home/Prior/Next/End" attached to the "Up/Down/Left/Right" keys.

Finally, add one line into .xinitrc:

xkbcomp  macbook78.xkm  $DISPLAY

I am using i3 as my window manager. Since i3 will bind to "command+up/down/left/right" too, I need to comment out i3's related key binding, so it won't override my customization.

# alternatively, you can use the cursor keys:
#bindsym $mod+Left focus left
#bindsym $mod+Down focus down
#bindsym $mod+Up focus up
#bindsym $mod+Right focus right

Now I feel more comfortable during editing since I have both "backspace" and "delete"; In my browser, I can use "pageup/pagedown/home/end" to scroll web page precisely.   Enjoy!


Mac book pro 11.3 Linux customization (5): Trackpad under X windows

$
0
0
Trackpad is a very important component for the user experience in Macbook. At the first several days, under the stock configuration of xf86-input-synaptics, I have both good and not so good  experience with the trackpad. The bad experience comes from:

a. Interference between keyboard and  trackpad
When I was busy typing, my palm will sometimes touch the trackpad, and input focus stray away to random place. It really piss me off and is a show stopper for productivity;
b. There are only one click button on trackpad. Although 1/2/3 finger  tap gesture could simulate the same 3 button mouse clicks, the default configuration does not provide a smooth transition path from traditional 3 button mouse to 1/2/3 fingers tap gesture;
c. I do copy/paste a lot. For copy, by default "tap and drag" configuration is off; For paste, the two finger tap will sometimes falsely move my input focus and I will paste into somewhere else. Such noise lowers my productivity;
d. the scroll direction in default configuration is not "natural", like the ones in tablet and mobile phone; and the scroll speed/coasting does fit my taste;
e. pointer device sensitivity. It is too slow or too fast. Need tuning;
f. Pinch gesture is not recognized yet;
g. there is no a video tutorial showing you how  gestures work. I took me lots of guess work to figure out what  "tap and drag", "circular scrolling", etc mean.

The user experience under OS x is good. It just works. I need to make linux provide similar level experience.

0. The device
As Apple's official specs says

"Multi‑Touch trackpad for precise cursor control; supports inertial scrolling, pinch, rotate, swipe, three‑finger swipe, four‑finger swipe, tap, double‑tap, and drag capabilities."

1. Tools of Trade

The xf86-input-synaptics package provide a configuration hacking tool called "synclient". You can adjust the parameters via "synclient  para=value" form, and the change is effective immediately. After you are satisfied with the tuning, export your configuration via "synclient -l > config.txt", and persist it into "/etc/X11/xorg.conf.d/50-synaptics.conf".

Since xf86-input-synaptics is also an X driver, We can also query and set it's properties via xinput:
[luke@rmbp ~]$ xinput list
⎡ Virtual core pointer                    id=2[master pointer  (3)]
⎜   ↳ Virtual core XTEST pointer              id=4[slave  pointer  (2)]
⎜   ↳ bcm5974                                 id=10[slave  pointer  (2)]
⎣ Virtual core keyboard                   id=3[master keyboard (2)]
    ↳ Virtual core XTEST keyboard             id=5[slave  keyboard (3)]
    ↳ Power Button                            id=6[slave  keyboard (3)]
    ↳ Power Button                            id=7[slave  keyboard (3)]
    ↳ Sleep Button                            id=8[slave  keyboard (3)]
    ↳ Apple Inc. Apple Internal Keyboard / Trackpadid=9[slave  keyboard (3)]
[luke@rmbp ~]$ xinput list-props 10
Device 'bcm5974':
Device Enabled (137):1
Coordinate Transformation Matrix (139):1.000000, 0.000000, 0.000000, 0.000000, 1.000000, 0.000000, 0.000000, 0.000000, 1.000000
Device Accel Profile (274):1
Device Accel Constant Deceleration (275):2.500000
Device Accel Adaptive Deceleration (276):1.000000
Device Accel Velocity Scaling (277):12.500000
Synaptics Edges (278):-3898, 4428, 434, 6146
Synaptics Finger (279):70, 75, 0
Synaptics Tap Time (280):180
Synaptics Tap Move (281):535
Synaptics Tap Durations (282):180, 180, 100
Synaptics ClickPad (283):1
Synaptics Middle Button Timeout (284):0
Synaptics Two-Finger Pressure (285):283
Synaptics Two-Finger Width (286):7
Synaptics Scrolling Distance (287):-100, -100
Synaptics Edge Scrolling (288):0, 0, 0
Synaptics Two-Finger Scrolling (289):1, 1
Synaptics Move Speed (290):1.000000, 1.750000, 2.000000, 0.000000
Synaptics Off (291):1
Synaptics Locked Drags (292):0
Synaptics Locked Drags Timeout (293):350
Synaptics Tap Action (294):0, 0, 0, 0, 1, 2, 3
Synaptics Click Action (295):1, 3, 2
Synaptics Circular Scrolling (296):1
Synaptics Circular Scrolling Distance (297):0.200000
Synaptics Circular Scrolling Trigger (298):0
Synaptics Circular Pad (299):0
Synaptics Palm Detection (300):1
Synaptics Palm Dimensions (301):10, 200
Synaptics Coasting Speed (302):10.000000, 0.000000
Synaptics Pressure Motion (303):30, 160
Synaptics Pressure Motion Factor (304):1.000000, 1.000000
Synaptics Grab Event Device (305):0
Synaptics Gestures (306):1
Synaptics Capabilities (307):1, 0, 0, 1, 1, 1, 1
Synaptics Pad Resolution (308):1, 1
Synaptics Area (309):0, 0, 0, 0
Synaptics Soft Button Areas (310):2271, 0, 0, 0, -1239, 1769, 0, 0
Synaptics Noise Cancellation (311):40, 27
Device Product ID (264):1452, 610
Device Node (265):"/dev/input/event19"
[luke@rmbp ~]$ xinput set-prop 10 300 1
evtest will help you see the level events. Use it  via "sudo evtest" and select the device "bcm5974". To detect event in X, you need to do "synclient GrabEventDevice=0", so X won't monopolize the event source and evtest can capture the event at the same time with X.

Turn to experts for in depth information:

http://cgit.freedesktop.org/xorg/driver/xf86-input-synaptics/
http://who-t.blogspot.com/
http://www.x.org/releases/X11R7.7/doc/inputproto/XI2proto.txt


2.   event and xf86-input-synaptics parameters

Linux input event driver can provide related events to trackpad.  The details are here:

https://www.kernel.org/doc/Documentation/input/bcm5974.txt
https://www.kernel.org/doc/Documentation/input/event-codes.txt
https://www.kernel.org/doc/Documentation/input/multi-touch-protocol.txt

"man synaptics" list lots of configurable parameters.  It won't make any sense if you don't know the physical meaning of those parameters.  evtest would help you set meaningful values.

a. physical dimension and x/y coordinates

The trackpad is about "10.5x7.5"cm. The absolute X/Y coordinate are reported in evdev event  via "ABS_MT_POSITION_X" and "ABS_MT_POSITION_Y" events.
[luke@rmbp kbd]$ sudo evtest /dev/input/event14 | grep -i abs_mt_position_x > x.txt
[luke@rmbp kbd]$ sudo evtest /dev/input/event14 | grep -i abs_mt_position_y > y.txt
In my test, the X coordinate ranges from -4786 to 5301, Y coordinate ranges from -147 to 6733. In the jargon of display monitor, this trackpad has about 2400 DPI. It is quite amazing.


 The parameter  "AccelFactor" is used to setup the scale between your trackpad and the screen.  I set it to "4" so in theory, when my finger travel 20% distance on trackpad, the pointer on the screen should travel %20x4=%80 of screen distance.  But it does not work that way. Anyway, the sensitivity under "4" is o.K to me.
AccelFactor             = 4
synaptics provide 4 "edge" parameter to let you partition trackpad area logically into different functional areas.  Synaptics driver will treat events within different areas differently. This is a very useful feature.
      LeftEdge                = -3898
    RightEdge               = 4428
    TopEdge                 = 1400
    BottomEdge              = 5000

Within the edge area, touch movement will be treated as scroll event and cursor on the screen won't be moved. You can use one finger to scroll in edge areas. This helps to reduce the palm noise while typing.  The four corners could be configured as mouse button. But this is not my way.  We can use percentage in X conf file, as follows:
        option   "LeftEdge"    "15%"
        option   "RightEdge"   "15%"
        option   "TopEdge"     "10%"
        option   "BottomEdge"  "10%"
When I enable the edge area, I realize that "vertical/horizontal edge scroll" has been turned on automatically and can not be disabled.  You don't need to specify below parameters anymore: 
       Option "VertEdgeScroll" "1"
       Option "HorizEdgeScroll" "1"
Synaptic support 2 fingers touch as vertical/horizontal scroll gesture.  Just enable below options:
       Option "HorizTwoFingerScroll""1"
        Option "VertTwoFingerScroll"  "1"
        Option "HorizScrollDelta""-100"
        Option "VertScrollDelta" "-100"
        Option "CoastingSpeed" "20"
        Option "CoastingFriction""0"
The "delta" every delta unit your fingers move on the surface, one mouse scroll event will be generated. The smaller the delta, the quick the scrolling speed.  Remember trackpad is a device with very high "DPI", so with "100", I can get very fast scrolling speed.  The "-" makes scroll direction resemble your scrolling experience on tablet and mobile phone.

"scroll coasting" means when you fingers begin scrolling, after fingers leave off the surface, the scroll continues. Your fingers must scroll at a minimum speed to enable coasting, this min speed is defined via "CoastingSpeed". If it is not zero, it means you enable "off surface" coasting.  This speed is defined by how many scroll events your fingers generate every second. Remember we set scroll delta as "-100"? That means you fingers move about 100/2400 inch  (2400 is the DPI) and one scroll event will be generated.  The default value for "CoastingSpeed" is 20, that means your fingers need to scroll at 2000/2400 inches per second to begin coasting.  My fingers can move easily more than 10 inches in one second , so a normal swipe will begin the coasting. That is exactly what I want.

After the coasting begin, you can set up a "friction" factor, so coasting will slow down. This is a acceleration speed in unit of "scroll/second^2".  I set it to zero, so no friction . When I touch pad again, the coasting will stop.

You can also enable "circular scrolling". When one finger move clock wise or counter clock wise aroud the center area, the page will scroll in two direction. To activate circular scrolling, you can choose a "trigger" condition via option "CircScrollTrigger". If it is set to "0", then whenever your single finger move from any edge area into "center area" and begins circular movement around the center point of trackpoint, scroll events will be generated. The smaller the circle you draw, the quicker the scrolling speed, because the scrolling speed is generated according to your "arc speed" in the circle. The "CircScrollDelta" determine how much radian you travel to generate a scroll event. If you set it to "1", then a round trip of a circle will generate 2*3.14/1  scroll events. (3.14 is Pi).  I set it to 0.2 so I can have very fast circular scroll speed. ( 31.4 scroll  events per circle cycle).
       option "CircularScrolling" "1"
        option "CircularScrollTrigger" "0"
        option "CircScrollDelta"   "0.2"

b. pressure and width
The pressure to the trackpad surface will be carried via event type "ABS_PRESSURE":
[luke@rmbp tp]$  sudo evtest /dev/input/event14 | grep -i abs_pressure 
Pressure ranges from 0 to 255.

The width of the contact zone will be delivered via event type "ABS_TOOL_WIDTH". There are other width values, but synaptics driver use this one.

As I mentioned previously in this post, the false movement of my palm and thumb on trackpad while I was typing it a big headache.  Through the evedv interface, I capture width and pressure of mMulti‑Touch trackpad for precise cursor control; supports inertial scrolling, pinch, rotate, swipe, three‑finger swipe, four‑finger swipe, tap, double‑tap, and drag capabilitiesy Plam/thumb and other fingers, and do some data crunching. I got below histograms:


Synaptics driver support palm detection base on width and pressure.   Width can separate the palm/thumb from other fingers' gesture quite well. The best value for me is "9". For pressure, since the distribution of palm/thumb pressure is very sick, I will choose "185" based on the distribution of other fingers' pressure distribution to eliminate as much as possible the false alarm.
    PalmDetect              = 1
    PalmMinWidth            = 9
    PalmMinZ                = 185
After this setup, the false alarm almost vanished, and the other normal trackpad operation does not suffer any noticeable negative effects.

Synaptics driver also provide another standalone program "syndaemon" to eliminate the interference between keyboard and trackpad. I tried it and it also works. syndaemon will disable trackpad event processing temporarily when keystroke is detected. After the timeout value you specify at command line expires, it will enable trackpad again.  The bigger the timeout value, the better chance to eliminate keyboard/trackpad interference, with the cost of a delayed operation transition from keyboard to trackpad. I set the timeout value to 0.2 second since I need quick switch from keyboard to trackpad. You also need to use "-k -K" option to tell syndaemon to ignore meta key and meta+normal key combination, since I often use "ctrl+ two fingers scroll up/down" to act as "zoom in/out". Here is the one liner to add  into your .xinitrc:

syndaemon -k -K -d -i 0.2 -R &

The combination of palm detect and syndaemon fix the issues of keyboard/trackpad inference almost perfectly.

c. mouse button
There is only one physical "click" button on trackpad. Synaptics provide 4 way to configure for more buttons:
. corner button
you can configure the 4 core areas as four buttons.
    RTCornerButton          = 0
    RBCornerButton          = 0
    LTCornerButton          = 0
    LBCornerButton          = 0
If the value is not zero, then it will be acted as button "N";
.click finger button
When you click the only physical button, one finger click stands for one button, and 2/3 finger clicks stands for another 2 buttons:
    ClickFinger1            = 1
    ClickFinger2            = 3
    ClickFinger3            = 2
    ClickPad                = 1
. tap button
You tap with 1/2/3 fingers will stands for different buttons:
    TapButton1              = 1
    TapButton2              = 2
    TapButton3              = 3
. soft area button
you can delineate areas for 1/2/3 buttons (left/middle/right) in the track pad. Clicks on different areas stands for different button:
 Option "SoftButtonAreas""RBL RBR RBT RBB MBL MBR MBT MBB"
I prefer tap button and soft area button. Here is my configure:
       Option "TapButton1""1"
        Option "TapButton2""2"
        Option "TapButton3""3"

        Option "SoftButtonAreas" "70% 0 0 0 35% 65% 0 0"


        Option "ClickButton1""0"
        Option "ClickButton2""0"
        Option "ClickButton3""0"

        Option "RTCornerButton""0"
        Option "RBCornerButton"         "0"
        option "LTCornerButton"         "0"
        option "LBCornerButton"         "0"
And finally I do select/copy/paste a lot. Synaptics provide a "tap and drag" gesture provide this convenient feature. You just need to enable it:
Option "TapAndDragGesture""1"

3. wrap it up
The final configuration file is here:
https://github.com/lukeluo/linux-debian7-admin/blob/master/archlinux/etc/X11/xorg.conf.d/50-synaptics.conf

It basically works now. There are hot debate about which desktop OS is better, among Linux/Windows/Mac. My opinion is: it all depends on who use it and to do what.  As a developer, Linux is best choice, not one of it. But for other people.... Even myself hesitate to spend 2 days to customize my trackpad, even as a developer.  Sometimes I also like to have "things" that just "works".  Synaptics driver, per user experience, is a car that demands yourself to tune the tires after delivered to your home. Anyway, you can tune it, and it is free!

Still fancy things are missing:  flip, three finger swipe, pinch, and customization on the actions that triggered by gesture. If you like these fancy stuff, try touchegg.
[luke@rmbp xorg.conf.d]$ packer -Ss touchegg
aur/touchegg 1.1.1-3 (35)
    Multitouch gesture recognizer
aur/touchegg-svn 187-1 (6)
    Multitouch gesture recognizer
aur/touchegg-rotate_threshold 1.1-0 (2)
    Multitouch gesture recognizer - patched to include a threshold for ROTATE gesture
aur/touchegg-gce-git 1.1-2 (1)

It works after you install it, and it is based on the gesture library of Ubuntu, "geist".  You  had better disable synaptics first, since touchegg is a user space program, and synaptics will process the evdev event first. Just remove the /etc/X11/xorg.conf.d/50-synaptics.conf, and X will use evdev driver for trackpad instead of synaptics, and touchegg will take full control of trackpad event through /dev/input/eventN interface. 


Mac book pro 11.3 Linux customization (6): Graphic Stack

$
0
0
Two things need to be handled well under X to gain better user experience in rmbp:
. GPU: intel HD5200 and Nvidia GT 750M
. retina screen: 2880x1800 resolution make lots of things different
After that, X windows work just as "X windows", and you can leverage all your prior X windows knowledge and experience.

1. GPU selection
By default, apple EFI Firmware will power down Intel Iris GPU if you boot into another OS other than Mac OS X.  With the help of "apple_set_os" grub patches mentioned in previous post, you can use the intel GPU. But the soft GPU switch between Iris and GT750M does not work under Linux yet. The kernel "vgaswitcheroo" driver does not work under rmbp 11.3. You can use only one of the physical GPUs at a time. The selection happens before you even booting  Linux, and was done in OS X, via the help from a OS X application "gfxCardStatus".

http://gfx.io/


Use a  2.2.1 or earlier version.  Later version does not provide the capability to forcibly  use a specific GPU.  Select "Integrated Only" if you want to use Intel GPU, or "Discrete Only/Dynamic Switching" if you prefer Nvidia GPU.

2.Graphic Stack
Reference:
https://docs.google.com/viewer?url=http%3A%2F%2Fphd.mupuf.org%2Ffiles%2Ftoulibre2012_deeper_look.pdf
http://www.linuxjournal.com/content/linux-graphics-news
http://blog.mecheye.net/2012/06/the-linux-graphics-stack/
http://blog.samuelig.es/2013/05/14/introduction-to-linux-graphics-drivers-drm/
http://www.bitwiz.org.uk/s/how-dri-and-drm-work.html
http://dvdhrm.wordpress.com/2013/09/01/splitting-drm-and-kms-device-nodes/

Please take a look at above reference docs if this is your first time to hear the phase "Linux Graphic Stacks". If you know that these ref docs are talking about, then treat contents afterwards as the software packages reference under Archilinx.  If you really don't care "Linux graphic stack", treat following contents as a cheat sheet, and copy paste it to try to make it work.

Here is theoretical component of linux graphic stack, extracted from Martin Peres's presentation:

Here is the related packages in Archlinux. This is only a rough illustration, so you can get a feeling about the graphic stack. It is far from complete.


a. First let us talk about video drivers in Linux kernel. For Intel Iris, it is the module "i915".  It is an open source driver maintained mainly by Intel engineers.

http://cgit.freedesktop.org/drm-intel
[luke@rmbp vpn]$ modinfo i915
filename:       /lib/modules/3.13.7-1-ARCH/kernel/drivers/gpu/drm/i915/i915.ko.gz
license:        GPL and additional rights
description:    Intel Graphics
author:         Tungsten Graphics, Inc.
license:        GPL and additional rights
alias:          pci:v00008086d0000162Dsv*sd*bc03sc*i*
.........................
alias:          pci:v00008086d00003577sv*sd*bc03sc*i*
depends:        drm_kms_helper,drm,intel-gtt,i2c-core,video,button,i2c-algo-bit,intel-agp
intree:         Y
vermagic:       3.13.7-1-ARCH SMP preempt mod_unload modversions 
parm:           invert_brightness:Invert backlight brightness (-1 force normal, 0 machine defaults, 1 force inversion), please report PCI device ID, subsystem vendor and subsystem device ID to dri-devel@lists.freedesktop.org, if your machine needs it. It will then be included in an upcoming module version. (int)
parm:           modeset:Use kernel modesetting [KMS] (0=DRM_I915_KMS from .config, 1=on, -1=force vga console preference [default]) (int)
parm:           fbpercrtc:int
parm:           panel_ignore_lid:Override lid status (0=autodetect, 1=autodetect disabled [default], -1=force lid closed, -2=force lid open) (int)
parm:           powersave:Enable powersavings, fbc, downclocking, etc. (default: true) (int)
parm:           semaphores:Use semaphores for inter-ring sync (default: -1 (use per-chip .............................

Pay attention to the tuneable parameters.  The current values of parameters for i915 module could be found here:
[luke@rmbp parameters]$ cd /sys/module/i915/parameters
[luke@rmbp parameters]$ sudo grep . *
disable_power_well:1
.......................

You can tune these parameters via a configuration file under "/etc/modprob.d":
[luke@rmbp modprobe.d]$ cat /etc/modprobe.d/i915.conf 
options i915 i915_enable_rc6=7 i915_enable_fbc=1 lvds_downclock=1 modeset=1

For Nvidia GT750M, you have two choices for kernel driver: nouveau and nvidia.  nouveau is open source and built-in already.  For proprietary Nvidia driver, install this package:
[luke@rmbp modprobe.d]$ pacman -Si nvidia
Repository     : extra
Name           : nvidia
Version        : 334.21-2
Description    : NVIDIA drivers for linux
Architecture   : x86_64
URL            : http://www.nvidia.com/
Licenses       : custom
Groups         : None
Provides       : None
Depends On     : linux>=3.13  linux<3.14  nvidia-libgl  nvidia-utils=334.21
Optional Deps  : None
Conflicts With : nvidia-96xx  nvidia-173xx
Replaces       : None
Download Size  : 4768.23 KiB
Installed Size : 4950.00 KiB
Packager       : Sven-Hendrik Haase <sh@lutzhaase.com>
Build Date     : Wed 05 Mar 2014 10:11:06 AM CST
Validated By   : MD5 Sum  SHA256 Sum  Signature
I would recommend the open source driver, if you don't have very specific requirement. nouveau is more friendly with other open source components, and it share lots of mesa components with i915. Similarly, you can view and changes nouveau parameters just like i915:
[luke@rmbp ~]$ modinfo nouveau
filename:       /lib/modules/3.13.7-1-ARCH/kernel/drivers/gpu/drm/nouveau/nouveau.ko.gz
license:        GPL and additional rights
description:    nVidia Riva/TNT/GeForce/Quadro/Tesla
author:         Nouveau Project
....................
[luke@rmbp ~]$ cd /sys/module/nouveau/parameters/
[luke@rmbp parameters]$ sudo grep . *
agpmode:-1
config:(null)
..............
[luke@rmbp parameters]$ cat /etc/modprobe.d/nouveau.conf 
options  nouveau runpm=1
Since we could not use two GPU at the same time, it does not make too much sense to load two kernel modules. Generally, I will only load one of them, via another config file under "/etc/modprobe":
[luke@rmbp ~]$ cat /etc/modprobe.d/blacklist.conf 
install nouveau /bin/false
install nvidia  /bin/false
#install i915    /bin/false
Here only i915 is loaded.

Linux kernel provide "DRM" interface to user application for GPU operation. Each GPU is represented as a drm device under "/dev/dri/cardN", and the drm driver resides in "/sys/class/drm/*".
[luke@rmbp ~]$ ls -l /dev/dri
total 0
crw-rw----+ 1 root video 226,  0 Apr  7 18:58 card0
crw-rw----  1 root video 226, 64 Apr  7 18:58 controlD64
[luke@rmbp ~]$ ls -l /sys/class/drm
total 0
lrwxrwxrwx 1 root root    0 Apr  7 18:58 card0 -> ../../devices/pci0000:00/0000:00:02.0/drm/card0
lrwxrwxrwx 1 root root    0 Apr  7 18:58 card0-eDP-1 -> ../../devices/pci0000:00/0000:00:02.0/drm/card0/card0-eDP-1
lrwxrwxrwx 1 root root    0 Apr  7 18:58 card0-VGA-1 -> ../../devices/pci0000:00/0000:00:02.0/drm/card0/card0-VGA-1
lrwxrwxrwx 1 root root    0 Apr  7 18:58 controlD64 -> ../../devices/pci0000:00/0000:00:02.0/drm/controlD64
lrwxrwxrwx 1 root root    0 Apr  7 18:58 ttm -> ../../devices/virtual/drm/ttm
-r--r--r-- 1 root root 4096 Apr  7 18:58 version

This is i915's output. We can see i915 provides two interface, "eDP-1" and "VGA-1". That is because i915 also provide traditional "framebuffer" device under "/dev/fbN". That is why you have a "VGA" interface.  Actually, when grub starts, it will use the framebuffer device provided by EFI firmware called "efi framebuffer". After Linux kernel loads "i915" or "nouveau", since both drivers provides framebuffer support, kernel will replace EFI framebuffer with the ones provided by either i915 or nouveau. dmesg will how you what happened:
[root@rmbp debug]# dmesg | grep fb
[    2.430730] pci 0000:00:1f.3: reg 0x20: [io  0xefa0-0xefbf]
[    2.474946] pci 0000:00:1c.0: BAR 14: assigned [mem 0x7fa00000-0x7fbfffff]
[    2.474981] pci 0000:00:1c.0:   bridge window [mem 0x7fa00000-0x7fbfffff]
[    2.475052] pci_bus 0000:02: resource 1 [mem 0x7fa00000-0x7fbfffff]
[    2.528480] efifb: probing for efifb
[    2.530575] efifb: framebuffer at 0xb0000000, mapped to 0xffffc9000b880000, using 20736k, total 20736k
[    2.530576] efifb: mode is 2880x1800x32, linelength=11776, pages=1
[    2.530576] efifb: scrolling: redraw
[    2.530577] efifb: Truecolor: size=8:8:8:8, shift=24:16:8:0
[    2.547386] fb0: EFI VGA frame buffer device
[    2.563678] fb: conflicting fb hw usage inteldrmfb vs EFI VGA - removing generic driver
[    2.956481] fbcon: inteldrmfb (fb0) is primary device
[    5.093420] i915 0000:00:02.0: fb0: inteldrmfb frame buffer device
If we install "xf86-video-fbdev", then X can use the "/dev/fb*" device for rendering, without hardware acceleration. Since UEFI firmware also provides framebuffer support, even without "i915" and "nouveau", we will still start an X session of "2880X1800" screen, with EFI FB as backend. Thanks to the retina screen, in the first two days setting up rmbp, I did not realize I was using the framebuffer driver because I was used to 1440x900 resolution. After I switched to nouveau/i915, there is still noticeable quality improvement in font rendering quality. When I played 4k video, I realized that cpu usage dropped under 5% percent comparing to 75% under framebuffer driver.

rmbp supports 4 display connectors at the same time: the embedded internal retina screen, one hdmi, two display ports. All external display connectors are "soldered" into Nvidia GPU/display controller. Intel Iris can only control embedded display port, a.k.a the retina screen. You can use "xrandr" to control the external display ports.

b. 2D/3D rendering acceleration(OpenGL, dri driver)

This is the world of OpenGL.  Mesa is the open source implementation of OpenGL, and both i915 and nouveau are compatible with mesa. nvidia-libgl  conflicts with mesa-libgl. If you install proprietary Nvidia driver, then both nouveau and i915 needs to be disabled.   X server does accelerated rendering through DRI interface. That is why we have "intel-dri" and "nouveau-dri" packages. The Device Dependent Driver of X (DDX) talk via backend GPU via DRI. Here we have "xf86-video-intel" and "xf86-video-nouveau". Generally, X server will try to load all loadable x display driver and kept the successfully loaded ones. For example, if only i915 kernel module is loaded, X will still try to load xf86-video-nouveau" and "xf86-video-i915". But since "nouveau" kernel module is not loaded, xf86-video-nouveau will fail to load. If you have both "i915/nouveau" kernel modules loaded, X server might have a wrong guess and your X session will error with "screen not found".  It is a good practice to tell X server which driver to use, via a config file under "/etc/X11/xorg.conf.d":
[luke@rmbp ~]$ cat /etc/X11/xorg.conf.d/20-intel.conf 
Section "Device"
   Identifier  "Intel Graphics"
   Driver      "intel"
   Option      "TearFree"   "true"
   Option      "AccelMethod" "glamor"
   #Option      "AccelMethod" "sna"
EndSection
Here we specify driver "intel" to be loaded. Specify "nouveau" as you will.
Both intel and nouveau X drivers have quite some tunable parameters, see "man intel" and "man nouveau" for detailed information.

c. Video Acceleration
Nvidia an Intel both proposed video acceleration API, named "VDPAU" and "VAAPI" respectively. VAAPI is has more open source support, thanks to Intel's open source commitment. But more applications provides better support for VDPAU, at least at this time.  There is "adapter" driver for transformation between this two APIs. For example, libva-vdapu-driver will provide VAAPI interface with VDAPU backend, and libvdpau-va-gl provides VADPU interface via a VAAPI backend. "vdpauinfo" and "vainfo" will help you identify the video acceleration capability on your platform. For example, when Iris is in use:

[luke@rmbp acpi]$ vainfo
libva info: VA-API version 0.35.0
libva info: va_getDriverName() returns 0
libva info: Trying to open /usr/lib/dri/i965_drv_video.so
libva info: Found init function __vaDriverInit_0_35
libva info: va_openDriver() returns 0
vainfo: VA-API version: 0.35 (libva 1.3.0)
vainfo: Driver version: Intel i965 driver - 1.3.0
vainfo: Supported profile and entrypoints
      VAProfileMPEG2Simple            :VAEntrypointVLD
      VAProfileMPEG2Simple            :VAEntrypointEncSlice
      VAProfileMPEG2Main              :VAEntrypointVLD
      VAProfileMPEG2Main              :VAEntrypointEncSlice
      VAProfileH264ConstrainedBaseline:VAEntrypointVLD
      VAProfileH264ConstrainedBaseline:VAEntrypointEncSlice
      VAProfileH264Main               :VAEntrypointVLD
      VAProfileH264Main               :VAEntrypointEncSlice
      VAProfileH264High               :VAEntrypointVLD
      VAProfileH264High               :VAEntrypointEncSlice
      VAProfileVC1Simple              :VAEntrypointVLD
      VAProfileVC1Main                :VAEntrypointVLD
      VAProfileVC1Advanced            :VAEntrypointVLD
      VAProfileNone                   :VAEntrypointVideoProc
      VAProfileJPEGBaseline           :VAEntrypointVLD

I download a 4k mp4 sample video to test the video acceleration. Here is my test result:
. test data
for 720/1080/2160p data, I use this video from youtube:
http://www.youtube.com/watch?v=0vrdgDdPApQ

Since I can not download 2160p video from youtube, I download another 4k video from here:
http://box.houkouonchi.jp/4k/HONEY%20BEES%2096fps%20IN%204K%20(ULTRA%20HD)(Original_H.264-AAC).mp4

To test the flash player (PPAPI) in chromium browser, I use this link. It provide 720/1080p, but no 2160p:
http://tv.sohu.com/20130302/n367600509.shtml

. kernel driver
I use EFI framebuffer, i915 and nouveau
. cpu usage collection
I use "top" to collect cpu usage. Please be reminded that I use my eye to do some average. So don't treat the cpu usage as precise, but only on a scale sense. If cpu usage is "low", I think both rendering and video decode acceleration are being leveraged; if "high", then I think is the other case.
. video applications
I choose vlc/mplayer/youtube html5 player/PPAPI flash player in chromium. vlc has option to choose "vaapi" or "vdpau" for hw acceleration.  Both vlc and mplayer have log telling you what acceleration hw is being used. For html5 and flash, I don't know what hardware acceleration they use.
Here is the result:

Some observation from the data:
. In "UEFI framebuffer" case, except mplayer, all cpu usages roar up to way above 50%. At this time, you are not in any mood to watch a movie. All you can here is the furious fan noise;  How mplayer achieve such low cpu usage is a magic to me. It must know some trick to leverage GPU rendering and video acceleration even under EFI framebuffer, or it can not achieve such low cpu usage;
. both vlc and mplayer can leverage VAAPI and VDPAU well, especially for vlc/nouveau under VDAPU. For 2304p, vlc will tell you that VDPAU does not support this format. Both vlc/mplayer manage to control cpu usage around 10% for 4k(2036p) video.  I guess most extra cpu power is used to do video decoding at this time;
. Google html5 player works just O.K, although not that efficient as vlc/mplayer at resolution not higher than 1080p. I guess html5 player can not leverage VAAPI/VDPAU for accelerated video decoding, but it can do accelerated rendering;
. the built-in chrome PPAPI flash player's performance is not very good, comparing to html5 player, but acceptable. Since so many web sites other than youtube use flash, this flash plugin is still a necessity.  Don't install the flash player downloaded from Adobe web site. Per my experience, (on Archlinux Chrome), it fails on many video web site. But PPAPI flash alway works.

Finally the take away from above observations:
. Under "optimal" condition (GPU acceleration fully leveraged), the CPU usage should way blow 5%;
. Even under "suboptimal" condition (GPU Video acceleration not leveraged), CPU usage should be controlled below 10%;
. You should never hear rmbp's ran roaring while you are watching video.  Or there must be something wrong with your graphic stack configuration.

3. DPI
I have mentioned how to setup bigger font for Grub and Linux virtual console. Under X, it is simple. For me, just add dpi parameter when you start X server:
[luke@rmbp ~]$ cat .xserverrc
#!/bin/sh
  exec /usr/bin/X -nolisten tcp -dpi 168 -logverbose 7 "$@" vt7
dpi=168 is o.k for me. You have the free will to set it to any value. dpi=220 might be another good choice. If you are using Gnome or KDE, it should have been set up to reasonable value already. 

4. External Monitor(s)
I have mentioned you can use external monitors only via "GT750M". Under nouveau, you can see all 4 display connectors:
[luke@rmbp drm]$ ls -l /sys/class/drm/
total 0
lrwxrwxrwx 1 root root    0 Apr  8 15:14 card0 -> ../../devices/pci0000:00/0000:00:01.0/0000:01:00.0/drm/card0
lrwxrwxrwx 1 root root    0 Apr  8 15:14 card0-DP-1 -> ../../devices/pci0000:00/0000:00:01.0/0000:01:00.0/drm/card0/card0-DP-1
lrwxrwxrwx 1 root root    0 Apr  8 15:14 card0-DP-2 -> ../../devices/pci0000:00/0000:00:01.0/0000:01:00.0/drm/card0/card0-DP-2
lrwxrwxrwx 1 root root    0 Apr  8 15:14 card0-eDP-1 -> ../../devices/pci0000:00/0000:00:01.0/0000:01:00.0/drm/card0/card0-eDP-1
lrwxrwxrwx 1 root root    0 Apr  8 15:14 card0-HDMI-A-1 -> ../../devices/pci0000:00/0000:00:01.0/0000:01:00.0/drm/card0/card0-HDMI-A-1
lrwxrwxrwx 1 root root    0 Apr  8 15:14 controlD64 -> ../../devices/pci0000:00/0000:00:01.0/0000:01:00.0/drm/controlD64
lrwxrwxrwx 1 root root    0 Apr  8 15:14 ttm -> ../../devices/virtual/drm/ttm
-r--r--r-- 1 root root 4096 Apr  8 15:14 version
Use "xrandr" to setup your external monitors. I have a HDMI TV, here is one feasible setup:
[luke@rmbp drm]$ xrandr --listproviders
Providers: number : 1
Provider 0: id: 0x67 cap: 0x7, Source Output, Sink Output, Source Offload crtcs: 4 outputs: 4 associated providers: 0 name:nouveau
[luke@rmbp drm]$ xrandr
Screen 0: minimum 320 x 200, current 2880 x 1800, maximum 8192 x 8192
eDP-1 connected 2880x1800+0+0 (normal left inverted right x axis y axis) 331mm x 207mm
   2880x1800      60.0*+
   1920x1200      59.9  
   1920x1080      60.0  
   1600x1200      59.9  
   1680x1050      60.0  
   1400x1050      60.0  
   1280x1024      59.9  
   1280x960       59.9  
   1152x864       60.0  
   1024x768       59.9  
   800x600        59.9  
   640x480        59.4  
   720x400        59.6  
   640x400        60.0  
   640x350        59.8  
DP-1 disconnected (normal left inverted right x axis y axis)
DP-2 disconnected (normal left inverted right x axis y axis)
HDMI-1 disconnected (normal left inverted right x axis y axis)
After I plug in the hdmi cable, 
[luke@rmbp drm]$ xrandr
Screen 0: minimum 320 x 200, current 2880 x 1800, maximum 8192 x 8192
eDP-1 connected 2880x1800+0+0 (normal left inverted right x axis y axis) 331mm x 207mm
   2880x1800      60.0*+
................ 
DP-1 disconnected (normal left inverted right x axis y axis)
DP-2 disconnected (normal left inverted right x axis y axis)
HDMI-1 connected (normal left inverted right x axis y axis)
   1280x720       60.0 +   50.0     59.9  
   1920x1080i     60.1     50.0     60.0  
................  
[luke@rmbp ~]$ xrandr --output HDMI-1 --below eDP-1
[luke@rmbp ~]$ xrandr --output HDMI-1 --mode 1920x1080i
[luke@rmbp ~]$ xrandr --output eDP-1 --mode 2880x1800

Now I have two monitors with different contents. If want synchronized monitors, "--same-as" will do the trick for you.  I think I could use 3 external retina monitors..yeah, some day.

Mac book pro 11.3 Linux customization (7)-A: Power Management Under OS X

$
0
0
Under Mac OS X, for normal editing, web browsing, and some youtube videos, the battery can last about 7 hours. It is really a relaxing experience because 7 hours almost cover the day job time. There must have been lots of effort from Apple to make this happen. Since Apple controls hardware, firmware and software, it should have lots of optimization bandwidth. Under Linux, we can only optimize based on public information. Even so, there is still room for improvement.

1. basic information
So the battery voltage is about 12.6V.  The fully charged capacity now is about 8700mAh.  So the total battery power is about 12.6x8.7=106.92 Wh.
I open a safari, with network on, and several other low profile background apps, then I open "battery status" to check the static power dissipation rate:
It says "Power Usage: 7.81 Watts".  According to the power rate, the battery could last 106.92/7.81=14.035 hours.

2. prominent user experience

a. sleep state

rmbp will enter "sleep" state only after about 2 mins inactivity. During "sleep", all I/O device are in lower power state or power disconnected. Network is down, and cpu freezes.  It is some kind of "suspend to ram", with very quick resume time.  I guess this state is them same as the one after you close lid.  "pmset" can log the battery discharge current every minute.
I use pmset to log what happen before and during a sleep state:
localhost:pm luke$ pmset -g rawlog > sleep.log
After resume from "sleep", I check the log:
localhost:pm luke$ tail -f sleep.log
 Polled boot=04/09/14 20:38:17; User visible=04/09/14 19:18:33
04/09/14 20:39:17
 No AC; Not Charging; 96%; Cap=8396: FCC=8675; Design=8440; Time=22:10; -379mA; Cycles=43/1000; Location=0;
 Polled boot=04/09/14 20:38:17; Full=04/09/14 20:38:17; User visible=04/09/14 20:39:17
04/09/14 20:40:17
 No AC; Not Charging; 96%; Cap=8408: FCC=8690; Design=8440; Time=41:01; -205mA; Cycles=43/1000; Location=0;
 Polled boot=04/09/14 20:38:17; Full=04/09/14 20:38:17; User visible=04/09/14 20:40:17
04/09/14 20:42:24
 No AC; Not Charging; 96%; Cap=8402: FCC=8686; Design=8440; Time=763:49; -11mA; Cycles=43/1000; Location=0;
 Polled boot=04/09/14 20:38:17; Full=04/09/14 20:42:24; User visible=04/09/14 20:40:17
04/09/14 20:43:24
 No AC; Not Charging; 96%; Cap=8366: FCC=8663; Design=8440; Time=15:09; -552mA; Cycles=43/1000; Location=0;
 Polled boot=04/09/14 20:38:17; Full=04/09/14 20:42:24; User visible=04/09/14 20:43:24
04/09/14 20:44:24
 No AC; Not Charging; 96%; Cap=8352: FCC=8658; Design=8440; Time=12:32; -666mA; Cycles=43/1000; Location=0;
 Polled boot=04/09/14 20:38:17; Full=04/09/14 20:42:24; User visible=04/09/14 20:44:24
The last tracked discharge rate is "-11mA" before "sleep". The actually sleep current might be even less than this value. Even for 11mA discharge, your fully charged rmbp can last about 8500/10=85 hours.
After sleep for a period time, rmbp will enter hibernate mode. Under this sate, power consumption is very low, and rmbp should be able to last  weeks or even month. There are two states which will cause hibernation to happen, "standby" and "autopoweroff".  The only difference I can tell between them is whether rmbp is on battery power.  According to "man pmset":

"The system will not auto power off if any external devices are connected, if the system is on battery power, or if the system is bound to a network and wake for network access is enabled."

The default values for both AC and Battery are:
users-MacBook-Pro:~ luke$ pmset -g  | grep -E 'standby|autopoweroff'
 standbydelay         10800
 standby              1
 autopoweroffdelay    14400
 autopoweroff         1
Both "standby" and "autopoweroff" are enabled on either AC or battery profile. Is the man page wrong for this?  On the condition that rmbp can enter hibernation, I should not care too much whether it is "standby" or "autopoweroff".   3 hours of sleep to enter standby, while 4 hours of sleep will cause "autopoweroff".

b. static power consumption.

When system is not in sleep state and inactive, I call this "static" state.  This is a very important baseline measurement. I close all applications, with wifi on, bluetooth off, keyboard backlight to zero, screen backlight to my comfortable level, and check the static battery discharge current:
 localhost:pm luke$ pmset -g rawlog | tee static.log
 localhost:pm luke$ cat static.log | grep mA | cut -d ';' -f 7 | sed -e 's/-//g' -e 's/mA//g' | (s=0;i=0; while read v; do s=$((s+v)); i=$((i+1)); done; echo $((s/i)) )
450
So the static current is about "450mA". It is about 12.5x0.45=5.625W.  Under this discharge rate, the fully charged battery can last 8700/450=19.3 hours. That is pretty amazing.

c. Applications

On the base of "static" context, I will run different  application to check power consumption:

. quicktime

full screen, different resolutions,  sound mute and  comfortable brightness level (25%, 16 lx). The sample video is downloaded from youtube, with different resolution in MP4 format:
https://www.youtube.com/watch?v=W2d8mIC9O0I

Quicktime works perfect from power consumption perspective.  Even for 3840x2160, the discharge is   not significant from other resolution, and only 930mA.  The cpu usage for 3820x2160 is only %2, so hardware video acceleration is leveraged perfectly.  All 4 modes are decoded and rendered by Intel Iris GPU. I guess the power difference comes mainly from GPU video decoding.  There should not be two much difference in rendering, since  all rendered to 2880x1800 screen.  You can watch about 10 hours of high quality video with fully charged battery.  This is an amazingly  good user experience.

. html5 player

For the same youtube video, chrome+html5 player, cached video (no wifi download), mute, full screen, Intel Iris. The cpu usage is about 10%, and battery discharge is 1750mA and 2000mA for 720p and 1080p.  It is far less power efficient comparing to Quicktime. I think the reason is GPU video acceleration is not leveraged , and cpu usage rise up to about 10% accordingly. This cause the different  power consumption.

. flash player

video from other site, 720p and 1080p.  chrome+flash player (12.0.7.7), cached video, mute, full screen, Intel Iris. The cpu usage is 12% and 15%, respectively.  Battery power is 2450mA and 3000mA. This performance  is analogue to html5 players, only way worse.  Hardware video acceleration  surely not leveraged. And I guess rendering acceleration not leveraged well either. Poor flash player. It is like an orphan in Mac world.

. wifi download

wget in about 1.5MB/s. 950mA discharge.  500mA delta comparing to static 450 mA, noticeable  power consumption.

. mp3 play (speaker, sound level 50%) 585mA. 130mA delta to staid level, minor impact.

.iFacetime:  opening camera will cost you 860mA. While chatting, will be 1360mA. The extra power consumption should come from networking.

. chrome, multiple tabs open with web contents, no keyboard/mouse activities.

1 tab, blank: 550mA
1 tab, sina.com, with lots of flash dynamic contents (ads): 2200mA
10 tabs, famous web portals, msnbc,nytimes, CNN, bbc, Facebook, yahoo, google+, etc, with nytimes     in the front: 695mA
10 tabs, the same configuration, with sina.com in the front: 2400mA

The take away here is:  It all depends on the website you are browsing.  If it is a website with lots of dynamic contents, especially with flash plugin enable contents, then power consumption will be roaring up.  In fact, you are watching flash videos on these web sites. Multiple tabs does not pose significant impact.  So the conclusion is : to save power, stay away from those "flashy" website!

No wonder that Safari has an option "Stop plugin to save power":
3. Web video war : Safari vs Chrome,  Flash vs html5/vp9
You might have noticed  during testing for web video play, I deliberately choose Chrome for testing. We don't have Safari on Linux.  Google, Apple, Adobe all have a stake in web video rendering war.

Apple: Does not like Flash, say few thing about vp9, but is Quicktime already dead for  web video? So you can still use Adobe flash plugins in Safari.
Google: promote vp9. In chrome, youtube video will be forced(?) to use html5 player. But hardware video acceleration for vp9 is not available yet.  When you visited other video web site, Chrome will use flash plugin, be it google's PPAPI flash or Adobe's NPAPI flash;
Adobe: abandon flash support for Linux. There  is still support for Mac.
Video website: Many web video providers, especially in China, promote their  standalone "video player".  These "video players" most of time are just a wrapper for Adobe Flash Player.  The interesting( or sick) thing is, the standalone player will enable video hardware acceleration, while browser flash playing will not leverage hardware video decoding.

Are you confused already? I am.  For video player in browser, here is the way:

. for youtube.com: use safari, both rendering and video decoding are hardware accelerated. the adobe flash plugin work fines at youtube. Thanks , "goodgirl", for "not that evil" thing;

. For other video websites providing flash based video, you are at the mercy of the web site owner. If they are so dedicated to their "standalone player", most likely you will have high power consumption for web video playing. If you are so fond of their contents, install the dedicated player will save power budget (most likely). Is there  any "unspoken rules" here?

Are we too paranoid on video player power consumption? For a movie, you will save, say (2000-600)mA * 12.5 V * 2 hours = 0.035 kWh, which translates to about 0.35 cent.  But it is not about power budget, but about the feeling of 8 hours versus 2.5 hours of continuous video playing on battery. You  save power, you save battery life, and you are COOL!

4.  Summary

Based on data collected so far, here is a power consumption profile graph. You should be able to get a basic feeling how mac book pro will perform under daily operation.


You might wonder why I did not mention Nvidia GPU but only Intel Iris. During all my testing, none of the test cases trigger the operation of Nvidia GPU.  I am not doing any video editing job. Iris's power has far more exceed my requirement.  The only scenario for me to leverage GPU power might be CUDA/openCL.  Till then, I will stick to Intel Iris, unless GTM750M has less power consumption then Iris, which is not likely to be true.

With all these reference data at hand on OS X platform, let us turn to Linux in next post.

Mac book pro 11.3 Linux customization (7)-B: Power Management Under Linux

$
0
0
Reference:
https://access.redhat.com/site/documentation/en-US/Red_Hat_Enterprise_Linux/6/html/Power_Management_Guide/

If you don't care the detail of power saving features, here is the quick summary and take-away for rmbp power consumption on Arch Linux:

. OS X is far more efficient in managing the "power save/suspend" state  comparing to Linux. When you boot os up and do nothing, on OS X, power is 5.6w; while on Linux, after all the known power save tuning applied, it is 13.3w;
. OS X provide a very good "sleep" state, which only consumes about 0.125w and resume within seconds. Linux does not provide such "deep sleep/sleep fast/resume fast/ power efficient" standby state;
. Application's power profile are on par between OS X and Linux. 

As we can see from last post, from a user's perspective, you don't need to bother with power saving setting under OS X, and mac book pro just works pretty well. Even if you are "tech savvy", all you can do is play with "pmset" command line. Apple provides you a "closed loop" user experience.

Things are quite different under Linux. To be frank, "works out of box" seldom happens here. For power management, there are so many aspects of Linux power management  system, and none of them make too much senses to a "normal" end user.  In many linux distribution, by default, the power management parameters are not tuned in favor of power saving.  To make situation worse, there is not a centralized, user experience oriented power management "center", so we can simply set up  our power usage preference/profile, and everything just works.  On the contrary, you can tune almost every parameters of every device driver, you can select different mechanisms to suspend/hibernate/resume machine, etc. Linux give you so much freedom and so many choices to control your machine, but sometimes, you feel  just "out of control" with so many controls. 

Enough ranting, let us get back to business. 

1. Kernel: 3.14 stock mainline 

. I need to tinker with lot PM debugging and need to open lots debugging options of linux kernel;
. Power Management depends heavily on device drivers, and open source device drivers for GPU, and other new devices are under heavy development. 

I enable almost all  modules/capabilities under "power management and ACPI". I also enable quite some debugging facilities under "Kernel Hacking".  Whenever I realize I lack a testing tool/mechanism provided by kernel, I will re-config and rebuild kernel. 

2. Measurement

Thanks to linux module "battery", we can have all the battery information under "/sys/class/power_supply/BAT0".  We are interested in "energy_now/power_now/voltage_now". The units of these measurement are "µwh/µw/µv".  Here is a simple script to capture these measures:
[luke@rmbp pm]$ cat power.sh
#!/usr/bin/bash
echo 'time,power,energy,voltage'> power.csv

power_now='/sys/class/power_supply/BAT0/power_now'

energy_now='/sys/class/power_supply/BAT0/energy_now'
voltage_now='/sys/class/power_supply/BAT0/voltage_now'

while true

do
(echo $(date +%s) ',' ; cat $power_now; echo ',';cat $energy_now; echo ','; cat $voltage_now  ) | xargs echo | tee -a power.csv
sleep 2
done
In our previous post, we use "mA" a lot to measure the power consumption, since "pmset" give us "mA".  The power unit provided by "battery" is "µw". To translate it into "mA", we need to :
mA = (power_now/voltage_now)*1000
Under OS X, the static current is "450mA". This is about 0.45Ax12V=5.40w.
Intel release a tool called "powertop". Use it as reference only.  There are also other tools available, namely "cpupower", which is a kernel tool, and "i7z". Use them as you will.  The battery discharge power is the ultimate litmus test for how good the power management is.
There is a similar tool "powerstat", you can install it from "AUR/powerstat-git".
[luke@rmbp ~]$ packer -S powerstat-git
[luke@rmbp ~]$  powerstat -d 5
Running for 470 seconds (47 samples at 10 second intervals).
ACPI battery power measurements will start in 5 seconds time

  Time    User  Nice   Sys  Idle    IO  Run Ctxt/s  IRQ/s Fork Exec Exit  Watts
07:31:15   0.9   0.0   0.2  98.9   0.0    2    848    516    1    0    1  14.06
07:31:25   0.8   0.0   0.1  99.0   0.0    2    762    506    0    0    0  14.29
07:31:35   1.0   0.0   0.1  98.9   0.0    1    842    520    0    0    0  14.06
07:31:45   0.8   0.0   0.1  99.1   0.0    2    732    507    0    0    1  14.15
07:31:55   0.9   0.0   0.1  99.0   0.0    2    667    358    0    0    0  13.94
..................
 Average   1.1   0.0   0.2  98.7   0.0  1.7  883.4  471.9  0.1  0.0  0.3  14.40
  StdDev   0.3   0.0   0.1   0.4   0.0  0.5  190.8   58.0  0.3  0.0  0.5   0.48
-------- ----- ----- ----- ----- ----- ---- ------ ------ ---- ---- ---- ------
 Minimum   0.8   0.0   0.1  98.2   0.0  1.0  666.6  358.3  0.0  0.0  0.0  13.94
 Maximum   1.6   0.0   0.3  99.1   0.0  2.0 1224.7  519.7  1.0  0.0  1.0  15.15
-------- ----- ----- ----- ----- ----- ---- ------ ------ ---- ---- ---- ------
Summary:
 14.40 Watts on Average with Standard Deviation 0.48  


3. CPU & GPU
cpu is a big topic, and also a very matured one.  With so much effort from Intel, both hardware and software, I should say cpu power management is the component which is  closest to "works out of box" situation. You can skipped to other sections if you are not interested on low level details of cpu power management.

a. CPU power capping
If you feel uncomfortable for the fan noise of rmbp when it is working hard, you can limit the power consumption of intel CPU via "power capping".  The default capping driver in Arch Linux is "intel_powerclamp".
./Documentation/thermal/intel_powerclamp.txt
./drivers/thermal/intel_powerclamp.c
/sys/devices/virtual/thermal/cooling_deviceN/
For each logical core, you can set up how much percentage of cpu time should spent as "idle" via parameter  "/sys/devices/virtual/thermal/cooling_deviceN/cur_state".  This value should not surpass "max_state" , which is generally "50" (50 percent). For example, if "cur_state=10", then you are demanding that cpu should be busy at most 90 percent of time.

There is another more advanced power capping driver called "intel_rapl", which exists at processors Sandy Bridge and newer models. Instead of specifying the idle time percentage, you specify directly the power limit of cpu package/core/uncore. I prefer more "rigid" thing so I choose to use "intel_rapl" as my power capping driver.
./drivers/powercap/intel_rapl.c
./Documentation/power/powercap/powercap.txt
/sys/class/powercap/intel-rapl/

I need to add one line into "intel_rapl.c" so the CPU in rmbp could be recognized.
949 static const struct x86_cpu_id rapl_ids[] = {
 950         { X86_VENDOR_INTEL, 6, 0x2a},/* SNB */
 951         { X86_VENDOR_INTEL, 6, 0x2d},/* SNB EP */
 952         { X86_VENDOR_INTEL, 6, 0x37},/* VLV */
 953         { X86_VENDOR_INTEL, 6, 0x3a},/* IVB */
 954         { X86_VENDOR_INTEL, 6, 0x45},/* HSW */
 955         { X86_VENDOR_INTEL, 6, 0x46},/* HSW mbp*/
 956         /* TODO: Add more CPU IDs after testing */
 957         {}
Then re-compile this driver and install it into module dirs. 
[luke@rmbp ~]$ cat /proc/cpuinfo
.................
cpu family: 6
model: 70
model name: Intel(R) Core(TM) i7-4850HQ CPU @ 2.30GHz
stepping: 1
microcode: 0xf
......................
I check the Intel processor manual, and it said the TDP of "i7-4850HQ" is 47W. 
[luke@rmbp intel-rapl:0]$ pwd 
/sys/class/powercap/intel-rapl/intel-rapl:0
[luke@rmbp intel-rapl:0]$ ls
constraint_0_max_power_uw  constraint_0_power_limit_uw  constraint_1_max_power_uw  constraint_1_power_limit_uw  device   energy_uj       intel-rapl:0:1       name   subsystem
constraint_0_name          constraint_0_time_window_us  constraint_1_name          constraint_1_time_window_us  enabled  intel-rapl:0:0  max_energy_range_uj  power  uevent
[luke@rmbp intel-rapl:0]$ grep . constraint_0*
constraint_0_max_power_uw:47000000
constraint_0_name:long_term
constraint_0_power_limit_uw:25000000
constraint_0_time_window_us:28000000
From the output, we can see "intel_rapl" correctly identify the TDP of our CPU (47w). I open a kernel compiling terminal with 8 threads working, and play a 4k mp4 video, to  fully load rmbp. Per my observation , when I set "power_limit_uw" to 25w, the fan will be quiet. When set to 30w, you will hear light fan noise. After 30w, you will hear loud fan noise. The larger the value, the sooner you hear the loud fan noise. After the power upper limit is set, I can see it will take more time to finish a kernel compile. 

Refer to this presentation for more information on power capping on Linux:
http://events.linuxfoundation.org/sites/events/files/slides/LinuxConPowerCapping_jpan.pdf
According to this presentation, rapl is the most efficient one concerning to power efficiency. 

b. cpufreq/intel_pstate
./Documentation/cpu-freq/intel-pstate.txt
/sys/devices/system/cpu/intel_pstate/
intel_pstate is the default cpufreq driver. It is built-in in kernel. With intel_pstate, we can forget about all other legacy "governors". Since intel_pstate has internal governor. Quoted from intel_pstate documentation:

"For contemporary Intel processors, the frequency is controlled by the
processor itself and the P-states exposed to software are related to
performance levels.  The idea that frequency can be set to a single
frequency is fiction for Intel Core processors. Even if the scaling
driver selects a single P state the actual frequency the processor
will run at is selected by the processor itself.
"
So has been said about cpu frequency (p state) control. intel_pstate only allow you to set up the p state range you want you cpu  to run on, in a percentage sense. 
[luke@rmbp intel_pstate]$ pwd
/sys/devices/system/cpu/intel_pstate
[luke@rmbp intel_pstate]$ grep . *
max_perf_pct:100
min_perf_pct:22
no_turbo:0
The default values are range from 22% ---100%.  The effect of such setting could be viewed here:
[luke@rmbp cpufreq]$ pwd
/sys/devices/system/cpu/cpu0/cpufreq
[luke@rmbp cpufreq]$ sudo grep . *
affected_cpus:0
cpuinfo_cur_freq:813625
cpuinfo_max_freq:3500000
cpuinfo_min_freq:800000
cpuinfo_transition_latency:4294967295
related_cpus:0
scaling_available_governors:performance powersave
scaling_driver:intel_pstate
scaling_governor:powersave
scaling_max_freq:3500000
scaling_min_freq:800000
scaling_setspeed:<unsupported>

For "i7-4850HQ", the min/max p state frequency is 800M/3.5G.   When "no_turbo=1", frequency higher that 2.3G should be excluded. Let us do an experiment.
[luke@rmbp ~]$ cd /sys/devices/system/cpu/intel_pstate
[luke@rmbp intel_pstate]$ echo 50 | sudo tee max_perf_pct 
50
[luke@rmbp intel_pstate]$ echo 1 | sudo tee no_turbo 
1
[luke@rmbp intel_pstate]$ grep . *
max_perf_pct:50
min_perf_pct:22
no_turbo:1
Now let us use "powertop" to see cpu freq stats:

Now we can see CPU works on freqs "800/900/1000/1100MHz". 
Since we are focusing on lowering the power consumption, here  an interesting question rises: On the condition that our performance requirement is satisfied, for example, we can play 4k video smoothly, on what frequency should we put cpu to work at? Will cpu be more power efficient under 800M to finish an operation comparing to under 3.5G?  I don't know. But I assume Intel CPU knows better than me. So we  let cpu decide to work under whichever p state under certain load. So the default setting is just good, since cpu can choose from all freq to work at. 

c. cpu idle/intel_idle
Haswell is promoted as very power efficient because it has very "deep" sleep mode. When cpu is idle, it will consume very little power under deep sleep mode.  The module in Linux to handle cpu idle states is "intel_idle". It is built-in and not as a module. 
./drivers/idle/intel_idle.c
"powertop" can also output the idle stats:

So most of the times, all cpus are in the deepest idle state "c7s-HSW".  It works "out of box".  We can also see GPU is in deep sleep state "RC6" 99.7% of time, since we enable Intel GPU power saving.

d. GPU(Iris)
I test Intel Iris only. Because:
. Under OS X, all data are collected when Nvidia is NOT on;
. It is open source backed by Intel. It is  under active development;
. nouveau is poor at power management at this moment.  We can not count on  when nouveau can crack out Nvidia's power management secrets.
Through "modinfo i915", we can see there are quite some parameters relating to power saving. I collect all of them and save into i915 config file:
[luke@rmbp ~]$ cat /etc/modprobe.d/i915.conf 
options i915 powersave=1 i915_enable_rc6=7 i915_enable_fbc=1 lvds_downclock=1 disable_power_well=true enable_pc8=1 fastboot=1 modeset=1

e. Summary
After all these observation, let us summarize the CPU power consumption.  There are 4 major parts in a CPU package: core, uncore,dram controller, GPU.  Here is the powertop result when computer is basically idle:
Here we can see these figures:
Display backlight: 3.14w  (why there are two identical items?)
DRAM: 1.29w
CPU Core: 102mw
CPU misc: 1.24w
GPU core: 98.3mw
GPU misc: 0mW

Here , CPU core is very low already (102mw), this means cpu most of the time is in very deep "sleep" state.  GPU core is also in very low power consumption(98.3 mw), this means our "i915" module power saving parameters  works great, so GPU core is also in deep sleep state.  Since we have 16G ram, 1.29w for dram is also reasonable(dram needs to be recharged at fixed interval).  What is "cpu misc: 1.24w"? I guess this is caused by the on-chip cache.  Since we have retina screen, I guess 3.14w for display is also reasonable.  So the total cpu+gpu+backlight is about 5.87w.  Powertop use "rapl" to collect cpu power info. Let us verify this result with the data collected via "intel_rapl" driver:
[luke@rmbp intel-rapl:0]$ pwd
/sys/class/powercap/intel-rapl/intel-rapl:0
[luke@rmbp intel-rapl:0]$ find . -name "name" | xargs grep . 
./name:package-0
./intel-rapl:0:0/name:core
./intel-rapl:0:1/name:dram
Here we only have 3 items, namely "package-0/core/dram". In theory, package-0=core+dram+other(cache/gpu etc). 
[luke@rmbp intel-rapl:0]$ find . -name "energy_uj"
./energy_uj
./intel-rapl:0:0/energy_uj
./intel-rapl:0:1/energy_uj

[luke@rmbp intel-rapl:0]$ find . -name "energy_uj" | xargs cat ; sleep 60 ; find . -name "energy_uj" | xargs cat ;
21136051513
1675808105
6941526367
21298879333
1686475646
7021075195
I collect the power consumption of "package/core/dram" in 60 seconds interval. Here is the result:
package=(21298879333-21136051513)/60=2.713w
core=(1686475646-1675808105)/60=178mw
dram=(7021075195-6941526367)/60=1.325w

so "cpu other" = 2.713-1.325-0.178=1.21w.
The figures basically align with each other.  Within the CPU package, the uncore(cache+dram) consumes most of the power, while cpu core+gpu core are already very power efficient in idle states. 
I turn the monitor off and collect data via rapl again. 
[luke@rmbp intel-rapl:0]$ xset dpms force off; find . -name "energy_uj" | xargs cat ; sleep 60 ; find . -name "energy_uj" | xargs cat ; xset dpms force on
25217893432
1986931396
8448147460
25375672973
1995559753
8526942810
Now the package power is "(25375672973-25217893432)/60"=2.63w.  This confirms that backlight is not part of cpu package.  I collect data again from battery discharge, with both monitor on and off, and the power difference is 2.64w.  While comparing to "backlight=3.14w", it have quite some error, but the error is within reasonable margin. So I think backlight is about 3w in rmbp under reasonable brightness level. 
This diagram is a typical power consumption under idle state for both cpu/gpu and backlight. We can see both cpu core and gpu core is very power efficient under idle states.  On comparison, the uncore and dram controller are the major contribution to cpu package energy consumption, since we have 16G ram and large on chip cache, (128M eLLC cache) as can be seen from "lscpu":
[luke@rmbp pm]$ lscpu
Architecture:          x86_64
CPU op-mode(s):        32-bit, 64-bit
Byte Order:            Little Endian
CPU(s):                8
On-line CPU(s) list:   0-7
Thread(s) per core:    2
Core(s) per socket:    4
Socket(s):             1
NUMA node(s):          1
Vendor ID:             GenuineIntel
CPU family:            6
Model:                 70
Model name:            Intel(R) Core(TM) i7-4850HQ CPU @ 2.30GHz
Stepping:              1
CPU MHz:               813.625
CPU max MHz:           3500.0000
CPU min MHz:           800.0000
BogoMIPS:              4591.44
Virtualization:        VT-x
L1d cache:             32K
L1i cache:             32K
L2 cache:              256K
L3 cache:              6144K
L4 cache:              131072K (eLLC display cache, 128M)
NUMA node0 CPU(s):     0-7

4. I/O device runtime power management
https://www.kernel.org/doc/Documentation/power/runtime_pm.txt
Linux can activate runtime power management for I/O devices. PCI and USB (and others) devices will enter "suspend" state after a specified interval of inactivity. Under a device node in sysfs, if the device driver support run time PM, in the "./power" sub directory, we have:
[luke@rmbp power]$ pwd
/sys/bus/usb/devices/usb1/power
[luke@rmbp power]$ grep . *
active_duration:3297956
async:enabled
autosuspend:2
autosuspend_delay_ms:2000
connected_duration:3297956
control:auto
level:auto
runtime_active_kids:1
runtime_active_time:3297956
runtime_enabled:enabled
runtime_status:active
runtime_suspended_time:0
runtime_usage:0
wakeup:disabled

When "control" is "auto/on", runtime PM is enabled/disabled". If enabled, "autosuspend_delay_ms" is the inactive interval before device enters suspend state. 

5. PCIe link Active-State Power Management (ASPM)
https://access.redhat.com/site/documentation/en-US/Red_Hat_Enterprise_Linux/6/html/Power_Management_Guide/ASPM.html

We can lower the power consumption of PCIe link when it is idle.
[luke@rmbp power]$ cat /sys/module/pcie_aspm/parameters/policy
default performance [powersave] 
[luke@rmbp power]$ echo powersave | sudo tee /sys/module/pcie_aspm/parameters/policy
powersave

6. SATA Aggressive Link Power Management (ALPM) 
We can also lower the power consumption of SATA link when it is idle.
[luke@rmbp power]$ sudo echo min_power | sudo tee /sys/class/scsi_host/host0/link_power_management_policy
min_power

7. wifi and bluetooth
you should close wifi or bluetooth if you don't use them to save power. Use "rfkill block xx" to do this. 

8. static power consumption: the baseline
We can use "powertop"/"tlp"/"pm-utils" or other tools to fine tune many power saving tuning config for us. For example, "sudo powertop  --auto-tune" will set up all generally available tuning options for you. For pm-utils, "pm-powersave true" will do similar thing. You can add it into systemd service as this:
[luke@rmbp system]$ cat pm-powersave.service 
[Unit]
Description=pm-utils pm-powersave command

[Service]
Type=oneshot
RemainAfterExit=yes
ExecStart=/usr/bin/pm-powersave true

[Install]
WantedBy=multi-user.target


After all the above tuning, the static power consumption of rmbp under Archlinux (kernel 3.14) is:

screen off (dpms off): 9.7w
screen on : 13.3w

[luke@rmbp ~]$ powerstat -d 10 2
Running for 470 seconds (235 samples at 2 second intervals).
ACPI battery power measurements will start in 10 seconds time

  Time    User  Nice   Sys  Idle    IO  Run Ctxt/s  IRQ/s  Watts               
07:28:08   0.0   0.0   0.0 100.0   0.0    1     72     51  13.14
07:28:10   0.1   0.0   0.0  99.9   0.1    1    108     79  13.35
07:28:12   0.1   0.0   0.0  99.9   0.0    1    106     91  13.40
07:28:14   0.1   0.0   0.0  99.9   0.0    1     92     74  13.28
07:28:16   0.1   0.0   0.1  99.9   0.0    1    110     81  13.41
07:28:18   0.1   0.0   0.0  99.9   0.0    1     94     75  13.39
07:28:20   0.1   0.0   0.1  99.8   0.1    1    100     82  13.18
07:28:22   0.1   0.0   0.0  99.9   0.0    1    100     76  13.42
07:28:24   0.1   0.0   0.0  99.9   0.1    1    107     78  13.38
07:28:26   0.0   0.0   0.0 100.0   0.0    1     99     75  13.25
07:28:28   0.1   0.0   0.0  99.9   0.0    1    105     81  13.42
07:28:30   0.1   0.0   0.0  99.9   0.0    1    151    121  13.94
07:28:32   0.1   0.0   0.0  99.8   0.1    1     50     34  13.13
07:28:34   0.1   0.0   0.0  99.9   0.0    1     98     74  13.43
07:28:36   0.1   0.0   0.1  99.9   0.0    1    102     80  13.42
07:28:38   0.1   0.0   0.0  99.9   0.0    1     88     74  13.26
07:28:40   0.1   0.0   0.0  99.9   0.1    1    106     80  13.33
07:28:42   0.1   0.0   0.1  99.9   0.0    1    101     80  13.32
07:28:44   0.1   0.0   0.0  99.9   0.0    1    102     79  13.15
^C-------- ----- ----- ----- ----- ----- ---- ------ ------ ------
 Average   0.1   0.0   0.0  99.9   0.0  1.0   99.7   77.1  13.35
  StdDev   0.0   0.0   0.0   0.1   0.0  0.0   18.5   16.0   0.17
-------- ----- ----- ----- ----- ----- ---- ------ ------ ------
 Minimum   0.0   0.0   0.0  99.8   0.0  1.0   49.5   33.5  13.13
 Maximum   0.1   0.0   0.1 100.0   0.1  1.0  151.0  121.0  13.94
-------- ----- ----- ----- ----- ----- ---- ------ ------ ------
Summary:
 13.35 Watts on Average with Standard Deviation 0.17  


While comparing to OS X's static power consumption (450mA/5.62w), this is hardly satisfactory performance. I have not done anything useful on computer, and it will only last about 85/13.3=6.4 hours. Even under poweroff screen, it will only last about 85/9.7=8.8 hours.  While in OS X's "sleep" state, it consumes about "10mA/0.12W". OS X does far more super job under "power saving/suspend" state comparing to Linux. 

9. Applications
I did similar data collection for applications running under Linux. The power unit is "watt". You can translate it to mA via "nw/12.5v". All the power is calculated as delta  against the "baseline/static" power. (os x 450mA/5.62w, linux 13.3w);

.vlc (intel gpu, vaapi video acceleration)


We can see vlc and quicktime's power performance are on par. 

.mp3  (mplayer versus itune) delta against baseline
mplayer:  1.43w
itune: 1.687w
on par

.wifi (1.5MB/s wget)
linux:  4.8w
os x: 6.25w
on par

html5: (chrome/youtube/1080p/vp9 format)
linux:24w
os x: 19.38w
on par

flash:(1080p) (chrome PPAPI flash 13.0)
linux: 9.0w
osx : 25.6w

The huge difference of flash performance might come from the different version of flash. On Mac OS X, I use the flash 12, while in Linux, I use ppapi flash 13 in chrome.  I am a little skeptical about this result, so I went back to OS X and install flash 13.0 in chrome and re-test it. This time, the power delta value is 25w.  This is the only case where an application have super power performance in Linux comparing to OS X, and it happens to be the flash player!

10. Summary 

I have put the summary on the beginning of this post.   There are lots of bandwidth for improvement for Linux power management.  It might come from:
a. more power saving device "suspend" state. This demands more fine-tuned device driver, and more in depth knowledge of the physical device;
b. Nvidia card is not used in my testing, but is it powered off, or it still consumes power?
c. There are devices which we don't have drivers yet, like the camera, the thunder bolt port (display port).  Do they still consume power? 


Mac book pro 11.3 Linux customization (8): i3 Window Manager

$
0
0
I used WMII on Debian. It has not been updated for quite a while. I decided to convert to i3, because i3 promoted itself as a modified and ground-up  re-design of wmii. It turns out I am satisfied with i3, after some glitches which I solved at last.

1. final configuration
https://github.com/lukeluo/linux-debian7-admin/blob/master/archlinux/home/luke/.xinitrc 
https://github.com/lukeluo/linux-debian7-admin/blob/master/archlinux/home/luke/.xserverrc
https://github.com/lukeluo/linux-debian7-admin/blob/master/archlinux/home/luke/.i3/config

2. dmenu
The original dmenu does not support font rendering under xft, and the font is just too small to be seen. Uninstall it and install a package from AUR called "dmenu-xft". It will respect your configuration on dpi/font size on i3 configuration.

3. "media key".
There are "F1-F12" 12 so called "media keys" on mac keyboard. Among them, display back light, keyboard back light, and audio volume are the ones we cared.

a. display back light
The only reliable display back light control is provided by the driver "apple_gmux".  The sysfs interface is under "/sys/class/backlight/gmux_backlight":
[luke@rmbp gmux_backlight]$ ll
total 0
-r--r--r-- 1 root root 4096 Apr 24 12:57 actual_brightness
-rw-r--r-- 1 root root 4096 Apr 24 12:57 bl_power
-rw-r--r-- 1 root root 4096 Apr 24 12:57 brightness
lrwxrwxrwx 1 root root    0 Apr 24 12:59 device -> ../../../00:07
-r--r--r-- 1 root root 4096 Apr 24 12:57 max_brightness
drwxr-xr-x 2 root root    0 Apr 24 13:00 power
lrwxrwxrwx 1 root root    0 Apr 24 12:59 subsystem -> ../../../../../class/backlight
-r--r--r-- 1 root root 4096 Apr 24 12:57 type
-rw-r--r-- 1 root root 4096 Apr 24 12:57 uevent
[luke@rmbp gmux_backlight]$ grep . *brightness*
actual_brightness:71
brightness:71
max_brightness:1023
That is why we have below scripts in i3 config file:
#screen brightness 
bindsym XF86MonBrightnessDown exec --no-startup-id "cd /sys/class/backlight/gmux_backlight/; cur=$(cat brightness); cur=$((cur-20)) ; if [ $cur -lt 1 ]; then cur=5; fi; echo $cur | sudo tee brightness " 
bindsym XF86MonBrightnessUp   exec --no-startup-id "cd /sys/class/backlight/gmux_backlight/; cur=$(cat brightness); cur=$((cur+20)) ; if [ $cur -gt 1023 ]; then cur=1023; fi; echo $cur | sudo tee brightness " 
This script will work no matter intel or nvidia drivers(open source) are used.  You can also use "xbacklight" from "xorg-xbacklight" package, but this "raw" script will work under all circumstances. 

b. keyboard back light
the keyboard back light control is provided by driver "applesmc".  The sysfs interface is under"/sys/class/leds/smc::kbd_backlight":
[luke@rmbp smc::kbd_backlight]$ pwd
/sys/class/leds/smc::kbd_backlight
[luke@rmbp smc::kbd_backlight]$ ll
total 0
-rw-r--r-- 1 root root 4096 Apr 24 13:17 brightness
lrwxrwxrwx 1 root root    0 Apr 24 13:19 device -> ../../../applesmc.768
-r--r--r-- 1 root root 4096 Apr 24 13:17 max_brightness
drwxr-xr-x 2 root root    0 Apr 24 13:19 power
lrwxrwxrwx 1 root root    0 Apr 24 05:51 subsystem -> ../../../../../class/leds
-rw-r--r-- 1 root root 4096 Apr 24 13:17 trigger
-rw-r--r-- 1 root root 4096 Apr 24 13:17 uevent
[luke@rmbp smc::kbd_backlight]$ grep . *brightness
brightness:12
max_brightness:255

So we have these scripts on i3 config files:
#kebyboard LED  brightness
bindsym XF86KbdBrightnessDown exec --no-startup-id "cd /sys/class/leds/smc::kbd_backlight; cur=$(cat brightness); cur=$((cur-5)); if [ $cur -lt 0 ]; then cur=0; fi; echo $cur | sudo tee brightness "
bindsym XF86KbdBrightnessUp   exec --no-startup-id "cd /sys/class/leds/smc::kbd_backlight; cur=$(cat brightness); cur=$((cur+5)); if [ $cur -gt 255 ]; then cur=255; fi; echo $cur | sudo tee brightness "

c. sound volume
The ALSA information could be gathered under "/proc/asound/":
[luke@rmbp asound]$ pwd
/proc/asound
[luke@rmbp asound]$ ll
total 0
dr-xr-xr-x 5 root root 0 Apr 24 16:07 card0
dr-xr-xr-x 5 root root 0 Apr 24 16:07 card1
dr-xr-xr-x 5 root root 0 Apr 24 16:07 card2
-r--r--r-- 1 root root 0 Apr 24 16:07 cards
-r--r--r-- 1 root root 0 Apr 24 16:07 devices
lrwxrwxrwx 1 root root 5 Apr 24 16:07 HDMI -> card0
-r--r--r-- 1 root root 0 Apr 24 16:07 hwdep
-r--r--r-- 1 root root 0 Apr 24 16:07 modules
lrwxrwxrwx 1 root root 5 Apr 24 16:07 NVidia -> card2
dr-xr-xr-x 2 root root 0 Apr 24 16:07 oss
lrwxrwxrwx 1 root root 5 Apr 24 16:07 PCH -> card1
-r--r--r-- 1 root root 0 Apr 24 16:07 pcm
dr-xr-xr-x 2 root root 0 Apr 24 16:07 seq
-r--r--r-- 1 root root 0 Apr 24 16:07 timers
-r--r--r-- 1 root root 0 Apr 24 16:07 version
[luke@rmbp asound]$ cat cards
 0 [HDMI           ]: HDA-Intel - HDA Intel HDMI
                      HDA Intel HDMI at 0xc1e10000 irq 54
 1 [PCH            ]: HDA-Intel - HDA Intel PCH
                      HDA Intel PCH at 0xc1e14000 irq 53
 2 [NVidia         ]: HDA-Intel - HDA NVidia
                      HDA NVidia at 0xc1080000 irq 17
There are 3 audio cards. For me, I only care about the device "1", namely the Intel PCH device. Since it controls the built-in speakers and headphone.  The intel HDMI should be the one in CPU chip with Iris. Since it is not hard wired into any external display port, it is of no use to us.  The Nvidia is the one accompanying the Nvidia display card. If we are going to connect an external TV set through HDMI or display port, this sound sink should be selected.  "aplay -l " will also list all output devices:
[luke@rmbp ~]$ aplay -l
**** List of PLAYBACK Hardware Devices ****
card 0: HDMI [HDA Intel HDMI], device 3: HDMI 0 [HDMI 0]
  Subdevices: 1/1
  Subdevice #0: subdevice #0
card 0: HDMI [HDA Intel HDMI], device 7: HDMI 1 [HDMI 1]
  Subdevices: 1/1
  Subdevice #0: subdevice #0
card 0: HDMI [HDA Intel HDMI], device 8: HDMI 2 [HDMI 2]
  Subdevices: 1/1
  Subdevice #0: subdevice #0
card 1: PCH [HDA Intel PCH], device 0: CS4208 Analog [CS4208 Analog]
  Subdevices: 1/1
  Subdevice #0: subdevice #0
card 1: PCH [HDA Intel PCH], device 1: CS4208 Digital [CS4208 Digital]
  Subdevices: 1/1
  Subdevice #0: subdevice #0
card 2: NVidia [HDA NVidia], device 3: HDMI 0 [HDMI 0]
  Subdevices: 1/1
  Subdevice #0: subdevice #0
card 2: NVidia [HDA NVidia], device 7: HDMI 1 [HDMI 1]
  Subdevices: 1/1
  Subdevice #0: subdevice #0
card 2: NVidia [HDA NVidia], device 8: HDMI 2 [HDMI 2]
  Subdevices: 1/1
  Subdevice #0: subdevice #0

Most of the time, pulseaudio will be installed in X environment. And almost all application under X will play sound via pulseaudio.  The best way to select which sound card as default output device, at least to me, is through "gnome-control-center-->audio". You need to install gnome to use this:


Here, the "Analog Output - Built-in Audio" is the one.  Or you can use the command line "pactl":
[luke@rmbp .i3]$ pactl list sinks
[luke@rmbp .i3]$ pactl set-default-sink 2
[luke@rmbp .i3]$ pulseaudio --killconky and dzen2. The final ...
[luke@rmbp .i3]$ pulseaudio --start
Here sink 2 is the built-in analog audio. 

"alsamixer" will show us the detailed channels in input/output devices:


Above figure shows all the channels of built-in intel PCH device. It has one headphone, two speakers(one normal, one bass) as analog output devices.  The S/PDIF output devices actually multiplexed with the headphone. If you unmute it, you will see slim red light coming out for the headphone slot. You need a mini toslink 5mm cable to output the spdif signal, like this one:
http://www.monoprice.com/Product?c_id=102&cp_id=10229&cs_id=1022902&p_id=1557&seq=1&format=2


pulseaudio will be  brought up when you start X servers. Since we need to use pulseaudio anyway, I will use "pactl" to control volume. "pactl list sinks" will list all output devices:
[luke@rmbp system]$ pactl list sinks
Sink #0
State: SUSPENDED
.................................................................
Sink #2
State: SUSPENDED
Name: alsa_output.pci-0000_00_1b.0.analog-stereo
Description: Built-in Audio Analog Stereo
Driver: module-alsa-card.c
Sample Specification: s16le 2ch 44100Hz
Channel Map: front-left,front-right
Owner Module: 8
Mute: no
Volume: front-left: 26200 /  40% / -23.89 dB,   front-right: 26200 /  40% / -23.89 dB
       balance 0.00
Base Volume: 65536 / 100% / 0.00 dB
Monitor Source: alsa_output.pci-0000_00_1b.0.analog-stereo.monitor
Latency: 0 usec, configured 0 usec
Flags: HARDWARE HW_MUTE_CTRL HW_VOLUME_CTRL DECIBEL_VOLUME LATENCY 
Properties:
alsa.resolution_bits = "16"
device.api = "alsa"
.........................................
Ports:
analog-output: Analog Output (priority: 9900)
analog-output-speaker: Speakers (priority: 10000)
analog-output-headphones: Headphones (priority: 9000, not available)
Active Port: analog-output-speaker
Formats:


pcm

We can see sink #2 is our built-in analog audio (speakers, headphone).  Here is our i3 config part:
set $sink alsa_output.pci-0000_00_1b.0.analog-stereo
bindsym XF86AudioRaiseVolume exec --no-startup-id "pactl set-sink-mute $sink 0; pactl set-sink-volume $sink +2% "
bindsym XF86AudioLowerVolume exec --no-startup-id "pactl set-sink-mute $sink 0; pactl set-sink-volume $sink -- -2% "
bindsym XF86AudioMute exec --no-startup-id "pactl set-sink-mute $sink toggle "

d. vacant media keys
F3,F4,F7,F8,F9 are vacant. Through "xev", you can check out their keysyms under X. The keysyms are "XF86LaunchA/XF86LaunchB/XF86AudioPrev/XF86AudioPlay/XF86AudioNext". Use these keys at your will. 

4. systemd and sound volume/screen backlight/keyboard backlight
Systemd has built-in service to help you store your set up on volume, screen/keyboard backlight. When systemd boots up, it will try to restore these values to the ones in your last session. But there are some glitches you need to solve to make it work, since we are in a macbook pro machine.

a. sound volume
After you installed the package "alsa-utils", you will see  two "run-once" services to store alsamixer configuration values before shutdown and restore them after system boot up. There services are:
"alsa-restore.service  alsa-state.service  alsa-store.service".

These two services are enabled automatically under "basic.target.wants":
[luke@rmbp ~]$ cd /usr/lib/systemd/system/basic.target.wants/
[luke@rmbp basic.target.wants]$ ll
total 0
lrwxrwxrwx 1 root root 23 Jul 29  2013 alsa-restore.service -> ../alsa-restore.service
lrwxrwxrwx 1 root root 21 Jul 29  2013 alsa-state.service -> ../alsa-state.service
[luke@rmbp basic.target.wants]$ cat alsa-state.service 
#
# Note that two different ALSA card state management schemes exist and they
# can be switched using a file exist check - /etc/alsa/state-daemon.conf .
#

[Unit]
Description=Manage Sound Card State (restore and store)
#ConditionPathExists=/etc/alsa/state-daemon.conf
DefaultDependencies=no
After=sysinit.target
Before=shutdown.target
Conflicts=shutdown.target

[Service]
Type=simple
ExecStart=-/usr/bin/alsactl -s -n 19 -c rdaemon
ExecStop=-/usr/bin/alsactl -s rkill save_and_quit


It actually calls "alsactl" to finish the job. Since alsa-utils in archlinux does not provide a "/etc/alsa" directory anymore, we need to un-comment the "ConditionPathExists" line to start this service.  After that, you alsamixer setup will be stored and restored successfully.

b. keyboard backlight
This works out of box.
[luke@rmbp basic.target.wants]$ journalctl -b | grep leds
Apr 25 10:50:08 rmbp systemd[1]: Starting Load/Save Screen Backlight Brightness of leds:smc::kbd_backlight...
Apr 25 10:50:08 rmbp systemd[1]: Started Load/Save Screen Backlight Brightness of leds:smc::kbd_backlight.
................
[luke@rmbp leds]$ ll /sys/class/leds/
total 0
lrwxrwxrwx 1 root root 0 Apr 25 10:50 smc::kbd_backlight -> ../../devices/platform/applesmc.768/leds/smc::kbd_backlight

c. screen backlight
This does not work out of box, since the only reliable way to control the through driver "apple_bl/apple_gmux".  By default, systemd will try to use intel/nvidia backlight services depending on the display drivers you loaded. We can see from udev rule files :

[luke@rmbp rules.d]$ pwd
/usr/lib/udev/rules.d
[luke@rmbp rules.d]$ cat 99-systemd.rules 
.....................
# Pull in backlight save/restore for all backlight devices and
# keyboard backlights

SUBSYSTEM=="backlight", TAG+="systemd", IMPORT{builtin}="path_id", ENV{SYSTEMD_WANTS}+="systemd-backlight@backlight:$name.service"
SUBSYSTEM=="leds", KERNEL=="*kbd_backlight", TAG+="systemd", IMPORT{builtin}="path_id", ENV{SYSTEMD_WANTS}+="systemd-backlight@leds:$name.service"
..........................

I track the udev event via "udevadm monitor -p", here is the difference between intel_backlight and gmux_backlight:

-----------------------------------------------------------------
KERNEL[636.499409] add      /devices/pci0000:00/0000:00:02.0/drm/card0/card0-eDP-1/intel_backlight (backlight)
ACTION=add
DEVPATH=/devices/pci0000:00/0000:00:02.0/drm/card0/card0-eDP-1/intel_backlight
SEQNUM=3112
SUBSYSTEM=backlight

UDEV  [636.500894] add      /devices/pci0000:00/0000:00:02.0/drm/card0/card0-eDP-1/intel_backlight (backlight)
ACTION=add
DEVPATH=/devices/pci0000:00/0000:00:02.0/drm/card0/card0-eDP-1/intel_backlight
ID_PATH=pci-0000:00:02.0
ID_PATH_TAG=pci-0000_00_02_0
SEQNUM=3112
SUBSYSTEM=backlight
SYSTEMD_WANTS=systemd-backlight@backlight:intel_backlight.service
TAGS=:systemd:/usr/lib/systemd/system/alsa-state.service/usr/lib/systemd/system/alsa-state.service
USEC_INITIALIZED=89

KERNEL[639.771458] add      /devices/pnp0/00:07/backlight/gmux_backlight (backlight)
ACTION=add
DEVPATH=/devices/pnp0/00:07/backlight/gmux_backlight
SEQNUM=3113
SUBSYSTEM=backlight

UDEV  [639.772771] add      /devices/pnp0/00:07/backlight/gmux_backlight (backlight)
ACTION=add
DEVPATH=/devices/pnp0/00:07/backlight/gmux_backlight
SEQNUM=3113
SUBSYSTEM=backlight
USEC_INITIALIZED=9771500

----------------------------------------------------------
The only major difference I can see the the device path. One is in "pci" and another in "pnp".  I did a "udevadm test" for this gmux device:

[luke@rmbp ~]$ udevadm test /devices/pnp0/00:07/backlight/gmux_backlight
calling: test
version 212
This program is for debugging only, it does not run any program
specified by a RUN key. It may show incorrect results, because
some values may be different, or not available at a simulation run.

load module index
timestamp of '/etc/systemd/network' changed
timestamp of '/usr/lib/systemd/network' changed
Parsed configuration file /usr/lib/systemd/network/99-default.link
Created link configuration context
timestamp of '/etc/udev/rules.d' changed
timestamp of '/usr/lib/udev/rules.d' changed
read rules file: /usr/lib/udev/rules.d/10-dm.rules
......................................
read rules file: /usr/lib/udev/rules.d/95-upower-wup.rules
read rules file: /usr/lib/udev/rules.d/99-systemd.rules
rules contain 196608 bytes tokens (16384 * 12 bytes), 26016 bytes strings
13609 strings (120806 bytes), 11522 de-duplicated (96878 bytes), 2088 trie nodes used
IMPORT builtin 'path_id' /usr/lib/udev/rules.d/99-systemd.rules:60
IMPORT builtin 'path_id' returned non-zero
ACTION=add
DEVPATH=/devices/pnp0/00:07/backl/usr/lib/systemd/system/alsa-state.serviceight/gmux_backlight
SUBSYSTEM=backlight
USEC_INITIALIZED=1677549512
unload module index
Unloaded link configuration context

Now I know the reason is "path_id" failed. (return non-zero). I don't  think systemd-backlight service will mandate this "id_path" to do its work, so I disable it:
#SUBSYSTEM=="backlight", TAG+="systemd", IMPORT{builtin}="path_id", ENV{SYSTEMD_WANTS}+="systemd-backlight@backlight:$name.service"
SUBSYSTEM=="backlight", TAG+="systemd",  ENV{SYSTEMD_WANTS}+="systemd-backlight@backlight:$name.service"
Then I reboot system. This time, the gmux_backlight device is handled correctly by udev rules and "systemd-backlight@backlight:gmux-backlight.service" is started, and screen backlight is restored to the value in last session.
[luke@rmbp ~]$ journalctl -b | grep backlight
Apr 25 13:39:04 rmbp kernel: Command line: BOOT_IMAGE=/vmlinuz-linux-master root=UUID=29cd6b51-83fa-4818-a78f-8426f578f397 rw quiet libata.force=noncq pcie_aspm=force acpi_backlight=vendor acpi_osi=Linux resume=/dev/disk/by-uuid/939fe999-4ce1-4e9b-af08-7722d516e5da no_console_suspend=1
Apr 25 13:39:04 rmbp kernel: Kernel command line: BOOT_IMAGE=/vmlinuz-linux-master root=UUID=29cd6b51-83fa-4818-a78f-8426f578f397 rw quiet libata.force=noncq pcie_aspm=force acpi_backlight=vendor acpi_osi=Linux resume=/dev/disk/by-uuid/939fe999-4ce1-4e9b-af08-7722d516e5da no_console_suspend=1
Apr 25 13:39:04 rmbp systemd[1]: Starting system-systemd\x2dbacklight.slice.
Apr 25 13:39:04 rmbp systemd[1]: Created slice system-systemd\x2dbacklight.slice.
Apr 25 13:39:04 rmbp systemd[1]: Starting Load/Save Screen Backlight Brightness of backlight:gmux_backlight...
Apr 25 13:39:04 rmbp systemd[1]: Started Load/Save Screen Backlight Brightness of backlight:gmux_backlight.
Apr 25 13:39:04 rmbp systemd[1]: Starting Load/Save Screen Backlight Brightness of backlight:intel_backlight...
Apr 25 13:39:04 rmbp systemd[1]: Started Load/Save Screen Backlight Brightness of backlight:intel_backlight.
Apr 25 13:39:04 rmbp systemd[1]: Starting Load/Save Screen Backlight Brightness of leds:smc::kbd_backlight...
Apr 25 13:39:04 rmbp systemd[1]: Started Load/Save Screen Backlight Brightness of leds:smc::kbd_backlight.


4.  output video/audio to external TV
This is a showcase for "xrandr" and "pactl". We will use a external HDMI TV to play a video via vlc. To do that, we need to:
a. transfer to nouveau driver;
b. setup display output via xrandr;
b. set default sink to nvidia hdmi sink via pactl;
c. use vlc to play movie
[luke@rmbp ~]$ xrandr --output HDMI-1 --above eDP-1
[luke@rmbp ~]$ xrandr --output HDMI-1 --mode 1280x1024
[luke@rmbp ~]$ pactl set-default-sink 2
[luke@rmbp ~]$ pulseaudio --kill
[luke@rmbp ~]$ pulseaudio --start
[luke@rmbp ~]$ cvlc sample.mp4


5. wallpaper
you can setup a wallpaper for i3 root window, via "feh"/"xsetroot"/"nitrogen". Some examples here:
#exec_always --no-startup-id  xsetroot -gray
exec_always --no-startup-id   feh --bg-scale ~/wallpaper/Wave.jpg
#exec_always --no-startup-id   nitrogen --restore

6. window layout
Comparing to wmii, the layout management in i3 is very flexible, or even bewildering for first time user. The documentation provides a clean  cut tree based model for window layout, but lacks sufficient user interaction guidance.  How to efficiently manipulate the window layout has large impact on productivity, at least to me. I hope my experience here would help other users to shorten this leaning gap.

In i3, the layout property is attached to an object called "container".  Windows are contained within container.  The container does not have visual appearance, but it is the corner stone for layout manipulation.  The first container we would encounter is the "workspace".   Any container has 4 layout schemes, namely "stack/splitv/tabbed/splith".  "stack/splitv" are vertical layout, and "tabbed/splith" are horizontal layout.  The default layout for container is "splitv" or "splith", depending on the shape of the container. If its width > lenght, then it will be "splith", otherwise it is "splitv".

You can change the layout of a focus container via "layout" command. These commands all have key bindings:

# change container layout (stacked, tabbed, toggle split)
bindsym $mod+s layout stacking
bindsym $mod+w layout tabbed
bindsym $mod+e layout toggle split

# split in horizontal orientation
bindsym $mod+h split h
# split in vertical orientation
bindsym $mod+v split v

I open two workspaces,  and open 3 and 2 application in these two workspaces respectively. i3 provides command to dump the display tree structure:
[luke@rmbp ~]$ i3-msg -t get_tree | jq '.'> layout.json

The output is a json object.  "jq" is a json data formatting tool.  After parsing, the display structure is as this:


From the diagram, we can see the major components of i3 display tree. For simplicity reason, we omit the floating windows case.

a. One root component
b. One global top dock, where "dmenu" will reside;
c. One global scratchpad area, where scratchpad windows reside;
d. For each connected display connector (monitor), i3 will create a top level component for it. In our case, we only have the embedded display port retina display(eDP1);
e. Under each display connector component, you have one "bottomdock", where the i3status bar reside;
f. Under each display connector component, there is one workspace component corresponding to each workspace you opened; Here we have two workspace components, namely "1" and "2"
g. Under each workspace, we have one component for each opened application window;

If you have done rich client gui programming before, you will realize all windows layout related software possess similar concepts. For example, in Java Swing, we also have container, layout manager, etc.
For each container(display port, workspace, etc) or application window, there are three layout related properties:
layout:
workspace_layout:
last_split_layout:
These three properties take same values, "splith/splitv/tabbed/stacked/default".  Among them, "workspace_layout" is the layout value of the workspace, where low level container or application resides.
I am not sure how "last_split_layout" is used, but it actually record the last split happened to this object.
The most pertinent properties should be "layout", because it directly determined if a new app windows is created in this container, what layout this new window will be placed in.  Actually, "layout" should be the property of a container, but not a instantiated window.  By default, all windows within one container will inherit the layout property of its container.  When you change the layout property of a window, then it is different from its inherited value from outside container, a new container will be created to wrap this window, with the new different layout property.

A demo will help you understand how to create a basic funny layout.  Here is the final window layout:

To cook such a layout, we only need use three shortcut:
$mod+v: change the layout to splitv;
$mod+h: change the layout to splith;
$mod+Enter: open a new terminal

The default layout of workspace is "splith", since we have a width>length" retina screen.
The key stroke sequence to achieve this layout is as follows:

$mod+Enter (new terminal)--> $mod+Enter--> $mod+v-->$mod+Enter-->$mod+h-->$mod+Enter-->$mod+v-->$mod+Enter-->$mod+h-->$mod+enter...................................

So we alternate the splith and splitv layout, and create a new terminal window after each layout change.

The biggest secret to master i3 window layout manipulation is: give you a window, you can identify its direct parent container. Because a container can only have one layout property value, so all direct child windows of this container will be laid out to the same scheme. Here are some examples:
The black color areas are within a "splith" container, while the blue color areas are within a "splitv" container, and red color areas are within a "splith" container.

When a window is focused, "$mod+A" will focus its direct container.  All windows within this container will be focused(highlighted) too.

When an object is focused, be it a app window or a container, when "$mod+s/e/w" is pressed, this object's direct parent container's layout will be changed, and you will see visual change on the screen. You can use this technique to change the layout of a container(an area within the screen) .

On the other hand, for a focused object (window/container), when "$mod+v/h" is pressed, this object's layout property will be changed, but no visual appearance is changed. When the area possessed by this object is split to create new window, the new window will reside with the original object within the same container which has the layout property you specify previously via "$mod+v/h".

i3 provides commands to move windows in 4 directions: up/down/left/right.  Moving a window will change the window layout in interesting ways. You need to do some practice to get acquitted with i3's re-layout algorithms. At least to me, it is quite confusing in my first try.  You can imagine moving a window as a 3 step procedure:
a. the moved windows disappear from screen, the left windows will expand to occupy its left space;
b. along the moving direction, find out the "container" where the moved window will be squeezed into, and its current layout.
c. you will squeezed the moved window into this container. The behavior is similar to opening  another window in this container. For example, if the container has "tabbed" layout, the moved in window will become one new tab in this container; If container has stacked layout, the moved in window will stack over other existing windows in this container; If the container has "splitv" or "splith" layout, the moved in window will become another split block in the existing container.

If, on the moving direction, there is no visible container, then the behavior is like the moved window "escape" from its current container, and new space will be allocated according to upper level container's layout scheme, and the moved window will be placed into newly allocated space.

 Window moving sometimes is intuitive, and sometime is counter-intuitive. It all depends on how well you understand the concepts of "container/window/current layout" and parent/child relationship among containers.  I created some video clips on youtube, you can take a look. Hopefully these video clips will help you layout your windows more easily and productively.

http://www.youtube.com/playlist?list=PLlZOIC9SkuhOpMEyY1J4mY-Zl_tHkoHQs

7. external microphone

If you have a headphone/earphone like the one in Iphone,  it is a 4 rings jack and has a built in micro phone in it.  Under OS x, this mic could be identified and used as input device. But under Linux, till now, I still did not find suitable driver so this mic could be identified and used.  A USB mic is universally available and you can use that. If you are super hifi fan, you might have those s/pdif device so you can use the toslink adapter to input voice via the headphone jack hole.  Although the built-in mic works under Liux, but it is quite annoying that the keystroke and sometimes the fan noise will be picked up by internal microphone. 

Mac book pro 11.3 Linux customization (9): Win 8.1, A side step

$
0
0
I heard that Mac's bootcamp can provide support for Windows on Mac book pro.  Will it be possible to switch between two GPUs under windows?  I install a win8 64 bit preview to verify my guess. It turns out that GPU switching is not supported under Win 8 either, and even worse, I can only use the Nvidia GPU under Win 8.  Every time I try to install an Intel display driver, the screen display crashed.

Some notable things I encountered during the Win 8 installation.

a. EFI installation

It turns out that Macbook pro EFI firmware supports a standardized Win8 EFI installation.  I did not use Bootcamp to prepare a win 8 usb, but use another utils tool I found on Google (called something like "win8 to usb"?).  After installation, Win 8 will add boot efi file into EFI sys partition, under "/EFI/Microsoft/Boot/", and win 8 will change EFI boot order so win 8 will by default be booted by apple macbook firmware; To be frank, I am very surprised that Apple firmware will respect the boot order entry in UEFI standard.

[luke@rmbp Boot]$ efibootmgr
BootCurrent: 0001
Timeout: 5 seconds
BootOrder: 0001,0003,0002,0080
Boot0001* grub
Boot0002* Windows Boot Manager
Boot0003* efishell
Boot0080* Mac OS X
Boot0082* 
BootFFFF* 
menuentry "Win8.1" {
        echo 'Loading Win 8.1 ....'
        set root=(hd1,gpt1)
        chainloader /EFI/Microsoft/Boot/bootmgfw.efi

}

b. After win8 installation, copy the corresponding bootcamp files into win 8, and install the bootcamp files. They are just a bunch of device drivers.  Most device works just file, and we can visit the HFS+ file system now.  But synaptics driver does not work so well, and external mic via headphone still can not be recognized by win 8.

 c. font rendering under Retina

Apple software (quicktime,itunes...) and Google chrome all have very poor font rendering under Win8.  But win 8 native applications' (IE, etc) font rendering are pretty good.  Once upon a time, I was not very satisfied with the font rendering under Linux. After I have seen the performance of non-microsoft application on win8, I should say I really should not have too much complaint on Linux. Below are some font rendering samples. You need to view the original pics to see the rendering difference.
IE Win8
Chrome Win8
Safari Win8
Linux Chrome


d. EFI Shell
To my surprise, Arch ISO provide two versions of EFI shell, version 1 and version 2, and version 1 works under Apple EFI firmware!  I took no delay to copy this v1 shell into EFI system partition and create a boot entry for this shell ("EFI Shell").  Why am I so excited to find a workable EFI shell? Because after you enter an EFI shell, you can boot any other operation system, just like running an normal dos application.  For example, to run win 8, you just need to do:

fs0:
[luke@rmbp efi]$ cd EFI/Microsoft/Boot/
[luke@rmbp Boot]$ ls *.efi
bootmgfw.efi  bootmgr.efi  memtest.efi
[luke@rmbp Boot]$ bootmgfw.efi

To boot into grub, you just need to execute the grub64.efi:
[luke@rmbp grub]$ pwd
/efi/EFI/grub
[luke@rmbp grub]$ ls
grubx64.efi

e. grub2 can chainloader into win8.   Add a boot entry like below into grub.conf will work:
menuentry "Win8.1" {
        echo 'Loading Win 8.1 ....'
        set root=(hd1,gpt1)
        chainloader /EFI/Microsoft/Boot/bootmgfw.efi

}


Git as I understand (1): Content-Addressable Object Model

$
0
0
I have used numerous source control systems in my past career.  To list a few:

. ECMS: a proprietary version control tool used in AT&T/Lucent
. RCS:  my personal hobby in my early Unix days
. CVS:  the first source control I encountered in open source world
. Clearcase: When worked for enterprise customers, I used it a lot within Rational framwork
. SVN: Dominant tool after year 2005
. Mercurial: when I did low level hacking in JDK/jvm
. Git: When I began linux kernel  trip

As a team player, I am very sensitive to any tool/work flow/process which can boost team productivity. That might explain my lasting interests in SCM system.  Git is the last source control system I used as major tool.  My first impression with Git are:

. It is tool developed by developer for developer
. With  a succinct object model, the command line interface looks like not so well organized. I personally think "porcelain" interface is just a migration helper for users of existing SCMs. For me, its net effect is just prolonging  my full adoption of Git's essence;
. The distributed model in Git provide just so much leeway for cooperation workflow, sometimes it confuses even veteran SCM users like me

All in all, Git is an unique and excellent source/content control system, founded by Linus' maverick design philosophy (Distributed Object Store/snapshot based).  I personally think Git's biggest strength is its domain object model, and snapshot based history management. Once these two principles are established, any development of features never deviate from principles.  Simple is beautiful, and consistency helps adoption.

There are more than plenty of good reference material for Git.  There are many approaches to become a confident and competent Git user. My approach is  bottom up, stick to the fundamental data object model, and using as few and as low level command lines (plumbing) as possible to achieve a workable SCM systems.

1. Principle and Rational
As Linus put it:

"In many ways you can just see git as a filesystem - it's content-
addressable, and it has a notion of versioning, but I really really
designed it coming at the problem from the viewpoint of a _filesystem_
person (hey, kernels is what I do), and I actually have absolutely _zero_
interest in creating a traditional SCM system."
....
"But it clearly is the only right way. The fact that everybody else does it 
some other way only means that they are wrong."
As in Git manual:
GIT(1)                                                                                        Git Manual                                                                                        GIT(1)

NAME
       git - the stupid content tracker

So Git in Linus's eyes is a content-addressable file system with versioning support.   Why is it "stupid"? My paraphrase for this model is as through a home-brewed "version control system":
a. There is demand for a new project, be it personal hobby or customer requirement;
b. I begins coding, and all my artifacts needs to be stored in a file system;
c. I use files to store my codes, and directory to organize my code;
d. I am a very logical man, and know the "split and conquer" strategy to handle complex problems. So I code step by step, with many meaningful interim results; When I am satisfied with  an interim result, I archive all the content under root directory, and store it as a snapshot of my work; I generally name these snapshots with meaning directory names, for example, v0.1-add-feature-a, v0.2-add-feature-b,v0.3-fix-bug-c, etc, so I can remember what is my achievement in every snapshot; After sometimes, I have a lineage of snapshot history:

v0.1-->v0.2-->v0.3......

v0.1 is a directory tree, v0.2 is a directory tree, and so on.  This ordered lineage reflects my incremental progress for my delivery. 
e. When boss ask me what I have done today, I will show him with a diff commands:
diff -r v0.2 v0.3
To show him what file I have changed, what new files I have added, and what new directories I have added.  the "diff" utility also help me remember what I have done between each interim results. 
f. I am an efficient coder and have brain capability for parallel working. Sometimes I works on more that one idea in a project, and these ideas are quite separate from each other.  I don't what to mess my codes with both ongoing ideas, so I have more than one copies of snapshots. I call them "working directory", and work each ideas on each "working directory":

 ......--> v3.3---> idea-a (working directory)
               |
               |------> idea-b (working directory)
I switch between these working directories per my will.  Someday, I think both ideas have been implemented and tested, I use a 3 party merge tool like "kdiff3" to merge 3 directory into one, and name it "v3.4":

kdiff3 v3.3 idea-a idea-b
cp -r merge-result v3.4

Now I have a new "concept diagram" for my work/contribution:

......--> v3.3---> idea-a (working directory)------>v3.4
               |                                     ^                           
               |                                     |                        
               |------> idea-b (working directory)---|
g. Another developer, Tom, join this project. I tar all my snapshot directories and compressed it with gzip, bundled with one of my updated "concept diagram" and send the bundle file to Tom;
h. Tom is responsible for a specific feature "Tom-a", and I told him to base his work on "v3.4" directory. Tom finish his work on a directory "tom-a", and send back the result for me to review:
diff  v3.4 tom-a > tom-a.patch
After Tom create this "patch", he send it to me and an update "concept diagram graph":
......--> v3.3---> idea-a (working directory)------>v3.4--->tom-a
               |                                     ^                           
               |                                     |                        
               |------> idea-b (working directory)---|
Then I review the patch file, and test Tom's work:
vi tom-a.patch
cp -r v3.4  review
cp tom-a.patch review
cd review
patch -p1 tom-a.patch
make
make test
...

We iterate step a through g on and on, until one day we all retired. 
There are 3 critical concepts in this home-brewed "version control workflow",namely:
. file("blob" under git)
. working directory/tree: this directory we are working on ("working directory" under git)
. snapshot directory/tree:  an archived working directory ("tree" under git)
. concept diagram: a working history logging what we have done ("commit log" under git), with multiple "lineage of working" ("branch" under git);

Such an home-brew workflow might seem "stupid", but from my point of view, Git just automates this workflow, and automate it very well. This might be one of the reason Linus call git a "stupid content tracker". 

2. blob
blob store file contents, be it text or binary, without a file name.  git will SHA-1 the blob content and use the SHA-1 hash value to store blob under ".git/object". 

[luke@rmbp git]$ git init project1
Initialized empty Git repository in /tmp/git/project1/.git/
[luke@rmbp git]$ cd project1
[luke@rmbp project1]$ rm -rf .git/hooks/*
[luke@rmbp project1]$ tree .git
.git
├── branches
├── config
├── description
├── HEAD
├── hooks
├── info
│   └── exclude
├── objects
│   ├── info
│   └── pack
└── refs
    ├── heads
    └── tags
[luke@rmbp project1]$ echo "Hello World!"> hello.txt
[luke@rmbp project1]$ git hash-object -t blob -w hello.txt
980a0d5f19a64b4b30a87d4206aade58726b60e3
[luke@rmbp project1]$ tree .git/objects/
.git/objects/
├── 98
│   └── 0a0d5f19a64b4b30a87d4206aade58726b60e3
├── info
└── pack

3 directories, 1 file

Here we add "hello.txt" into git object store as a blob.  All objects are "zlib" deflated. We need a zlib command line tools:

Since git use the compress level of "Z_BEST_SPEED", we need to make minor change to zpipe.c:

184     /* do compression if no arguments */
185     if (argc == 1) {
186 //        ret = def(stdin, stdout, Z_DEFAULT_COMPRESSION);
187 //        ret = def(stdin, stdout, Z_BEST_COMPRESSION);
188         ret = def(stdin, stdout, Z_BEST_SPEED);

gcc -lz zpipe.c -o zpipe


zpipe -d <.git/objects/98/0a0d5f19a64b4b30a87d4206aade58726b60e3 > blob
hexedit blob

00000000   62 6C 6F 62  20 31 33 00  48 65 6C 6C  6F 20 57 6F  blob 13.Hello Wo
00000010   72 6C 64 21  0A                                     rld!.
00000020

Actually the format of a blob file is very simple:
blob\space length\0 content

[luke@rmbp project1]$ sha1sum blob
980a0d5f19a64b4b30a87d4206aade58726b60e3  blob
[luke@rmbp project1]$ zpipe <blob > blob.compress
[luke@rmbp project1]$ cmp blob.compress .git/objects/98/0a0d5f19a64b4b30a87d4206aade58726b60e3 
[luke@rmbp project1]$ 

So everything matches. 
We can also use "git cat-file" to display content of a blob file:
[luke@rmbp project1]$ git cat-file -p 980a0d5f19a64b4b30a87d4206aade58726b60e3
Hello World!


3. tree and index/cache/staging area
We know to how to create blobs, it is time to organize our blobs(files) via tree(directory); First, let us examine an existing tree:
[luke@rmbp project1]$ git ls-tree -tr HEAD
040000 tree b6532456130e3225202f17e070c9b8178ef8d922docs
100644 blob d9b401251bb36c51ca5c56c2ffc8a24a78ff20aedocs/README
100644 blob 9c36258b3007167a308da65fb6648e44f745da35hello.c
100644 blob 980a0d5f19a64b4b30a87d4206aade58726b60e3hello.txt
[luke@rmbp project1]$ tree
.
├── docs
│   └── README
├── hello.c
└── hello.txt

1 directory, 3 files

This tree corresponds to the working directory tree.  Every entry in a tree has below format/content:
 <mode> SP <type> SP <object> TAB <file/path name>

Both tree and blob are stored as git objects. We can find them under ".git/objects":
[luke@rmbp project1]$ find .git/objects -type f  | sed -e 's$\.git/objects/$$g' | sed 's$/$$g' | xargs -n1 git cat-file -p
tree 999ba42cf9a8a98eeb9e87d0f43955de7fd5fdf9
author Luke Luo <luke.jf.luo@gmail.com> 1400504866 +0800
committer Luke Luo <luke.jf.luo@gmail.com> 1400504866 +0800

Iniital Commit'
040000 tree b6532456130e3225202f17e070c9b8178ef8d922docs
100644 blob 9c36258b3007167a308da65fb6648e44f745da35hello.c
100644 blob 980a0d5f19a64b4b30a87d4206aade58726b60e3hello.txt
100644 blob d9b401251bb36c51ca5c56c2ffc8a24a78ff20aeREADME
hello.c
read me
Hello World!

Here we can see the "root tree" is stored as object " 999ba42cf9a8a98eeb9e87d0f43955de7fd5fdf9
".

[luke@rmbp project1]$ git ls-tree 999ba42cf9a8a98eeb9e87d0f43955de7fd5fdf9
040000 tree b6532456130e3225202f17e070c9b8178ef8d922docs
100644 blob 9c36258b3007167a308da65fb6648e44f745da35hello.c

100644 blob 980a0d5f19a64b4b30a87d4206aade58726b60e3hello.txt

[luke@rmbp 99]$ zpipe -d <9ba42cf9a8a98eeb9e87d0f43955de7fd5fdf9 > ~/tree.data

[luke@rmbp 99]$ hexedit ~/tree.data
00000000   74 72 65 65  20 31 30 33  00 34 30 30  30 30 20 64  tree 103.40000 d
00000010   6F 63 73 00  B6 53 24 56  13 0E 32 25  20 2F 17 E0  ocs..S$V..2% /..
00000020   70 C9 B8 17  8E F8 D9 22  31 30 30 36  34 34 20 68  p......"100644 h
00000030   65 6C 6C 6F  2E 63 00 9C  36 25 8B 30  07 16 7A 30  ello.c..6%.0..z0
00000040   8D A6 5F B6  64 8E 44 F7  45 DA 35 31  30 30 36 34  .._.d.D.E.510064
00000050   34 20 68 65  6C 6C 6F 2E  74 78 74 00  98 0A 0D 5F  4 hello.txt...._
00000060   19 A6 4B 4B  30 A8 7D 42  06 AA DE 58  72 6B 60 E3  ..KK0.}B...Xrk`.

All entries in a tree are either blobs or trees, and they must have been stored into object store before they can be listed an entry in a tree.  This is because tree is only a mechanism to organize git objects, not normal files under working directory. tree is also an recursive data structure, starting from an root tree, you can include other low level "trees". 

All tree must be created via the "index" mechanism provided by git. An "index" is an staging area to construct an tree object, and it is stored in "./git/index".  "index","staging area", and "cache" are often used interchangeably in Git.  

# empty the index/cache/staging area
[luke@rmbp project1]$ git read-tree --empty
# list index tree contents. Index tree is not stored into object yet, so you can not use "git ls-tree"

[luke@rmbp project1]$ git ls-files --stage
# mode: git only track "644" or "755" for file and directory. "100" is normal file, "120" is symbolic link, "040" is a directory
# we will re-use existing objects to construct an new tree object in index area
# add hello.c into index and use new file name "hello-new.c"
[luke@rmbp project1]$ git update-index --add --cacheinfo 100644 9c36258b3007167a308da65fb6648e44f745da35 hello-new.c
[luke@rmbp project1]$ git ls-files --stage
100644 9c36258b3007167a308da65fb6648e44f745da35 0hello-new.c
# add hello.txt and use the path name "dir1/hello-new.txt"
[luke@rmbp project1]$ git update-index --add --cacheinfo 100644 980a0d5f19a64b4b30a87d4206aade58726b60e3 dir1/hello-new.txt
[luke@rmbp project1]$ git ls-files --stage
100644 980a0d5f19a64b4b30a87d4206aade58726b60e3 0dir1/hello-new.txt
100644 9c36258b3007167a308da65fb6648e44f745da35 0hello-new.c
# add an existing directory "docs" via path "docs-new":
[luke@rmbp project1]$ git read-tree --prefix docs-new b6532456130e3225202f17e070c9b8178ef8d922
[luke@rmbp project1]$ git ls-files -s
100644 980a0d5f19a64b4b30a87d4206aade58726b60e3 0dir1/hello-new.txt
100644 d9b401251bb36c51ca5c56c2ffc8a24a78ff20ae 0docs-new/README

100644 9c36258b3007167a308da65fb6648e44f745da35 0hello-new.c
# now we will store the index tree into object store and generate a tree object
[luke@rmbp project1]$ git write-tree
11a57232319f8e6bd9bd7031e284e1d6ed99c8db
[luke@rmbp project1]$ git ls-tree -tr 11a57232319f8e6bd9bd7031e284e1d6ed99c8db
040000 tree e54c875df80ddce5c11daa793779785f672146a2dir1
100644 blob 980a0d5f19a64b4b30a87d4206aade58726b60e3dir1/hello-new.txt
040000 tree b6532456130e3225202f17e070c9b8178ef8d922docs-new
100644 blob d9b401251bb36c51ca5c56c2ffc8a24a78ff20aedocs-new/README
100644 blob 9c36258b3007167a308da65fb6648e44f745da35hello-new.c
# here we can see a new tree "dir1" is created automatically for us since we specify the path name "dir1/hello-new.txt"; "docs-new" has the same hash value with original "docs" dir 
# you can delete entries in index tree via "path/file name"

[luke@rmbp project1]$ git update-index --remove dir1/hello-new.txt
[luke@rmbp project1]$ git update-index --remove docs-new/README

Git does not track an empty directory. It is not possible to generate an tree object via an empty directory. 
"git add" is a high level command which can add entry into index via the files in working directory. It is actually a two-steps command. First, it will generated blob and tree object using the files/dirs you added from working directory; then it will use "git update-index"/"git read-tree" to update the index. For example:
[luke@rmbp git]$ git init project1
Initialized empty Git repository in /tmp/git/project1/.git/
[luke@rmbp git]$ cd project1
[luke@rmbp project1]$ echo "Hello World!"> hello.txt
[luke@rmbp project1]$ tree .git/objects
.git/objects
├── info
└── pack

2 directories, 0 files
[luke@rmbp project1]$ git add hello.txt
[luke@rmbp project1]$ tree .git/objects
.git/objects
├── 98
│   └── 0a0d5f19a64b4b30a87d4206aade58726b60e3
├── info
└── pack

3 directories, 1 file
[luke@rmbp project1]$ git ls-files --stage
100644 980a0d5f19a64b4b30a87d4206aade58726b60e3 0hello.txt
[luke@rmbp project1]$ git write-tree
581caa0fe56cf01dc028cc0b089d364993e046b6
[luke@rmbp project1]$ tree .git/objects
.git/objects
├── 58
│   └── 1caa0fe56cf01dc028cc0b089d364993e046b6
├── 98
│   └── 0a0d5f19a64b4b30a87d4206aade58726b60e3
├── info
└── pack

4 directories, 2 files
[luke@rmbp project1]$ git ls-tree -tr 581caa0fe56cf01dc028cc0b089d364993e046b6
100644 blob 980a0d5f19a64b4b30a87d4206aade58726b60e3hello.txt


Till now, Git has provides blob and tree to store our coding artifacts.  The next logical step is to provide mechanism to record our "working history".

4. commit
Every snapshot of our work is a tree. We have tried to use meaningful names for archived snapshot trees in home-brewed version control system, and we also need to manually create a "concept diagram" to record our working history.  In Git, "commit" is the key mechanism to record our working history.  A commit must points to one and only one "tree object", since a commit corresponds to a snapshot. A commit also needs to have one or more "parent commit" since we need to record our "incremental/step by step" working history.
"git commit-tree" will generate a commit object. It mandate an existing tree object, and optional parent commit objects. It also mandate configuration data "author name" and "committer name". 
[luke@rmbp project1]$ cat ~/.gitconfig 
[user]
email = luke.jf.luo@gmail.com

name = Luke Luo
Normally, "author" and "committer" refer to same person. But there are exceptions, especially when merge and rebase happens.  Here is an example to generate a commit to record a snapshot tree:

[luke@rmbp git]$ git init project1
Initialized empty Git repository in /tmp/git/project1/.git/
[luke@rmbp git]$ cd project1/
[luke@rmbp project1]$ echo "hello world"> hello.txt
[luke@rmbp project1]$ git hash-object -w hello.txt
3b18e512dba79e4c8300dd08aeb37f8e728b8dad
[luke@rmbp project1]$ git update-index --add hello.txt
[luke@rmbp project1]$ git ls-files -s
100644 3b18e512dba79e4c8300dd08aeb37f8e728b8dad 0hello.txt
[luke@rmbp project1]$ git write-tree
68aba62e560c0ebc3396e8ae9335232cd93a3f60
[luke@rmbp project1]$ git commit-tree -m "Initial commit" 68aba62e560c0ebc3396e8ae9335232cd93a3f60
0e44be6380e382d826d07046c2ad66f65752fc7b
[luke@rmbp project1]$ git cat-file -p 0e44be6380e382d826d07046c2ad66f65752fc7b
tree 68aba62e560c0ebc3396e8ae9335232cd93a3f60
author Luke Luo <luke.jf.luo@gmail.com> 1400515839 +0800
committer Luke Luo <luke.jf.luo@gmail.com> 1400515839 +0800

Initial commit
[luke@rmbp project1]$ zpipe -d <.git/objects/68/aba62e560c0ebc3396e8ae9335232cd93a3f60 > commit.raw
[luke@rmbp project1]$ hexedit commit.raw
00000000   74 72 65 65  20 33 37 00  31 30 30 36  34 34 20 68  65 6C 6C 6F  2E 74 78 74  00 3B 18 E5  12 DB A7 9E  4C 83 00 DD  08 AE B3 7F  8E 72 8B 8D  tree 37.100644 hello.txt.;......L........r..

0000002C   AD  
[luke@rmbp project1]$ git log --pretty=fuller 0e44be6380e382d826d07046c2ad66f65752fc7b
commit 0e44be6380e382d826d07046c2ad66f65752fc7b
Author:     Luke Luo <luke.jf.luo@gmail.com>
AuthorDate: Tue May 20 00:10:39 2014 +0800
Commit:     Luke Luo <luke.jf.luo@gmail.com>
CommitDate: Tue May 20 00:10:39 2014 +0800

    Initial commit
[luke@rmbp project1]$ 

Here we can see "git commit-tree" did take "user" values from my "~/.gitconfig" to use them as "Author" and "committer" fields in commit; It also generate commit time stamp for us.  Since this is the initial commit, I did not specify any "parent commit".  The commit message (-m "Initial commit") is also recorded into commit object.   "git log <commit>" is the canonical way to view the content of a commit and all its ancestor commits. 
Next, we will add another file "README" into object store, create a new tree object containing both "hello.txt" and "README", and create a new commit based on this new tree, with our first commit as parent commit:
[luke@rmbp project1]$ echo "readme doc"> README
[luke@rmbp project1]$ git ls-files --stage
100644 3b18e512dba79e4c8300dd08aeb37f8e728b8dad 0hello.txt
[luke@rmbp project1]$ git update-index --add README
[luke@rmbp project1]$ git ls-files --stage
100644 523f5db4d1652fb348f11b92417d7a2dc9dd7d70 0README
100644 3b18e512dba79e4c8300dd08aeb37f8e728b8dad 0hello.txt
[luke@rmbp project1]$ git write-tree
7927ca308b476e40989a7393983aacf23ee52026
[luke@rmbp project1]$ git commit-tree -m "second commit" -p 0e44be6380e382d826d07046c2ad66f65752fc7b 7927ca308b476e40989a7393983aacf23ee52026
b1f0d68803efd0d2fc620a8739ad9b8a7b822432
[luke@rmbp project1]$ git log --pretty=fuller b1f0d68803efd0d2fc620a8739ad9b8a7b822432
commit b1f0d68803efd0d2fc620a8739ad9b8a7b822432
Author:     Luke Luo <luke.jf.luo@gmail.com>
AuthorDate: Tue May 20 00:26:34 2014 +0800
Commit:     Luke Luo <luke.jf.luo@gmail.com>
CommitDate: Tue May 20 00:26:34 2014 +0800

    second commit

commit 0e44be6380e382d826d07046c2ad66f65752fc7b
Author:     Luke Luo <luke.jf.luo@gmail.com>
AuthorDate: Tue May 20 00:10:39 2014 +0800
Commit:     Luke Luo <luke.jf.luo@gmail.com>
CommitDate: Tue May 20 00:10:39 2014 +0800

    Initial commit
[luke@rmbp project1]$ git cat-file -p b1f0d68803efd0d2fc620a8739ad9b8a7b822432
tree 7927ca308b476e40989a7393983aacf23ee52026
parent 0e44be6380e382d826d07046c2ad66f65752fc7b
author Luke Luo <luke.jf.luo@gmail.com> 1400516794 +0800
committer Luke Luo <luke.jf.luo@gmail.com> 1400516794 +0800

second commit
[luke@rmbp project1]$ git ls-tree 7927ca308b476e40989a7393983aacf23ee52026
100644 blob 523f5db4d1652fb348f11b92417d7a2dc9dd7d70README
100644 blob 3b18e512dba79e4c8300dd08aeb37f8e728b8dadhello.txt

[luke@rmbp project1]$

Since one commit always points to exactly one tree.  When we want to refer to a tree object, we can always do this indirectly via a corresponding commit object.  tree and commits are all "tree-ish" under Git slang.  For example, to take a look at the snapshot tree a commit stands for, we can do:
[luke@rmbp project1]$ git ls-tree -tr b1f0d68803efd0d2fc620a8739ad9b8a7b822432 (commit hash)
100644 blob 523f5db4d1652fb348f11b92417d7a2dc9dd7d70README

100644 blob 3b18e512dba79e4c8300dd08aeb37f8e728b8dadhello.txt
# we can also import a commit's tree into index
[luke@rmbp project1]$ git read-tree --empty
[luke@rmbp project1]$ git read-tree b1f0d68803efd0d2fc620a8739ad9b8a7b822432
[luke@rmbp project1]$ git ls-files --stage
100644 523f5db4d1652fb348f11b92417d7a2dc9dd7d70 0README

100644 3b18e512dba79e4c8300dd08aeb37f8e728b8dad 0hello.txt

Git provide GUI tools to examine the working history ("concept diagram") embedded in commit objects. gitk is one of them:
[luke@rmbp project1]$ gitk b1f0d68803efd0d2fc620a8739ad9b8a7b822432


Thanks to git commit object, we don't need to draw "concept diagram" working history manually anymore. 
In essence, we can regard commit as a special "annotation/metadata" information for a specific tree. A commit annotate a snapshot tree with specified "name/value" pairs like "parent commits","Author","committer","Author time","commit time", and "commit message".  Via such annotations to snapshot tree, we can reconstruct a work history for all our archived snapshot tree. 

"git commit" is a high level command comparing to "git commit-tree". It will first do a "git write-tree" according to the current content of index, then it will do "git commit-tree" to the newly generated tree. 

5. tag
commit is a special annotation to a tree. Git also provides another type of object called "tag", which acts as generic annotation to commit objects.  We use "git tag" to create a tag object:
[luke@rmbp project1]$ git log
commit d2f5de55ee3aa1dc90aec01a4e450f61285fece0
Author: Luke Luo <luke.jf.luo@gmail.com>
Date:   Tue May 20 15:27:36 2014 +0800

    initial commit
[luke@rmbp project1]$ tree .git
.git
├── branches
├── COMMIT_EDITMSG
├── config
├── description
├── HEAD
├── hooks
├── index
├── info
│   └── exclude
├── logs
│   ├── HEAD
│   └── refs
│       └── heads
│           └── master
├── objects
│   ├── 3b
│   │   └── 18e512dba79e4c8300dd08aeb37f8e728b8dad
│   ├── 68
│   │   └── aba62e560c0ebc3396e8ae9335232cd93a3f60
│   ├── d2
│   │   └── f5de55ee3aa1dc90aec01a4e450f61285fece0
│   ├── info
│   └── pack
└── refs
    ├── heads
    │   └── master
    └── tags

15 directories, 12 files
[luke@rmbp project1]$ git tag -a -m "tag for initial commit" v0.1 d2f5de55ee3aa1dc90aec01a4e450f61285fece0
[luke@rmbp project1]$ tree .git
.git
├── branches
├── COMMIT_EDITMSG
├── config
├── description
├── HEAD
├── hooks
├── index
├── info
│   └── exclude
├── logs
│   ├── HEAD
│   └── refs
│       └── heads
│           └── master
├── objects
│   ├── 3b
│   │   └── 18e512dba79e4c8300dd08aeb37f8e728b8dad
│   ├── 68
│   │   └── aba62e560c0ebc3396e8ae9335232cd93a3f60
│   ├── af
│   │   └── 6aae63b3551d4b650ea52408b4648d1c62ec71
│   ├── d2
│   │   └── f5de55ee3aa1dc90aec01a4e450f61285fece0
│   ├── info
│   └── pack
└── refs
    ├── heads
    │   └── master
    └── tags
        └── v0.1

16 directories, 14 files
[luke@rmbp project1]$ cat .git/refs/tags/v0.1 
af6aae63b3551d4b650ea52408b4648d1c62ec71

[luke@rmbp project1]$ git cat-file -p af6aae63b3551d4b650ea52408b4648d1c62ec71
object d2f5de55ee3aa1dc90aec01a4e450f61285fece0
type commit
tag v0.1
tagger Luke Luo <luke.jf.luo@gmail.com> 1400570948 +0800


tag for initial commit
[luke@rmbp project1]$ zpipe -d <.git/objects/af/6aae63b3551d4b650ea52408b4648d1c62ec71 
tag 150object d2f5de55ee3aa1dc90aec01a4e450f61285fece0
type commit
tag v0.1
tagger Luke Luo <luke.jf.luo@gmail.com> 1400570948 +0800

tag for initial commit

We can see "git tag" create an object under ".git/objects", it also create a text file with file name of "tag name" under ".git/ref/tags/v0.1". The content of "v0.1" file is just the commit SHA1 value this tag SHA1 value.  The data structure of a tag is quite simple. It contains the object hash it is pointing to, the type of pointed to object, the tag name, and tagger information. A tag also mandate a tag message.

Since there is one-one correspondence between tag and commit, and tag has a user friendly tag name, whenever we want to refer to a commit, we can refer to it indirectly via tag name:
[luke@rmbp project1]$ git log v0.1
commit d2f5de55ee3aa1dc90aec01a4e450f61285fece0
Author: Luke Luo <luke.jf.luo@gmail.com>
Date:   Tue May 20 15:27:36 2014 +0800

    initial commit
[luke@rmbp project1]$ git log d2f5de55ee3aa1dc90aec01a4e450f61285fece0
commit d2f5de55ee3aa1dc90aec01a4e450f61285fece0
Author: Luke Luo <luke.jf.luo@gmail.com>
Date:   Tue May 20 15:27:36 2014 +0800

    initial commit

6. Immutable Object
All Git objects are stored under ".git/ojbects" with path names formed from their SHA1 values. If you change any bit of the content of an object, the SHA1 values will change, and the new content will be stored with different path/file name. In theory, under Git, you can only create and delete object, and there are no such things as "modify/replace" objects.  Every object is immutable after its creation.  We often say we keep multiple versions of the same file under version control. Under git, we actually store multiple blob objects under object store. The connection among these blobs object are embedded in the corresponding commit and tree objects.  For example,  in a series of commits/trees, we all see an entry with path name "hello.txt" but with different blob hash.  So conceptually, we treat all these blobs as different versions of file "hello.txt".  From the point of Git object store, it does not care the relationship among all unique objects. You throw an object to it, git store it, and return you a SHA1 as reference.  You address you object with this reference. Since this reference is based on the content of you object, We can regard git as an "content-addressable object store". 


Git as I understand (2): reference

$
0
0
As we have seen in previous post, git locate stored objects with the SHA1 (160bit/20byte/40 ascii chars). SHA1 value is not human friendly.  Git provide a simple mechanism to assign human friendly names to stored objects called "reference".  A reference is just a text file store under ".git/refs" with a user friendly file name.  The content of this ascii file is just the SHA1 value of the referred objects.  There are four types of objects in Git, but Git only provides two types of references : heads and tags.  Heads refer to commit object, and tags refer to tag objects.  Why not provide reference to blobs and trees?  Because:
a.  A blob does not have file name information.  We often manipulate blob via a tree object, where file/path name are stored for each blob.  We can refer to blobs indirectly via a tree;
b. We generally store tree objects via "commit-tree/commit", where a commit object will be generated side by side with a tree. There is a link to the tree within the commit object. So we can locate tree object via commit;

1. basic ref operation

We can browse existing references via "git for-each-ref" and "git-show-ref":
[luke@rmbp project1]$ git for-each-ref
d2f5de55ee3aa1dc90aec01a4e450f61285fece0 commitrefs/heads/master
af6aae63b3551d4b650ea52408b4648d1c62ec71 tagrefs/tags/v0.1
[luke@rmbp project1]$ git show-ref
d2f5de55ee3aa1dc90aec01a4e450f61285fece0 refs/heads/master
af6aae63b3551d4b650ea52408b4648d1c62ec71 refs/tags/v0.1
[luke@rmbp project1]$ cat .git/refs/heads/master 
d2f5de55ee3aa1dc90aec01a4e450f61285fece0
[luke@rmbp project1]$ cat .git/refs/tags/v0.1 
af6aae63b3551d4b650ea52408b4648d1c62ec71

Git also provides "symbolic link" to reference called "symbolic reference". The most typical symbolic reference is "HEAD".
[luke@rmbp project1]$ cat .git/HEAD
ref: refs/heads/master
"ref:" signifies this file points to a reference. It is followed by the path names of the reference file, with ".git" as root directory.This is just another layer of indirection. There is a famous saying in computer science: "how to handle a problem? just create another layer of indirection!" 

We use "git update-ref" to create/update/delete reference. "git symbolic-ref" will be used to handle symbolic reference. 

# first create a head reference to a commit
[luke@rmbp project1]$ git update-ref  refs/heads/mybranch d2f5de55ee3aa1dc90aec01a4e450f61285fece0
[luke@rmbp project1]$ git for-each-ref
d2f5de55ee3aa1dc90aec01a4e450f61285fece0 commitrefs/heads/master
d2f5de55ee3aa1dc90aec01a4e450f61285fece0 commitrefs/heads/mybranch
af6aae63b3551d4b650ea52408b4648d1c62ec71 tagrefs/tags/v0.1
[luke@rmbp project1]$ cat .git/refs/heads/mybranch 
d2f5de55ee3aa1dc90aec01a4e450f61285fece0
# then we create a symbolic reference to this reference
[luke@rmbp project1]$ git symbolic-ref myhead refs/heads/mybranch
[luke@rmbp project1]$ cat .git/myhead
ref: refs/heads/mybranch

After we create the references, we can use them to refer to corresponding objects instead of SHA1 value:

[luke@rmbp project1]$ git log mybranch 
commit d2f5de55ee3aa1dc90aec01a4e450f61285fece0
Author: Luke Luo <luke.jf.luo@gmail.com>
Date:   Tue May 20 15:27:36 2014 +0800

    initial commit
[luke@rmbp project1]$ git cat-file -p mybranch
tree 68aba62e560c0ebc3396e8ae9335232cd93a3f60
author Luke Luo <luke.jf.luo@gmail.com> 1400570856 +0800
committer Luke Luo <luke.jf.luo@gmail.com> 1400570856 +0800

initial commit
[luke@rmbp project1]$ git cat-file -p myhead
fatal: Not a valid object name myhead
[luke@rmbp project1]$ ls
hello.txt
[luke@rmbp project1]$ git log mybranch
commit d2f5de55ee3aa1dc90aec01a4e450f61285fece0
Author: Luke Luo <luke.jf.luo@gmail.com>
Date:   Tue May 20 15:27:36 2014 +0800

    initial commit
[luke@rmbp project1]$ git cat-file -p mybranch
tree 68aba62e560c0ebc3396e8ae9335232cd93a3f60
author Luke Luo <luke.jf.luo@gmail.com> 1400570856 +0800
committer Luke Luo <luke.jf.luo@gmail.com> 1400570856 +0800

initial commit
[luke@rmbp project1]$ git ls-tree mybranch
100644 blob 3b18e512dba79e4c8300dd08aeb37f8e728b8dadhello.txt
[luke@rmbp project1]$ 

# finally we delete our newly created references
[luke@rmbp project1]$ git update-ref -d refs/heads/mybranch
[luke@rmbp project1]$ git show-ref
d2f5de55ee3aa1dc90aec01a4e450f61285fece0 refs/heads/master
af6aae63b3551d4b650ea52408b4648d1c62ec71 refs/tags/v0.1
[luke@rmbp project1]$ git symbolic-ref -d myhead
[luke@rmbp project1]$ cat .git/myhead
cat: .git/myhead: No such file or directory

Commit is the cornerstone of Git. All user level interaction with Git are based on commit. It is no surprise that all references point ultimately to commit objects. Tag reference points to a tag object, which ultimately points to a commit objects.  Git organize all artifacts via commit objects.

2. lightweight tag and branch

lightweight tag and branch are just normal ref (not symbolic) stored under "refs/tags" and "refs/heads". git also provide specific command to manage tag and branch. For lightweight tag, it generally points to a commit. For annotated tag, we need to use "git tag -a" to create an tag object, then create a lightweight tag pointing to this tag object.

"git branch" can manage local branch as "update-ref". The more import role is to set up tracking relation between local and remote branches. We will talk about remote repo sync later.

3. reflog
git log the value change of ref under ".git/logs/". "git reflog" will show the logs of HEAD by default. If you like to see the reflog:

[luke@rmbp project1]$ git reflog
6612aab HEAD@{0}: checkout: moving from master to test
4b3ac84 HEAD@{1}: commit: master.txt anot
daa6797 HEAD@{2}: checkout: moving from test to master
6612aab HEAD@{3}: checkout: moving from master to test
daa6797 HEAD@{4}: checkout: moving from test to master
6612aab HEAD@{5}: commit: c1
daa6797 HEAD@{6}: checkout: moving from master to test
daa6797 HEAD@{7}: commit (initial): c0
[luke@rmbp project1]$ git reflog HEAD
6612aab HEAD@{0}: checkout: moving from master to test
4b3ac84 HEAD@{1}: commit: master.txt anot
daa6797 HEAD@{2}: checkout: moving from test to master
6612aab HEAD@{3}: checkout: moving from master to test
daa6797 HEAD@{4}: checkout: moving from test to master
6612aab HEAD@{5}: commit: c1
daa6797 HEAD@{6}: checkout: moving from master to test
daa6797 HEAD@{7}: commit (initial): c0

[luke@rmbp project1]$ git reflog master
4b3ac84 master@{0}: commit: master.txt anot
daa6797 master@{1}: commit (initial): c0
og of individual branch, use "git reflog <branchname>"

Git as I understand (3): diff and merge

$
0
0
For traditional  delta-based SCM, diff/delta is the first class citizen which is stored as a native object in software model. Git is snapshot based,  and it stores "content" directly instead of delta. Even though git use diff/delta to pack object files into "pack file", the delta interface/structure does not aims to provide  open API for end users and only aims at providing storage space efficiency and network IO bandwidth saving on the background.  Whenever a diff view of different commit/snapshot tree is needed, git will compute it on the fly.  Per my understanding, git employs the design philosophy of "disk is cheap and trade cpu power for a simpler software model" in regard to diff/delta.

The more important reason for Git to exclude patch/diff out of basic object model, per my personal experience, is that "patch/diff" theory is far from perfect.  diff based on text line can not provide any syntactical or semantic diff.  Two source files with different text content might be identical in syntax. Two developer might have drastically different source code to implement the same algorithm/processing. When we diff/merge different software artifacts, current diff/patch implementation can not guarantee the merged results are correct in semantic sense, although it is an "automatic" merge. The correctness of merge will always depends on human judgement.  diff/merge implementation could only be used as a productivity tool but not a correctness verification tool.  By excluding diff/patch out of basic object model, Git has great flexibility to employ any progress in diff/patch algorithm at will, without introducing any compatibility issues for stored objects.

Additionally, traditional SCM  focus on tracking individual file/directory's history. On the contrary, git only tracks the history of root snapshot tree as a whole, instead of individual file/directory.

Git is distinguished for its encourage to use branch.  The usage of branch  will sure lead to merge.  Git touts its merge feature with saying like "merge just works automatically most of time".  Such saying at best is misleading.  Merging of source code always mandates human intervention, be it "merged automatically" or "merged with conflict resolution". If Git is said to be "more branch and merge friendly" comparing to other SCMs, it is just because Git does not make it harder.

Many of Git's advanced features mandate your thorough understanding on how diff and merge work. We will introduce many git work flow embedded within "porcelain" commands. Only after you know how diff/merge play roles in these commands you can use these commands with confidence and let Git help you to achieve your goal.

Git is a snapshot based version control system. When you need the difference between two snapshots, git will calculate the difference for us.  Git's diff algorithm largely derived from existing diff algorithm and implementations. There are many diff algorithms available, and git adopt 4 of them. In the help manual for "git diff", we have:
    --diff-algorithm={patience|minimal|histogram|myers}
           Choose a diff algorithm. The variants are as follows:

           default, myers
               The basic greedy diff algorithm. Currently, this is the default.

           minimal
               Spend extra time to make sure the smallest possible diff is produced.

           patience
               Use "patience diff" algorithm when generating patches.

           histogram
               This algorithm extends the patience algorithm to "support low-occurrence common elements".

To gain some solid understanding on how diff algorithm works, I recommend a classical paper:

http://xmailserver.org/diff2.pdf
http://simplygenius.net/Article/DiffTutorial1
http://simplygenius.net/Article/DiffTutorial2

If you want to know more about gnu diff/merge tools, you can refer to documentation of package "diffutils":
[luke@rmbp project]$ info diffutils

1.tree diff

Under many git work flow, a diff on snapshot directory tree is the first step.  Here is an example:


We have three branches, "master","doc" and "info".  We can list the directory tree of branch tip via "git ls-tree":
[luke@rmbp project]$ git ls-tree doc
100644 blob 6f1852975b9306ae5d8dfdf0d4cb1f5cb36ac229d1.txt
100644 blob fd3671590780b645e1bef030d550191f6cdf1c95d2.txt
100644 blob 69c77a9ea746edd27b46107142fc2c5288c1daf5d3.txt
100644 blob 3c69f010b48e8e008a43bf7f6c495b325d8af96em1.txt
100644 blob 08bb2331e777f431177c40df6841c0034f89fb58m2.txt
100644 blob e5c9ce9248c688a566f3d03be31d0097edb96443m3.txt
[luke@rmbp project]$ git ls-tree info
100644 blob ca49db8a781513484f01251ca2ae2bb92d46aafei1.txt
100644 blob 928f40b2d212da87857cfe0ffb2c90ea5c1b4f7bi2.txt
100644 blob 04ad29f02f6bc9aff95c6d07aedee83a808865f9i3.txt
100644 blob 835ceee2b2bb6d6167c59441d01b62cd849b7e1em1.txt
100644 blob 08bb2331e777f431177c40df6841c0034f89fb58m2-rename.txt
100644 blob e5c9ce9248c688a566f3d03be31d0097edb96443m3.txt


The output of "git ls-tree" is actually a text representation of a directory tree.  To diff these two directory, we can diff these two text representation.  But Git provides more sensible diff algorithm to show directory diff.
a. sort directory tree according to path names; the diff is based on path names first;
b. For every path name, do:
     . if it exists in both directory,  then
            . if the whole dir entry (mode, content hash, type" is identical to the one on another directory, then we say we have same entry;
            . if the whole dir entry is not identical, then we have "modified" entry (marked as "M");
     . If it exists only in one directory tree, then we have "added" or "deleted" entry, marked as "A" or "D".
[luke@rmbp project]$ git diff-tree doc info
:100644 000000 6f1852975b9306ae5d8dfdf0d4cb1f5cb36ac229 0000000000000000000000000000000000000000 Dd1.txt
:100644 000000 fd3671590780b645e1bef030d550191f6cdf1c95 0000000000000000000000000000000000000000 Dd2.txt
:100644 000000 69c77a9ea746edd27b46107142fc2c5288c1daf5 0000000000000000000000000000000000000000 Dd3.txt
:000000 100644 0000000000000000000000000000000000000000 ca49db8a781513484f01251ca2ae2bb92d46aafe Ai1.txt
:000000 100644 0000000000000000000000000000000000000000 928f40b2d212da87857cfe0ffb2c90ea5c1b4f7b Ai2.txt
:000000 100644 0000000000000000000000000000000000000000 04ad29f02f6bc9aff95c6d07aedee83a808865f9 Ai3.txt
:100644 100644 3c69f010b48e8e008a43bf7f6c495b325d8af96e 835ceee2b2bb6d6167c59441d01b62cd849b7e1e Mm1.txt
:000000 100644 0000000000000000000000000000000000000000 08bb2331e777f431177c40df6841c0034f89fb58 Am2-rename.txt
:100644 000000 08bb2331e777f431177c40df6841c0034f89fb58 0000000000000000000000000000000000000000 Dm2.txt


From the diff output, we can see:
a. "m2.txt" and "m3.txt" are identical entries;
b. "m1.txt" is "modified/M"
c. "d1.txt/d2.txt/d3.txt" does not exist in "info" branch, so they are marked as "deleted/D".
d. "i1.txt/i2.txt/i3.txt" does not exist in "doc" branch, so they are marked as "Added/A".
e. we rename "m2.txt" to "m2-rename.txt". In diff output, it is displayed as a "delete" and an "add".

Such a diff output format is called "raw format" in Git. We can also use "git diff -raw " to produce such output:
[luke@rmbp project]$ git diff --raw doc info
:100644 000000 6f18529... 0000000... D  d1.txt
:100644 000000 fd36715... 0000000... D  d2.txt
:100644 000000 69c77a9... 0000000... D  d3.txt
:000000 100644 0000000... ca49db8... A  i1.txt
:000000 100644 0000000... 928f40b... A  i2.txt
:000000 100644 0000000... 04ad29f... A  i3.txt
:100644 100644 3c69f01... 835ceee... M  m1.txt
:000000 100644 0000000... 08bb233... A  m2-rename.txt
:100644 000000 08bb233... 0000000... D  m2.txt

2. file diff
After we have identified the different entries between directory trees, we can use "git diff" to find out the difference among files.  The default diff output format for "git diff" is very similar to gnu diff "unified format". For example:
[luke@rmbp project]$ git diff doc:m1.txt info:m1.txt
diff --git a/doc:m1.txt b/info:m1.txt
index 3c69f01..835ceee 100644
--- a/doc:m1.txt
+++ b/info:m1.txt
@@ -1 +1 @@
-m1 doc
+m1 info
such output is a "patch", which could be applied via "patch" unix command. 

If we provide two tree to "git diff", it will output patch for each different file:
[luke@rmbp project]$ git diff doc info
diff --git a/d1.txt b/d1.txt
deleted file mode 100644
index 6f18529..0000000
--- a/d1.txt
+++ /dev/null
@@ -1 +0,0 @@
-d1
diff --git a/d2.txt b/d2.txt
deleted file mode 100644
index fd36715..0000000
--- a/d2.txt
+++ /dev/null
@@ -1 +0,0 @@
-d2
.......


3. Typical trees diff usage

In Git, the   most used directory snapshot trees are :
a. working directory
This is where we are working on
b. the git index
this the tree we are going to commit
c. most recent commit
this is the snapshot we base our current work on.

Since the difference between these three snapshot tree are so common, "git diff" provide specific options to select two of them to compare:
. git diff
index<---->working directory
.git diff --cached
most recent commit<--->index
.git diff HEAD
most recent commit<--->working directory

The untracked files in working directory are not used for diff.  You need to "git add" them first so they will be display in "git diff" results.  "git status" is a high level command which outputs difference among above three snapshot trees.

the most general format to select two tree is :
git diff tree-ish1 tree-ish2

Both tree-ish could be a reference (head or tag), a commit SHA1, a tree SHA1.
[luke@rmbp project1]$ git log --pretty=oneline
100e22641983cc82656b1202588d8a3dc9a22622 second commit
d2f5de55ee3aa1dc90aec01a4e450f61285fece0 initial commit
[luke@rmbp project1]$ git show-ref
100e22641983cc82656b1202588d8a3dc9a22622 refs/heads/master
d2f5de55ee3aa1dc90aec01a4e450f61285fece0 refs/heads/mybranch
af6aae63b3551d4b650ea52408b4648d1c62ec71 refs/tags/v0.1
[luke@rmbp project1]$ git diff d2f5de55ee3aa1dc90aec01a4e450f61285fece0 100e22641983cc82656b1202588d8a3dc9a22622
diff --git a/hello.txt b/hello.txt
index 3b18e51..fc9dda4 100644
--- a/hello.txt
+++ b/hello.txt
@@ -1 +1,2 @@
 hello world
+anohter
diff --git a/me b/me
new file mode 100644
index 0000000..78925fb
--- /dev/null
+++ b/me
@@ -0,0 +1 @@
+me
[luke@rmbp project1]$ git diff master^ master
diff --git a/hello.txt b/hello.txt
index 3b18e51..fc9dda4 100644
--- a/hello.txt
+++ b/hello.txt
@@ -1 +1,2 @@
 hello world
+anohter
diff --git a/me b/me
new file mode 100644
index 0000000..78925fb
--- /dev/null
+++ b/me
@@ -0,0 +1 @@
+me
[luke@rmbp project1]$ git cat-file -p master
tree c668aae69ca999df6648ea196c3f5af226e2262d
parent d2f5de55ee3aa1dc90aec01a4e450f61285fece0
author Luke Luo <luke.jf.luo@gmail.com> 1400592712 +0800
committer Luke Luo <luke.jf.luo@gmail.com> 1400592712 +0800

second commit
[luke@rmbp project1]$ git cat-file -p master^
tree 68aba62e560c0ebc3396e8ae9335232cd93a3f60
author Luke Luo <luke.jf.luo@gmail.com> 1400570856 +0800
committer Luke Luo <luke.jf.luo@gmail.com> 1400570856 +0800

initial commit
[luke@rmbp project1]$ git diff 68aba62e560c0ebc3396e8ae9335232cd93a3f60 c668aae69ca999df6648ea196c3f5af226e2262d
diff --git a/hello.txt b/hello.txt
index 3b18e51..fc9dda4 100644
--- a/hello.txt
+++ b/hello.txt
@@ -1 +1,2 @@
 hello world
+anohter
diff --git a/me b/me
new file mode 100644
index 0000000..78925fb
--- /dev/null
+++ b/me
@@ -0,0 +1 @@
+me

We can diff only two blobs instead of two tree. For example:
git diff blob1 blob2
or:
[luke@rmbp project1]$ git diff master^ master -- hello.txt
diff --git a/hello.txt b/hello.txt
index 3b18e51..fc9dda4 100644
--- a/hello.txt
+++ b/hello.txt
@@ -1 +1,2 @@
 hello world
+anohter


4. git merge
Git employs the classical 3-way merge algorithms.  You can get some feeling of 3 way merge via unix command "diff3".  A classical paper help me to gain a solid understanding on 3 way merge:

Formal Investigation of Diff3


A 3 way merge involves 3 nodes, "Base","Local (ours)", "Remote(Theirs)".  In Git, the most typical merge scenario is the merge of two branch tip, with the base of nearest common ancestor of both branch tips.  For example:

[luke@rmbp project]$ git branch 
* doc
  info
  master
[luke@rmbp project]$ git log --graph --all --decorate --oneline
* 678ecb9 (info) i5
* cda4be2 i4
* 1be45a3 i3
* 291b851 i2
* cdc35be i1
| * 0b765c2 (HEAD, doc) d4
| * c09b225 d3
| * 5eb037a d2
| * 8f5300c d1
|/  
* 34c21d1 (master) m3
* 323bccf m2
* af3f4db m1
[luke@rmbp project]$ git merge-base doc info | xargs git cat-file -p 
tree 4de9d581154a92be33508a0ddf59451a8f79fe29
parent 323bccfd5fbbe65685ab358df267d87daa45ded7
author Luke Luo <luke.jf.luo@gmail.com> 1401532415 +0800
committer Luke Luo <luke.jf.luo@gmail.com> 1401532415 +0800


m3

[luke@rmbp project]$ git merge info
Auto-merging m1.txt
CONFLICT (content): Merge conflict in m1.txt
Automatic merge failed; fix conflicts and then commit the result.

Here, we are in branch "doc", so the doc tip is the "Local" node; We merge branch "info" into branch "doc", so the "Remote" node is the "info" tip.  The base node "m3" could be found via "git merge_base".  Since we have conflict, let us look at the index:
[luke@rmbp project]$ git ls-files -s
100644 6f1852975b9306ae5d8dfdf0d4cb1f5cb36ac229 0d1.txt
100644 fd3671590780b645e1bef030d550191f6cdf1c95 0d2.txt
100644 69c77a9ea746edd27b46107142fc2c5288c1daf5 0d3.txt
100644 ca49db8a781513484f01251ca2ae2bb92d46aafe 0i1.txt
100644 928f40b2d212da87857cfe0ffb2c90ea5c1b4f7b 0i2.txt
100644 04ad29f02f6bc9aff95c6d07aedee83a808865f9 0i3.txt
100644 63a911f26fe84ea7fd8a863a636cfac908895ec9 1m1.txt
100644 3c69f010b48e8e008a43bf7f6c495b325d8af96e 2m1.txt
100644 835ceee2b2bb6d6167c59441d01b62cd849b7e1e 3m1.txt
100644 08bb2331e777f431177c40df6841c0034f89fb58 0m2-rename.txt
100644 e5c9ce9248c688a566f3d03be31d0097edb96443 0m3.txt
[luke@rmbp project]$ git cat-file -p 63a911f26fe84ea7fd8a863a636cfac908895ec9
m1
[luke@rmbp project]$ git cat-file -p 3c69f010b48e8e008a43bf7f6c495b325d8af96e
m1 doc
[luke@rmbp project]$ git cat-file -p 835ceee2b2bb6d6167c59441d01b62cd849b7e1e
m1 info

[luke@rmbp project]$ cat m1.txt 

<<<<<<< HEAD

m1 doc

=======

m1 info
>>>>>>> info


So "1/2/3" version of "m1.txt" in index corresponds to versions in "Base/Local/Remote" nodes.  and "m1.txt" in work tree is the merged version. After we merge "m1.txt" manually, we commit the change:

[luke@rmbp project]$ vi m1.txt 
[luke@rmbp project]$ git commit -am "merged of doc and info"
[doc 79f4756] merged of doc and info
[luke@rmbp project]$ git log --graph --decorate --all --oneline
*   79f4756 (HEAD, doc) merged of doc and info
|\  
| * 678ecb9 (info) i5
| * cda4be2 i4
| * 1be45a3 i3
| * 291b851 i2
| * cdc35be i1
* | 0b765c2 d4
* | c09b225 d3
* | 5eb037a d2
* | 8f5300c d1
|/  
* 34c21d1 (master) m3
* 323bccf m2
* af3f4db m1

5. subtree merge
git merge provide a merge strategy called "subtree".  You can do it via "git merge -s subtree" or "git merge -s recursive -X subtree=[xxx]". Since the second form is more flexible, I will stick to the second form in this section.
Suppose we have two branch "master" and "test":
[luke@rmbp subtree]$ git checkout master
Switched to branch 'master'
[luke@rmbp subtree]$ tree
.
├── common
│   └── cm.txt
├── master1
│   └── m1.txt
├── master2
│   └── m2.txt
└── master.txt

3 directories, 4 files
[luke@rmbp subtree]$ git checkout test
Switched to branch 'test'
[luke@rmbp subtree]$ tree
.
├── common
│   └── ct.txt
├── test1
│   └── t1.txt
├── test2
│   └── t2.txt
└── test.txt

3 directories, 4 files


We can specify "subtree=[a sub dir]". If this sub dir only exist in one branch, then the merge will happen between this sub dir in this branch and the root dir of another branch.  If this sub-dir exists in both branches, then only these two sub dirs' contents will be merged between this two branches.  Other directories in original branch are deleted as if we use "-s theirs"; other directories in other branch will be accepted as if "-s theirs"; 

Here are some example outputs:
[luke@rmbp subtree]$ git branch
  master
* test
[luke@rmbp subtree]$ git merge -s recursive -X subtree=common --no-commit --squash master
Removing test2/t2.txt
Removing test1/t1.txt
Removing test.txt
Squash commit -- not updating HEAD
Automatic merge went well; stopped before committing as requested
[luke@rmbp subtree]$ tree
.
├── common
│   ├── cm.txt
│   └── ct.txt
├── master1
│   └── m1.txt
├── master2
│   └── m2.txt
└── master.txt

[luke@rmbp subtree]$ git status -s
A  common/cm.txt
A  master.txt
A  master1/m1.txt
A  master2/m2.txt
D  test.txt
D  test1/t1.txt
D  test2/t2.txt

In this example, we merge master branch into test branch. Since "common" exists in both root tree, in this merge, only two "common" sub dirs are merged .  Other dirs in test are deleted, and other dirs in masters are added into test. 

[luke@rmbp subtree]$ git merge -s recursive -X subtree=master1  --no-commit --squash master

Squash commit -- not updating HEAD
Automatic merge went well; stopped before committing as requested
[luke@rmbp subtree]$ tree
.
├── common
│   └── ct.txt
├── m1.txt
├── test1
│   └── t1.txt
├── test2
│   └── t2.txt
└── test.txt

3 directories, 5 files
[luke@rmbp subtree]$ git status -s
A  m1.txt

In this example, the "master1" dir in mater branch is merged into root dir of test branch. 

6. gitdiffcore

"man gitdiffcore" will provide some in-depth details on how git do diff, especially on how "copy/rename" are detected, and how "pickaxe" is implemented.  Take a look at it if you love deep hacking on git.


Git as I understand (4): working tree,index,HEAD,branch,commit and local work flow

$
0
0
In this post, I will describe how git operate on individual entities like working tree, index,HEAD,branch, commit, tree, and how we use these basic level operation to compose a sensible daily work flow.  We will constraint ourselves to  local work flow in this post. In later post, we will talk about cooperation work flow among remote repositories.
git basic commands

1. work tree
A work tree is generally on the same level directory with the ".git" directory, but it can also resides in other place.  We need to setup environment variable to tell git command where to find the git repository, and where the working tree is, so git command can work properly. Concept wise, one working tree is linked with a HEAD and an index file, and by design, git will only allow one working tree for one repository at a time, because although we can specify an index file for a work tree, but only one HEAD exists in git repository.
[luke@rmbp git]$ git init --bare project1
Initialized empty Git repository in /tmp/git/project1/
[luke@rmbp git]$ mkdir wt
[luke@rmbp git]$ export GIT_DIR=/tmp/git/project1/
[luke@rmbp git]$ export GIT_WORK_TREE=/tmp/git/wt
[luke@rmbp git]$ git status
On branch master

Initial commit

nothing to commit (create/copy files and use "git add" to track)
[luke@rmbp git]$ git log
fatal: bad default revision 'HEAD'
[luke@rmbp wt]$ echo hello > hello.txt
[luke@rmbp wt]$ git add hello.txt
[luke@rmbp wt]$ git commit -m "first commit"
[master (root-commit) df04880] first commit
 1 file changed, 1 insertion(+)
 create mode 100644 hello.txt
[luke@rmbp wt]$ git log
commit df04880982563a946784bae5bf6e516d9dc47d42
Author: Luke Luo <luke.jf.luo@gmail.com>
Date:   Thu May 22 13:44:48 2014 +0800

    first commit
[luke@rmbp wt]$ git status
On branch master
nothing to commit, working directory clean


After we setup a bare repository and environment variables (GIT_DIR and GIT_WORK_TREE), we can use git commands (status,log) in directory other than working tree, since git knows where the repository and work tree is.  The default index file (GIT_INDEX_FILE) for this work tree resides by default in "$GIT_DIR/index", and the default object store (GIT_OBJECT_DIRECTORY) resides in "$GIT_DIR/objects".

We already know how to put entries into index via "git update-index/read-tree".  If we want to copy all file/dir in index to work tree, we can do "git checkout-index -a":
[luke@rmbp wt]$ ls
hello.txt
[luke@rmbp wt]$ git status
On branch master
nothing to commit, working directory clean
[luke@rmbp wt]$ git ls-files -s
100644 3b18e512dba79e4c8300dd08aeb37f8e728b8dad 0hello.txt
[luke@rmbp wt]$ rm hello.txt
[luke@rmbp wt]$ git status
On branch master
Changes not staged for commit:
  (use "git add/rm <file>..." to update what will be committed)
  (use "git checkout -- <file>..." to discard changes in working directory)

deleted:    hello.txt


no changes added to commit (use "git add" and/or "git commit -a")
[luke@rmbp wt]$ git checkout-index -a
[luke@rmbp wt]$ ls
hello.txt
[luke@rmbp wt]$ git status
On branch master

nothing to commit, working directory clean

2. index

index is a very critical native structure in git.  All tree must first be staged into index, and "write-tree" will create a tree object according to contents in index. There are no other way to create a tree object in git. Many git books describe index as a peculiar optional  staging work flow in git comparing to other SCMs. Such description is only partly true, because you can not  skip index to do any meaning operation in git. 

Index bridges between work tree and object repository.  Tree contents flow in bi-direction between work tree and object store via index.  "git ls-files" will list content in index, and "git diff/status" will show difference among work tree, index and commit.

index also includes support to construct snapshot tree for merging.  Different version of one files during a merge could co-exist within the index, so git knows which file needs to be resolved and it can show you the diff among versions in a typical "3-way" merge. Here is an example:

[luke@rmbp index]$ git merge test
Auto-merging hello.txt
CONFLICT (content): Merge conflict in hello.txt
Automatic merge failed; fix conflicts and then commit the result.
[luke@rmbp index]$ git ls-files -s
100644 ce013625030ba8dba906f756967f9e9ca394464a 1hello.txt
100644 22a5dfdfc80331be8a7f28c59e7646034a40d48a 2hello.txt
100644 748536090c67dbe2ef825e4fcd8f83901215f601 3hello.txt
[luke@rmbp index]$ git cat-file -p ce013625030ba8dba906f756967f9e9ca394464a
hello
[luke@rmbp index]$ git cat-file -p 22a5dfdfc80331be8a7f28c59e7646034a40d48a
hello master
[luke@rmbp index]$ git cat-file -p 748536090c67dbe2ef825e4fcd8f83901215f601
hello test
[luke@rmbp index]$ git status
On branch master
You have unmerged paths.
  (fix conflicts and run "git commit")

Unmerged paths:
  (use "git add <file>..." to mark resolution)

both modified:   hello.txt

no changes added to commit (use "git add" and/or "git commit -a")
[luke@rmbp index]$ cat hello.txt 
<<<<<<< HEAD
hello master
=======
hello test
>>>>>>> test


3. commit
When we deliver a "changeset" into git repository, we say we will commit the change.  To construct a commit object, we need to specify:
a. a snapshot tree, which is the current status of index
b. 0 or 1 or more parent commits, so we can construct a working history/lineage(DAG) among commits;
c. Author and Committer information, which are generally derived from git configuration;
d. data/time, which can be obtained via system call;
e. a commit message, which should be provided via command line or via a temporary file saved via an editor;

In theory, item a through e could be prepared separately. git commit does not care how these items are prepared.  For contents in index, we can import contents into index from working directory via "git add", or from tree stored in object store via "git read-tree", or manually select entries/items from object store via "git update-index", or the merged result of two or more commits.   For parent commits, we can specify any commits as parent commits. The related tree contents of these specified parent commits might have nothing to do with the contents in index.  Git itself does not impose any constraints between parent commits and content in index.  This design exactly explains why git is called a "snapshot based" SCM, since it really only records  a snapshot of items a to e in a time into a commit object. Git does not care how you reach such a snapshot state.  This is what happens when we do a "git commit-tree".

Such a design give end users great leeway to select how they could use git.  Git leave the selection of work flow model to end user. Git only cares about the final results (item a to e) of such work flow.  Such freedom is great for veteran users. But for first time user, bearing in mind a work flow beforehand to use Git is a formidable task.  Naturally, Git provides pre-setup work flow (or conventions) for normal users. Such convention will cover more than 90% of use cases.

Many of "porcelain" command provide such work flow/convention to construct snapshot tree in index and parent commits for new commit. For example, "git merge" will help you construct a commit based on different versions of files. "git cherrypick" help you pick content from a commit and merge it into new commit.

4. basic work flow
Git high level commands mandate you to work under a "branch".  Branch is represented as a ref file under ".git/refs/heads/xxx". It contains a SHA1 value to a certain commit. Git provides a default branch "master".  You can create multiple branch ref files, and Git provide a symbolic reference "HEAD" which generally points to one and only one of the branch. The pointed branch is your current working branch. Below we will use some typical commands to illustrate commonly-used work flows.

In Git's design, high level "porcelain" command will call low level "plumbing" command and chain "plumbing" to construct a high level work flow.  You can "export GIT_TRACE=1" so you can see how low level command is utilized.

a. checkout to a new branch, add a new file, then commit
. git checkout test
HEAD=master ----> HEAD=test
index=read-tree(t0)
work tree = index

As we can see, "git check branch" will  point HEAD to new branch head, initialize the index to new branch head commit, and populate working according to new index content.

. git add hello.txt
index=t0+hello.txt
.git commit
parent commit=HEAD
commit
test=t1

b. adjustment within a branch (git reset)

When you work under a branch, instead of a linear progress with commits on top of another commits, you can reset the branch tip to  any commit. You have options to update the index and work tree to the content of new commit.  There are three options:
. git reset --soft
only HEAD is pointed to new commit, both index and work tree are intact;
.git reset --mixed
HEAD and index are adjusted, work tree are intact;
.git reset --hard
HEAD, index and work tree are all adjusted to new commit

Several usage scenario are:

. You make some local change, and stage them into index. You want to discard all changes and recover state back to current commit, optionally work tree could also revert to current commit:
# reset index only, "HEAD" is optional"
git reset --mixed  HEAD
# reset both index and work tree, HEAD is optional
git reset --hard HEAD
# reset only only certain paths/files in index, but not in work tree
[luke@rmbp index]$ git add test.txt 
[luke@rmbp index]$ git ls-files -s
100644 748536090c67dbe2ef825e4fcd8f83901215f601 0hello.txt
100644 fe0aa778d6dac2263646a421f9fbad5300f70636 0test.txt
# reset only certain paths/files
[luke@rmbp index]$ git reset -- test.txt
[luke@rmbp index]$ git ls-files -s
100644 748536090c67dbe2ef825e4fcd8f83901215f601 0hello.txt
[luke@rmbp index]$ ls
hello.txt  test.txt
[luke@rmbp index]$ git status 
On branch master
Untracked files:
  (use "git add <file>..." to include in what will be committed)

test.txt

nothing added to commit but untracked files present (use "git add" to track)
.discard several commits on a branch and revert to previous commit
[luke@rmbp reset]$ git log --oneline --graph
* be62aba a3
* 27fe2d1 a2
* e5c1948 a1
[luke@rmbp reset]$ git reset --hard HEAD~2
HEAD is now at e5c1948 a1
[luke@rmbp reset]$ git log --oneline --graph
* e5c1948 a1
. reset a branch to another branch
[luke@rmbp reset]$ git branch
  master
* test
[luke@rmbp reset]$ git log --oneline --graph
* 4994d4a b2
* e260b7b b1
* 1927c09 a1
[luke@rmbp reset]$ git checkout master
Switched to branch 'master'
[luke@rmbp reset]$ git log --oneline --graph
* a6888a2 a3
* c85878d a2
* 1927c09 a1
[luke@rmbp reset]$ git branch
* master
  test
[luke@rmbp reset]$ git checkout test
Switched to branch 'test'
[luke@rmbp reset]$ git branch
  master
* test
[luke@rmbp reset]$ git reset --hard master
HEAD is now at a6888a2 a3
[luke@rmbp reset]$ git log --oneline --graph
* a6888a2 a3
* c85878d a2
* 1927c09 a1

5. commit --amend
"git commit --amend" generate a new commit, and the parent commit of the new commit is routed to HEAD~1 instead of HEAD.  After commit, the original HEAD will be an orphaned node, and branch tip is the new commit:
[luke@rmbp a]$ git log --oneline
bc0fd75 a2
b9e77e0 a1
[luke@rmbp a]$ git status -s
 M a1.txt
A  a3.txt
[luke@rmbp a]$ git commit --amend 
[master b3b16db] a2 amend
 2 files changed, 2 insertions(+)
 create mode 100644 a2.txt
 create mode 100644 a3.txt
[luke@rmbp a]$ git log --oneline
b3b16db a2 amend
b9e77e0 a1

In the above diagram, a new commit "d" is generated based on node "c", the original branch tip, and d's parent commit is "b", that is "c^"; After commit, branch tip points to "d", and "C" become an orphaned node.

6. stash
stash is a special kind of "HEAD".  A stash is recorded in ref ".git/refs/stash".
[luke@rmbp project]$ git reflog stash
6ced678 stash@{0}: WIP on doc: 79f4756 merged of doc and info
e962b40 stash@{1}: WIP on doc: 79f4756 merged of doc and info
 Here is an example of "git stash":
[luke@rmbp s]$ git log 
commit e774c05c99a9f3e6e2d8490fceb7277100a44779
Author: Luke Luo <luke.jf.luo@gmail.com>
Date:   Sun Jun 1 11:43:55 2014 +0800

    a1
[luke@rmbp s]$ git ls-tree  master
100644 blob da0f8ed91a8f2f0f067b3bdf26265d5ca48cf82ca1.txt
[luke@rmbp s]$ ls
a1.txt  a2.txt  a3.txt  a4.o
[luke@rmbp s]$ git status -s
A  a3.txt
?? a2.txt
?? a4.o
Here we have "a1.txt" already in master branch.  "a2.txt" is un-tracked, "a4.o" is an ignored file, and "a3.txt" has been added into staged area(index).  "git stash --all " will stash both index, untracked file, and ignored file:
[luke@rmbp s]$ git stash --all
Saved working directory and index state WIP on master: e774c05 a1
HEAD is now at e774c05 a1
[luke@rmbp s]$ git log --graph --all --oneline --decorate
*-.   1e7ac4b (refs/stash) WIP on master: e774c05 a1
|\ \  
| | * b7f5698 untracked files on master: e774c05 a1
| * e0d115f index on master: e774c05 a1
|/  
* e774c05 (HEAD, master) a1
[luke@rmbp s]$ git show e0d115f  (original master node)
commit e0d115fbd10bc33947a371af157bda80723d23ac
Author: Luke Luo <luke.jf.luo@gmail.com>
Date:   Sun Jun 1 11:49:20 2014 +0800

    index on master: e774c05 a1

diff --git a/a3.txt b/a3.txt
new file mode 100644
index 0000000..d616f73
--- /dev/null
+++ b/a3.txt
@@ -0,0 +1 @@
+a3
[luke@rmbp s]$ git show b7f5698 (untracked+ignore file commit)
commit b7f569836036d11595ad0caafd03ea26e327d074
Author: Luke Luo <luke.jf.luo@gmail.com>
Date:   Sun Jun 1 11:49:20 2014 +0800

    untracked files on master: e774c05 a1

diff --git a/a2.txt b/a2.txt
new file mode 100644
index 0000000..c1827f0
--- /dev/null
+++ b/a2.txt
@@ -0,0 +1 @@
+a2
diff --git a/a4.o b/a4.o
new file mode 100644
index 0000000..88ba23d
--- /dev/null
+++ b/a4.o
@@ -0,0 +1 @@
+a4
[luke@rmbp s]$ git show 1e7ac4b  (stash commit)
commit 1e7ac4b2f55713aee9cb79999d14c35379841ec1
Merge: e774c05 e0d115f b7f5698
Author: Luke Luo <luke.jf.luo@gmail.com>
Date:   Sun Jun 1 11:49:20 2014 +0800

    WIP on master: e774c05 a1
Here we can see the final "stash" commit is the merge of 3 node: master itself, index content, untracked+ignored files.  This is a so called "octopus merge". 


Now let us apply this stash somewhere else.
[luke@rmbp s]$ git log --oneline
6b81a16 a5
e774c05 a1
[luke@rmbp s]$ ls
a1.txt  a5.txt
[luke@rmbp s]$ git status -s 
[luke@rmbp s]$ git stash apply 
On branch master
Changes to be committed:
  (use "git reset HEAD <file>..." to unstage)

new file:   a3.txt
Untracked files:
  (use "git add <file>..." to include in what will be committed)

a2.txt
a4.o

[luke@rmbp s]$ ls
a1.txt  a2.txt  a3.txt  a4.o  a5.txt
[luke@rmbp s]$ git status -s
A  a3.txt
?? a2.txt
?? a4.o

"git stash apply" play some tricks, so untracked files are still kept as untracked, and staged file as staged. 

7. cherry-pick and revert

git cherry-pick and revert are all  3 way merge processes. The only difference is which node act as base and which node acts as remote. Compared with a merge, cherry-pick and revert's commit only has one parent node instead of two.
8. rebase
rebase is a series of cherry-pick.

a.  C = [c1 c2 c3] = upstream..branch = ^upstream branch
b.  git checkout branch
c.  git reset --hard g
d.  for ci in C; do
        git cherry-pick ci;
     done;

8. rebase --interactive

We will analyze the internal process of git rebase via an interactive rebase.
[luke@rmbp r]$ git branch 
  master
* rebase
[luke@rmbp r]$ git log --graph --decorate --oneline --all
* 652eb43 (master) m5
* 8b96b83 m4
| * eec6f27 (HEAD, rebase) r3
| * cb95f9d r2
| * ec49169 r1
|/  
* 86e1152 m3
* 69bd729 m2
* 19e4a55 m1
Here we have two branch, "master" and "rebase". We will rebase branch "rebase" into node "8b96b83 m4"interactively. 

[luke@rmbp r]$ git rebase --interactive --onto 8b96b83 master rebase

  1 edit ec49169 r1
  2 squash  cb95f9d r2
  3 reword eec6f27 r3
  4 
  5 # Rebase 652eb43..eec6f27 onto 8b96b83
  6 #
  7 # Commands:
  8 #  p, pick = use commit
  9 #  r, reword = use commit, but edit the commit message
 10 #  e, edit = use commit, but stop for amending
 11 #  s, squash = use commit, but meld into previous commit
 12 #  f, fixup = like "squash", but discard this commit's log message
 13 #  x, exec = run command (the rest of the line) using shell
 14 #
 15 # These lines can be re-ordered; they are executed from top to bottom.
 16 #.......................

Stopped at ec49169a68eff2e74340dc490d7ccfe98b826a9e... r1

You can amend the commit now, with


git commit --amend 


Once you are satisfied with your changes, run

git rebase --continue

First , we "edit" node "r1".  
[luke@rmbp r]$ git log --oneline 
e8ae488 r1
8b96b83 m4
86e1152 m3
69bd729 m2
19e4a55 m1
[luke@rmbp r]$ git show e8ae488
commit e8ae4882a26394e9c9966f0faf3183730c422e31
Author: Luke Luo <luke.jf.luo@gmail.com>
Date:   Sun Jun 1 12:34:14 2014 +0800

    r1

diff --git a/r1.txt b/r1.txt
new file mode 100644
index 0000000..f7d55cf
--- /dev/null
+++ b/r1.txt
@@ -0,0 +1 @@
+r1

[luke@rmbp r]$ ls

m1.txt  m2.txt  m3.txt  m4.txt  r1.txt


Right now, we can see "r1" has been cherry-pick onto node "m4".  There are many files under ".git/rebase_merge" which records the current status of interactive rebase:
[luke@rmbp r]$ ls .git/rebase-merge/
amend  author-script  done  end  git-rebase-todo  git-rebase-todo.backup  head-name  interactive  message  msgnum  onto  orig-head  patch  quiet  stopped-sha

[luke@rmbp r]$ cat .git/rebase-merge/amend
e8ae4882a26394e9c9966f0faf3183730c422e31
[luke@rmbp r]$ git show e8ae4882a26394e9c9966f0faf3183730c422e31
commit e8ae4882a26394e9c9966f0faf3183730c422e31
Author: Luke Luo <luke.jf.luo@gmail.com>
Date:   Sun Jun 1 12:34:14 2014 +0800

    r1

diff --git a/r1.txt b/r1.txt
new file mode 100644
index 0000000..f7d55cf
--- /dev/null
+++ b/r1.txt
@@ -0,0 +1 @@
+r1
The "amend" file contains the SHA1 of "r1".  It means when we do "rebase --continue", it actually will do a "git commit --amend".  We will add an "edit.txt" then do "rebase --continue" to see what would actually happen:

[luke@rmbp r]$git rebase --continue

[luke@rmbp r]$ git log --oneline

f17875f r1 amend

8b96b83 m4

86e1152 m3

69bd729 m2

19e4a55 m1

[luke@rmbp r]$ git show f17875f603576b472e453b915b6047db8a25eb1e
commit f17875f603576b472e453b915b6047db8a25eb1e
Author: Luke Luo <luke.jf.luo@gmail.com>
Date:   Sun Jun 1 12:34:14 2014 +0800

    r1 amend

diff --git a/edit.txt b/edit.txt
new file mode 100644
index 0000000..366226f
--- /dev/null
+++ b/edit.txt
@@ -0,0 +1 @@
+edit
diff --git a/r1.txt b/r1.txt
new file mode 100644
index 0000000..f7d55cf
--- /dev/null
+++ b/r1.txt
@@ -0,0 +1 @@
+r1
[luke@rmbp r]$ git ls-tree f17875f603576b472e453b915b6047db8a25eb1e
100644 blob 366226fb970ac0caa9d3f55967ab01334a548f60edit.txt
100644 blob 63a911f26fe84ea7fd8a863a636cfac908895ec9m1.txt
100644 blob 08bb2331e777f431177c40df6841c0034f89fb58m2.txt
100644 blob e5c9ce9248c688a566f3d03be31d0097edb96443m3.txt
100644 blob 995fb876a427d4042101ad139e24ac80e53b456bm4.txt
100644 blob f7d55cf9a84e9ea95e8db2b6264e5a5db85d22adr1.txt

We can see the "r1" commit has been "amended" and edit.txt is in its directory tree;
The next action is "squash r2".  Git will bring up a editor screen and ask us to key in the commit message for this "squash commit". 

1 # This is a combination of 2 commits.
  2 # The first commit's message is:
  3 
  4 r1 amend
  5 
  6 # This is the 2nd commit message:
  7 
  8 r2 squash
  9 
 10 # Please enter the commit message for your changes. Lines starting
 11 # with '#' will be ignored, and an empty message aborts the commit.
 12 # rebase in progress; onto 8b96b83
 13 # You are currently editing a commit while rebasing branch 'rebase' on '8b96b83'.
 14 #
 15 # Changes to be committed:
 16 #       new file:   edit.txt
 17 #       new file:   r1.txt
 18 #       new file:   r2.txt
 19 #

Let us verify current repository status:
[luke@rmbp r]$ git log --oneline
f17875f r1 amend
8b96b83 m4
86e1152 m3
69bd729 m2
19e4a55 m1
We can see "edit r1" has been committed. We are working based on node "r1 amend".
[luke@rmbp r]$ ls
edit.txt  m1.txt  m2.txt  m3.txt  m4.txt  r1.txt  r2.txt
[luke@rmbp r]$ git ls-files -s
100644 366226fb970ac0caa9d3f55967ab01334a548f60 0edit.txt
100644 63a911f26fe84ea7fd8a863a636cfac908895ec9 0m1.txt
100644 08bb2331e777f431177c40df6841c0034f89fb58 0m2.txt
100644 e5c9ce9248c688a566f3d03be31d0097edb96443 0m3.txt
100644 995fb876a427d4042101ad139e24ac80e53b456b 0m4.txt
100644 f7d55cf9a84e9ea95e8db2b6264e5a5db85d22ad 0r1.txt
100644 9a6c8d12dea8859b821b2ba705f7efd6cc914aa5 0r2.txt
[luke@rmbp r]$ git status -s
A  r2.txt
The content of node "r2": r2.txt, has been applied to both index and working tree, based on node "r1 amend".  When we commit this operation, a new commit node will combine both "r1 amend" and "r2" into one commit node, since we are "squashing" r2 node. 
[luke@rmbp r]$ git log --oneline
d35a2f8 r3
5ed7280 r1 amend
8b96b83 m4
86e1152 m3
69bd729 m2
19e4a55 m1
[luke@rmbp r]$ git show 5ed7280
commit 5ed7280a58f07911824e6366604427b4adb80a95
Author: Luke Luo <luke.jf.luo@gmail.com>
Date:   Sun Jun 1 12:34:14 2014 +0800

   r1 amend
    
    r2 squash

diff --git a/edit.txt b/edit.txt
new file mode 100644
index 0000000..366226f
--- /dev/null
+++ b/edit.txt
@@ -0,0 +1 @@
+edit
diff --git a/r1.txt b/r1.txt
new file mode 100644
index 0000000..f7d55cf
--- /dev/null
+++ b/r1.txt
@@ -0,0 +1 @@
+r1
diff --git a/r2.txt b/r2.txt
new file mode 100644
index 0000000..9a6c8d1
--- /dev/null
+++ b/r2.txt
@@ -0,0 +1 @@
+r2
[luke@rmbp r]$ git ls-tree 5ed7280
100644 blob 366226fb970ac0caa9d3f55967ab01334a548f60edit.txt
100644 blob 63a911f26fe84ea7fd8a863a636cfac908895ec9m1.txt
100644 blob 08bb2331e777f431177c40df6841c0034f89fb58m2.txt
100644 blob e5c9ce9248c688a566f3d03be31d0097edb96443m3.txt
100644 blob 995fb876a427d4042101ad139e24ac80e53b456bm4.txt
100644 blob f7d55cf9a84e9ea95e8db2b6264e5a5db85d22adr1.txt
100644 blob 9a6c8d12dea8859b821b2ba705f7efd6cc914aa5r2.txt

We can see the result commit node does includes both the content of "r1 amend" and "r2". 
our last action is "reword r3".  Git is prompting us for new commit message for "reword r3":
1 r3
  2 
  3 # Please enter the commit message for your changes. Lines starting
  4 # with '#' will be ignored, and an empty message aborts the commit.
  5 # rebase in progress; onto 8b96b83
  6 # You are currently editing a commit while rebasing branch 'rebase' on '8b96b83'.
  7 #
  8 # Changes to be committed:
  9 #       new file:   r3.txt
 10 #
The current status is :
[luke@rmbp r]$ ls
edit.txt  m1.txt  m2.txt  m3.txt  m4.txt  r1.txt  r2.txt  r3.txt
[luke@rmbp r]$ git status
rebase in progress; onto 8b96b83
You are currently editing a commit while rebasing branch 'rebase' on '8b96b83'.
  (use "git commit --amend" to amend the current commit)
  (use "git rebase --continue" once you are satisfied with your changes)

nothing to commit, working directory clean
[luke@rmbp r]$ git ls-files -s
100644 366226fb970ac0caa9d3f55967ab01334a548f60 0edit.txt
100644 63a911f26fe84ea7fd8a863a636cfac908895ec9 0m1.txt
100644 08bb2331e777f431177c40df6841c0034f89fb58 0m2.txt
100644 e5c9ce9248c688a566f3d03be31d0097edb96443 0m3.txt
100644 995fb876a427d4042101ad139e24ac80e53b456b 0m4.txt
100644 f7d55cf9a84e9ea95e8db2b6264e5a5db85d22ad 0r1.txt
100644 9a6c8d12dea8859b821b2ba705f7efd6cc914aa5 0r2.txt
100644 b6693b64f528de38cde5533acd781fde743bc3df 0r3.txt
[luke@rmbp r]$ ls .git/rebase-merge/
done  end  git-rebase-todo  git-rebase-todo.backup  head-name  interactive  msgnum  onto  orig-head  patch  quiet  rewritten-list  stopped-sha
[luke@rmbp r]$ cat .git/rebase-merge/rewritten-list 
ec49169a68eff2e74340dc490d7ccfe98b826a9e 5ed7280a58f07911824e6366604427b4adb80a95
cb95f9dcdef1e58943dc6c5b968e5460b2fbfc76 5ed7280a58f07911824e6366604427b4adb80a95
Now we save our commit message for "r3". Here is the final results of "git rebase":

[luke@rmbp r]$ git rebase --continue
[detached HEAD f17875f] r1 amend
 2 files changed, 2 insertions(+)
 create mode 100644 edit.txt
 create mode 100644 r1.txt
[detached HEAD 5ed7280] r1 amend
 3 files changed, 3 insertions(+)
 create mode 100644 edit.txt
 create mode 100644 r1.txt
 create mode 100644 r2.txt
[detached HEAD 68d7922] r3 reword
 1 file changed, 1 insertion(+)
 create mode 100644 r3.txt
Successfully rebased and updated refs/heads/rebase.

We can see during interactive rebase, git employ "detach head" mode to store our intermediate state. 
[luke@rmbp r]$ git log --oneline 
68d7922 r3 reword
5ed7280 r1 amend
8b96b83 m4
86e1152 m3
69bd729 m2
19e4a55 m1
[luke@rmbp r]$ git branch 
  master
* rebase
And git will finally align "rebase" branch to the rebased commit.

9. orphaned branch
In general, all branches in a repository form a DAG tree. There is only one "root"node of this tree, which is the "initial" commit.  In fact, git allow you to have more than one DAG in one repository.  With separate DAGS, you have another content partition layer besides branches.  The work histories (commits) between different DAGs are separate from each other. Starting from the branch of one DAG, you can not traverse into commits in other DAG.  But DAG still can share objects, like tree/blob/tag.

To have an orphaned branch/new DAG, we do:

git checkout --orphan orphaned-branch  [start-commit]


When an orphaned branch is created, the branch is pointing to NULL.  When you issue your first commit in this branch, a root/initial commit is created with null parent.  The content of commit "C" is copied into index and work tree as starting point.  If you want a clean state for your new orphan branch, you can do "git checkout --orphan ob" without providing a start commit.

An orphaned branch might seem to be a bizarre idea, but actually it is just an exceptional case of a branch.  Here is how simple it is:
[luke@rmbp a]$ git branch
* master
[luke@rmbp a]$ cat .git/HEAD
ref: refs/heads/master
[luke@rmbp a]$ cat .git/refs/heads/master 

72da3496ef4b3a2700d57172aca1bfb331d401b3

[luke@rmbp a]$ git checkout --orphan test
Switched to a new branch 'test'
[luke@rmbp a]$ git branch
  master
[luke@rmbp a]$ cat .git/HEAD
ref: refs/heads/test
[luke@rmbp a]$ ls .git/refs/heads/test
ls: cannot access .git/refs/heads/test: No such file or directory

To create an orphan branch named "test" and switch to it, you simply need to do this in one shell command:

[luke@rmbp a]$ echo "ref: refs/heads/test"> .git/HEAD

without providing a concrete ".git/refs/heads/test" file which should have the content of a concrete commit. 

10. filter-branch
I have mentioned how to create a fully legitimate commit using low level commands like "update-index" and "commit-tree" in post "Git as I understand(2)". Actually, git provide a high level command which would help you create new commit based on existing commit. "filter-branch" will loop over a list of commits you provide (a rev-list) and used the "filter" you provide in command lines to replace existing components of a commit, then make a new commit.  "git help filter-branch" to get more information on this command.  

Here is an example to filter-branch a commit series, where all commit messages are changed.
[luke@rmbp project]$ git log
* 4222cd6 (HEAD, master) a3
* b3aecda a2
* c43bd8f a1
[luke@rmbp project]$ git filter-branch --msg-filter "echo new commit message" master
Rewrite 4222cd6167cda8845a0cf55461929ef65ce40e3c (3/3)
Ref 'refs/heads/master' was rewritten
[luke@rmbp project]$ git l
bc44655 new commit message
9f37b93 new commit message

ffc3d49 new commit message


Git as I understand (5): Remote Repository and Collaboration

$
0
0
1. namespace

Collaboration among team members means the content exchange among different Git repositories. As we have known before, all Git object are addressed via content SHA1.  Such addressing scheme for object is like a globa UUID, where it is almost certain different objects will possess different ID, and different ID implies different content.   We can even store all source codes in the Earth into one Git repository. If SHA1 can not provide strong enough address uniqueness, We can employ SHA256, SHA512 and so on.  In theory, Git does not impose any restriction on what you put into your repository, and Git does not imply how you will collaborate with other's Git repository.  Git can store  "content of the world" and synchronize with any other repositories on the world, thanks to its SHA content addressable design.  The synchronization algorithm between two git repository is quite straight forward and efficient. Basically it is a (A-B)U(B-A) set operation where A/B are all ordered list of SHA1.

For human like us, we does not address our objects via SHA1 directly. We need to partition our works into different branches and address our artifacts via branch references or tags most of the time.  Git respect the propensity of human being and will prune any objects (garbage collection) which is not reachable from any references.  This implies that it only make senses to synchronize remote objects which are reachable from remote reference, or git will prune them sooner of later.

Reference in Git is not an object. They are stored under ".git/ref".  There are no any pre defined protocols for naming your branches.  By default, every git repository has a "master" branch.  The collision is inevitable if we insists to called both branches'"master" after content synchronization among these two repositories.  Git's solution to this reference naming issue is to employ a "namespace" like formality.  For example, if we have two remote repositories "A" and "B", then their reference will be synchronized and stored under local repository  directory path ".git/refs/remotes/A/" and ".git/refs/remotes/B/". Such separation of reference namespace are local to a  repository and invisible to other repositories. Every repository is free to have its own reference naming separation scheme. After all, it is just local repository's way to map remote references.

2. transport and remote URL
Git provides several transport mechanism for inter-repository content exchange/synchronization.  There are http/https, git, ssh transport mechanism. Accordingly, We use different URLs to address remote repositories. For example:

file:///home/luke/git/project.git
https://github.com/lukeluo/cubietruck.git
ssh://git@github.com:lukeluo/cubietruck.git
git://githost.com/project.git

Besides from an URL, we need to tell git what branches in remote repository to download into local repository, and how to map remote branch name into local ".git/refs/remote/XXX" namespace. Such information is called "refspecs" in Git's terminology.  The default value for such a "refspecs" is:

fetch = +refs/heads/*:refs/remotes/origin/*

It means we will download all remote branches under "refs/heads", and remap the branch names into local "refs/remotes/origin/*". The remote tracking branches act as a "handle" when we fetch/pull contents from remote repository.  The remote repository will calculate all reachable commits from these branches tips, glean all related tree/blob from these commits, and then compute the delta with your local objects. Then only the "delta objects" will be downloaded into local repository. All remote tracking branches under "ref/remotes/origin/*" will have values equal to the snapshot values of corresponding remote branches at the download time.

Of course you can configure to only download certain branches from repository, and map the remote branches to different branches names. For example:
[remote "b"]
url = file://tmp/git/b
fetch = +refs/heads/master:refs/remotes/b/b-master
        fetch = +refs/heads/release1.0:refs/remotes/b/b-release1.0

Here we are only interested in "master" and "release1.0" remote branches, and we will map them to "b-master" and "b-release1.0" remote tracking branches in our local repository.

Git provides commands to construct remote repository configuration.  The configuration is stored under ".git/config". Here is an example:

[luke@rmbp a]$ git remote add b file://tmp/git/b
[luke@rmbp a]$ cat .git/config
[core]
repositoryformatversion = 0
filemode = true
bare = false
logallrefupdates = true
[remote "b"]
url = file://tmp/git/b
fetch = +refs/heads/*:refs/remotes/b/*
Now we can fetch/pull all branches in repository b under "refs/heads". 

[luke@rmbp git]$ git init a
Initialized empty Git repository in /tmp/git/a/.git/
[luke@rmbp git]$ git init b
Initialized empty Git repository in /tmp/git/b/.git/
[luke@rmbp git]$ cd a
[luke@rmbp a]$ git remote add b file:///tmp/git/b
[luke@rmbp a]$ git simple-commit a1 a2 a3
[master (root-commit) dc663d0] a1
 1 file changed, 1 insertion(+)
 create mode 100644 a1.txt
[master 45c5621] a2
 1 file changed, 1 insertion(+)
 create mode 100644 a2.txt
[master bd83107] a3
 1 file changed, 1 insertion(+)
 create mode 100644 a3.txt
[luke@rmbp a]$ cd ../b
[luke@rmbp b]$ git simple-commit b1 b2 b3
[master (root-commit) 928a6e8] b1
 1 file changed, 1 insertion(+)
 create mode 100644 b1.txt
[master 8327dc6] b2
 1 file changed, 1 insertion(+)
 create mode 100644 b2.txt
[master 80b43d1] b3
 1 file changed, 1 insertion(+)
 create mode 100644 b3.txt
[luke@rmbp b]$ cd ../a
[luke@rmbp a]$ git fetch b
warning: no common commits
remote: Counting objects: 9, done.
remote: Compressing objects: 100% (5/5), done.
remote: Total 9 (delta 1), reused 0 (delta 0)
Unpacking objects: 100% (9/9), done.
From file:///tmp/git/b
 * [new branch]      master     -> b/master
[luke@rmbp a]$ gitk --all

Here we have two repositories "a" and "b".  "simple-commit" is a git script borrowed from git book "git recipes", which just helps you create simple commits for demo purpose.  We then add a remote URL in "a", use the default refspec, then we fetch from repository "b". After "fetch", we can see there are now two separate DAGs in "b", one is from remote repository "b".  At this, repository knows nothing about repository "a". This magnifies an fact that Git's synchronization between repositories are not "symmetric". For one way download synchronization, you only need to configure and remote URL in  your local repository, then you fetch from remote.  No configuration is needed in remote repository. 

3. push versus fetch
The configuration for push is similar to fetch.  If I want to push my local master branch to server branch "a-master", I can do it in command line:
[luke@rmbp a]$ git push /tmp/git/server master:a-master
If I often download  certain branches from "server" and upload certain local branches to "server", I will add a configuration for "server":
[core]
repositoryformatversion = 0
filemode = true
bare = false
logallrefupdates = true
[remote "server"]
url = /tmp/git/server
fetch = +refs/heads/*:refs/remotes/server/*
push =  +refs/heads/master:refs/heads/my-master

After we know the URL, refspec, and git fetch and push commands, we can exchange contents with any remote repository. 

4. collaboration work flow

Git does not mandate you how to collaborate with others.  The possibility for collaboration work flow is almost endless in Git world.  The best paper to summarize best practice in git work flow might be:


Github has its own work flow and it is good idea to take a look:


In an Internet age,seldom people has the leisure to work alone.  Many times, we based our work on existing project, and we will share our delivery with the world.  Sooner or later, you need to extract and merge other's code into your work, and you need to share your artifacts with others.  The most import and maybe the only mechanism in Git to partition work and share delivery is "branch".  You "fetch" or "pull" other work via  "remote branches", then you merge other's work into your local branch. After you feel good about your work, you publish you local branch so others can download from. 

To help you understand the branch-based collaboration process, Git provide classification on different branches, namely:

a. local branch: this is the branch only exists in your local repository, and you checkout them and work on them; 
b. remote branch: this is the branch exists in other repository. After you know the repository URL and remote branch name, you can "fetch/pull" them into your repository;
c. remote tracking branch: After you "fetch/pull" remote branch into your local repository, git will copy these remote branches reference into ".git/refs/remotes/xxx/". These remote tracking branches/references recorded the snapshot status of remote branches and help you remember when and where you copy the remote repository. You can not checkout remote tracking branches directly and work on them, and they are only updated when you "fetch/pull" corresponding remote branches again from remote repository;
d. local tracking branch:  Since you can  not work on remote tracking branches directly,  logically, you create local branches to merge the changeset from remote tracking branches, and keep working on these local branches. To help you remember where you copy changeset from, Git can create a link between you local branch and the corresponding remote tracking branches.  In most cases, we extract change from remote tracking branch into our local branch, so for a link between local branch and remote tracking branch, we call remote tracking branch the "upstream" branch.  When a local branch is correlated with a remote tracking branch, we call this local branch as "local tracking branch". 

There are several ways to create a "local tracking branch". you can:
[luke@rmbp git]$ git clone a b
Cloning into 'b'...
done.
[luke@rmbp git]$ cd b
[luke@rmbp b]$ git b -avv
* master                41d8f87 [origin/master] a3
  remotes/origin/HEAD   -> origin/master
  remotes/origin/master 41d8f87 a3

#a.create a local branch,  using the remote tracking branch as "start point";Since you use remote tracing branch as "start point", git will assume you create a local tracking branch. The local tracking information is stored in ".git/config"
[luke@rmbp b]$ git branch lb remotes/origin/master
Branch lb set up to track remote branch master from origin.
[luke@rmbp b]$ git branch -avv
  lb                    41d8f87 [origin/master] a3
* master                41d8f87 [origin/master] a3
  remotes/origin/HEAD   -> origin/master
  remotes/origin/master 41d8f87 a3
[luke@rmbp b]$ cat .git/config
[core]
repositoryformatversion = 0
filemode = true
bare = false
logallrefupdates = true
[remote "origin"]
url = /tmp/git/a
fetch = +refs/heads/*:refs/remotes/origin/*
[branch "master"]
remote = origin
merge = refs/heads/master
[branch "lb"]
remote = origin
merge = refs/heads/master
#b.  correlate existing local branch with remote tracking branch
[luke@rmbp b]$ git branch eb master~2
[luke@rmbp b]$ git checkout eb
Switched to branch 'eb'
[luke@rmbp b]$ git branch -avv
* eb                    24dcf74 a1
  lb                    41d8f87 [origin/master] a3
  master                41d8f87 [origin/master] a3
  remotes/origin/HEAD   -> origin/master
  remotes/origin/master 41d8f87 a3
[luke@rmbp b]$ git simple-commit eb1 eb2
[eb d3ae467] eb1
 1 file changed, 1 insertion(+)
 create mode 100644 eb1.txt
[eb a055623] eb2
 1 file changed, 1 insertion(+)
 create mode 100644 eb2.txt
[luke@rmbp b]$ git branch -u remotes/origin/master eb
Branch eb set up to track remote branch master from origin.
[luke@rmbp b]$ git branch -avv
* eb                    a055623 [origin/master: ahead 2, behind 2] eb2
  lb                    41d8f87 [origin/master] a3
  master                41d8f87 [origin/master] a3
  remotes/origin/HEAD   -> origin/master
  remotes/origin/master 41d8f87 a3
[luke@rmbp b]$ git log --graph --oneline --all --decorate
* a055623 (HEAD, eb) eb2
* d3ae467 eb1
| * 41d8f87 (origin/master, origin/HEAD, master, lb) a3
| * 7509fc8 a2
|/  
* 24dcf74 a1

After a local branches is setup as "local tracing branch", git provide you some extra goodies:
a. When you list branches via "git branch -v", git will find the merge base node (nearest common ancestor commit) of your local tracking branch and corresponding remote tracking branch, and display their discrepancy with (ahead n, behind m) where "n" is local branch's commits since merge base, and "m" is remote tracking branch's commits since merge base.  Such information will remind you when you should synchronize your local branch with remote branch. 
b. "git pull"
I have deliberately  to use "git fetch" to download remote branch instead of "git pull" in previous post. If you use "git pull" to synchronize a remote tracking branch, and git realize there is a corresponding local tracking branch for this remote tracking branch, then git will try to merge updated remote tracking branch into your local tracking branch.  I prefer to do such merge myself, that is why I always use "git fetch" instead of "git pull"

5. git request-pull: a small goody

If you want your upstream to integrate your change, generally you will send a pull request. git provide a command to help you draft a pull request. Here is an example:
[luke@rmbp git]$ git request-pull master~1 file:///home/luke/work/git/git master 
The following changes since commit 7e1a5381b0048572e72971af41e13a85804d48d9:

  Merge branch 'ib/test-selectively-run' (2014-06-16 12:18:56 -0700)

are available in the git repository at:


  file:///home/luke/work/git/git master

for you to fetch changes up to cb682f8cfe63ecd0da08a526f404d295e51e3ab1:

  Third batch for 2.1 (2014-06-16 12:39:35 -0700)

----------------------------------------------------------------
Junio C Hamano (1):
      Third batch for 2.1

 Documentation/RelNotes/2.1.0.txt | 80 ++++++++++++++++++++++++++++++++++++++++++++++++++++++++++++++++++++++++++++++++
 1 file changed, 80 insertions(+)

Github use similar mechanism to facilitate code review and pull integration.

6.  Summary
After you know how to fetch and push, and you feel comfortable with different scenarios of diff and merges, then you are ready to join any development environment with Git as source control.  Git users have to tradition to "revise" history when they share their artifacts with others.  rebase, cherry-pick, revert, filter-branch are all typical commands to revise work history.  "revise" is an illusive term to depict the work flow in Git. Actually, objects in Git are immutable, we are actually making new commits based on old ones.  Such "revise" commands might seem confusing at first sight. But after you get deeper understanding on how diff/merge work and what role DAG play in git history, then these commands will become your handy tools to "revise" history. 

Git as I understand (7): Special case for merge point

$
0
0
We have cover some high level commands on previous posts, like "commit --amend", revert, cherry-pick, and rebase.  When merge commits are involved in these commands, there are some special cases we need to address.

1. commit --amend

It will use all the parent nodes of the amended commit and copies it into newly generated commit.

[luke@rmbp amend]$ git help lg
`git lg' is aliased to `log --graph --oneline --all --decorate'
[luke@rmbp amend]$ git lg
*   201ee38 (HEAD, test) Merge branch 'master' into test
|\  
| * 455d5ca (master) m3
* | e6387d0 t2
* | 209f10e t1
|/  
* 91187b8 m2
* a04e904 m1
[luke@rmbp amend]$ ls
m1.txt  m2.txt  m3.txt  t1.txt  t2.txt
[luke@rmbp amend]$ echo t3 > t3.txt
[luke@rmbp amend]$ git add t3.txt
[luke@rmbp amend]$ git commit --amend -m "amend commit"
[test e35b8d2] amend commit
[luke@rmbp amend]$ git lg
*   e35b8d2 (HEAD, test) amend commit
|\  
| * 455d5ca (master) m3
* | e6387d0 t2
* | 209f10e t1
|/  
* 91187b8 m2
* a04e904 m1

In this example, we can see both parents of the amended commits are reserved and copied into new commit. 

2. cherry-pick

When we cherry-pick an merge node, we need to specify which "leg" of this merge node we would like to "cherry-pick".  Once we have select a leg to cherry-pick, we will merge not only this node's, but also all the change this selected "leg branch" bring about.  This is different from cherry-picking a non-merge node.

[luke@rmbp cherry]$ git lg
*   b2cd1c6 (HEAD, test) Merge branch 'master' into test
|\  
| * 542e954 (master) m4
| * 08a9ce5 m3
* | 2cc279c t3
* | b506d36 t2
* | 0d91cbe t1
|/  
* 32140d6 m2
* 0bebd44 m1
[luke@rmbp cherry]$ git checkout -b cherry 0bebd44
Switched to a new branch 'cherry'
[luke@rmbp cherry]$ git l
0bebd44 m1
[luke@rmbp cherry]$ git cherry-pick -m 1 -n b2cd1c6
[luke@rmbp cherry]$ ls
m1.txt  m3.txt  m4.txt
[luke@rmbp cherry]$ git cherry-pick -m 2 -n b2cd1c6
[luke@rmbp cherry]$ ls
m1.txt  m3.txt  m4.txt  t1.txt  t2.txt  t3.txt


We first use "-m 1" to select the first leg of merge node, and then use "-m 2" to select the second leg of merge node.  the "-n" option (--no-commit) is very useful if you don't want to auto commit your cherry-pick results. This option also applies to "revert, rebase, merge" etc.  

As we can see, the "leg 1" will pick changes of both "m3" and "m4", and "leg 2" will pick changes of all "t1/t2/t3" commits.  This is very different for the case of cherry-picking a non-merge node, because the original "merge base" node (32140d6 m2) is selected as the new "base" for the cherry-pick merge algorithm. 

3. merge --squash

Luke Luo
+1
Comment count
809View count
6/22/14

Git as I understand (8): Subtree and Submodule

If you want to merge the change from another branch, but does not want to record a merge commit, you can use "merge --squash". In this case,  all changes in other branches are brought into your branch, but the newly generated commit will only have your old branch tip as parent. 
[luke@rmbp squash]$ git lg
* 8847fab (HEAD, test) t2
* 379ce29 t1
| * 05cc2a7 (master) m4
| * 2d6a9ab m3
|/  
* 00ab15c m2
* cad77a1 m1
[luke@rmbp squash]$ git branch
  master
* test
[luke@rmbp squash]$ ls
m1.txt  m2.txt  t1.txt  t2.txt
[luke@rmbp squash]$ git merge --squash master
Squash commit -- not updating HEAD
Automatic merge went well; stopped before committing as requested
[luke@rmbp squash]$ ls
m1.txt  m2.txt  m3.txt  m4.txt  t1.txt  t2.txt
[luke@rmbp squash]$ git s
## test
A  m3.txt
A  m4.txt
[luke@rmbp squash]$ git commit -m "squash merge"
[test bacdd37] squash merge
 2 files changed, 2 insertions(+)
 create mode 100644 m3.txt
 create mode 100644 m4.txt
[luke@rmbp squash]$ git lg
* bacdd37 (HEAD, test) squash merge
* 8847fab t2
* 379ce29 t1
| * 05cc2a7 (master) m4
| * 2d6a9ab m3
|/  
* 00ab15c m2
* cad77a1 m1

In this example, we merge branch "master" into "test", with "--squash" option.  We can see the newly generated commit bring about the change in "master", but it only has one parent (8847fab t2).  No merge commit is generated. 

4. revert

When we revert a merge node, we need to tell which "leg" to revert.  It is similar to "cherry-pick". 
[luke@rmbp revert]$ git lg
* e0ffaeb (HEAD, test) t3
*   f005ad7 Merge branch 'master' into test
|\  
| * 9dfc4a0 (master) m3
* | fdf8871 t2
* | 80ef713 t1
|/  
* 596b904 m2
* 7ba4971 m1
[luke@rmbp revert]$ ls
m1.txt  m2.txt  m3.txt  t1.txt  t2.txt  t3.txt

[luke@rmbp revert]$ git revert -m 1 -n f005ad7
[luke@rmbp revert]$ ls
m1.txt  m2.txt  t1.txt  t2.txt  t3.txt
[luke@rmbp revert]$ git s
## test
D  m3.txt
[luke@rmbp revert]$ git revert -m 2 -n f005ad7
[luke@rmbp revert]$ ls
m1.txt  m2.txt  t3.txt
[luke@rmbp revert]$ git s
## test
D  m3.txt
D  t1.txt
D  t2.txt
Here we revert the merge node "f005ad7".  It has two legs(parents). We revert them in two commands via "-m 1" and "-m 2".  For leg "2", not only "t2" is reverted, but also "t1" is reverted.  So when we revert a leg of a merge node, it is more like revert the whole "leg branch" but not just the direct parent commit.  That is because the original merge base node (596b904  m2) is selected as the "Remote" node in revert merge algorithm.  This is also very different from reverting a non-merged node. 

5.  rebase

In normal case, we select a linear series of commits and "graft" them into a base point. If for any reason, we did not specify a linear commit series, what would happen?  Here is an example:
Here we have two branches "master" and "test".  In test branches, m4 and m5 node in "master" are merged  and two merge nodes are created.  For reason of clarity, we create another branch "rebase", and we will try to rebase "m2..test" into branch "rebase":


[luke@rmbp rebase]$ git lg
* 0d91a5b (HEAD, rebase) r2
* af47c8a r1
| * 8cb46b3 (test) t5
| *   5ac792b Merge commit '90bc5b1' into test
| |\  
| | * 90bc5b1 (master) m5
| * | 1a5c979 t4
| * | d449a5f t3
| * |   4d954aa Merge commit 'e55270c' into test
| |\ \  
| | |/  
| | * e55270c m4
| | * 29590ee m3
| * | bb32acc t2
| * | 4e10f26 t1
| |/  
| * 7ffd4fb m2 
|/  
* 7a6a85d m1
[luke@rmbp rebase]$ git branch
  master
* rebase
  test
[luke@rmbp rebase]$ git l
0d91a5b r2
af47c8a r1
7a6a85d m1
[luke@rmbp rebase]$ git rebase --onto rebase 7ffd4fb test
First, rewinding head to replay your work on top of it...
Applying: m3
Applying: m4
Applying: m5
Applying: t1
Applying: t2
Applying: t3
Applying: t4
Applying: t5

Although there are two merge points within the commits we selected via "7ffd4fb test", git rebase will not select these merge nodes. And git also will re-generate a linear series based on  the commits it select and "graft" this new linear series into new base point.

6. patch

When we generate a patch via "git diff" or "git format-patch", and apply this patch in another repository via "git apply" or "git am", there are very big chance that this patch could not be applied cleanly to work tree to in remote repository.  The reason for this is that we generate patch against a commit, and apply it into the work tree of another commit in another repository.

"git apply/am" provide an option called "--3way", which will provides a 3 way merge as a resort if a patch can not be applied cleanly.  Let us illustrate this via an example.
[luke@rmbp patch]$ git lg
* fb588eb (HEAD, test) t2
* 64282a9 t1
| * e1a07b7 (master) m2
|/  
* ef25953 m1

[luke@rmbp patch]$ git show ef25953:m1.txt
m1
[luke@rmbp patch]$ git show e1a07b7:m1.txt
m1
m2
[luke@rmbp patch]$ git show 64282a9:m1.txt
t1
m1
[luke@rmbp patch]$ git show fb588eb:m1.txt
t1
m1
t2

We have two branches (master and test), and one single file "m1.txt".  This file is changed independently in test and master branch.   Suppose now we would like to merge the change in test branch into master branch. Instead of doing a merge, we would like to generate patch then apply them in master branch:
[luke@rmbp patch]$ git show-branch -a
! [master] m2
 * [test] t2
--
 * [test] t2
 * [test^] t1
+  [master] m2
+* [test~2] m1
[luke@rmbp patch]$ git format-patch master..test
0001-t1.patch
0002-t2.patch
Here we generate a patch series, which includes all the change in test branch but not in master branch. 
[luke@rmbp patch]$ cat 0001-t1.patch 
From 64282a91b4940e03ed8bbc83d02bf17f85ff7694 Mon Sep 17 00:00:00 2001
From: Luke Luo <luke.jf.luo@gmail.com>
Date: Sat, 14 Jun 2014 17:15:39 +0800
Subject: [PATCH 1/2] t1

---
 m1.txt | 1 +
 1 file changed, 1 insertion(+)

diff --git a/m1.txt b/m1.txt
index 63a911f..c682859 100644
--- a/m1.txt
+++ b/m1.txt
@@ -1 +1,2 @@
+t1
 m1
-- 
2.0.0.rc4.dirty

[luke@rmbp patch]$ git ls-tree master^1
100644 blob 63a911f26fe84ea7fd8a863a636cfac908895ec9m1.txt
[luke@rmbp patch]$ git ls-tree test^1
100644 blob c682859ff109a4a2f5e72f0d229848efec3c6b9am1.txt
[luke@rmbp patch]$ cat 0002-t2.patch 
From fb588ebafc406993cbebbfdd24fe8cc005b0b9d2 Mon Sep 17 00:00:00 2001
From: Luke Luo <luke.jf.luo@gmail.com>
Date: Sat, 14 Jun 2014 17:49:51 +0800
Subject: [PATCH 2/2] t2

---
 m1.txt | 1 +
 1 file changed, 1 insertion(+)

diff --git a/m1.txt b/m1.txt
index c682859..72150d7 100644
--- a/m1.txt
+++ b/m1.txt
@@ -1,2 +1,3 @@
 t1
 m1
+t2
-- 
2.0.0.rc4.dirty

[luke@rmbp patch]$ git ls-tree test^1 
100644 blob c682859ff109a4a2f5e72f0d229848efec3c6b9am1.txt
[luke@rmbp patch]$ git ls-tree test
100644 blob 72150d7843a00900ebe7be11c7537eb16d74efdfm1.txt

From the output of patch file, we can see the first patch is the diff from "m1-->t1" and the second patch is diff from "t1-->t2".  The patch generated by git include the SHA1 of two blobs being diffed.  If we apply the first patch to "m1", then everything should just work:
[luke@rmbp patch]$ ls
0001-t1.patch  0002-t2.patch  m1.txt
[luke@rmbp patch]$ git checkout master^1
Note: checking out 'master^1'.

You are in 'detached HEAD' state. You can look around, make experimental
changes and commit them, and you can discard any commits you make in this
state without impacting any branches by performing another checkout.

If you want to create a new branch to retain commits you create, you may
do so (now or later) by using -b with the checkout command again. Example:

  git checkout -b new_branch_name

HEAD is now at ef25953... m1
[luke@rmbp patch]$ git l
ef25953 m1
[luke@rmbp patch]$ ls
0001-t1.patch  0002-t2.patch  m1.txt
[luke@rmbp patch]$ git am 0001-t1.patch
Applying: t1
[luke@rmbp patch]$ git l
09e4e74 t1
ef25953 m1
[luke@rmbp patch]$ git am 0002-t2.patch
Applying: t2
[luke@rmbp patch]$ git l
3350381 t2
09e4e74 t1
ef25953 m1

Unfortunately,  master branch's HEAD is now m2.  Let us try apply these patches into m2:

[luke@rmbp patch]$ git checkout master
[luke@rmbp patch]$ ls
0001-t1.patch  0002-t2.patch  m1.txt
[luke@rmbp patch]$ cat m1.txt
m1
m2
[luke@rmbp patch]$ git am 0001-t1.patch
Applying: t1
[luke@rmbp patch]$ git am 0002-t2.patch
Applying: t2
error: patch failed: m1.txt:1
error: m1.txt: patch does not apply
Patch failed at 0001 t2
The copy of the patch that failed is found in:
   /tmp/git/patch/.git/rebase-apply/patch
When you have resolved this problem, run "git am --continue".
If you prefer to skip this patch, run "git am --skip" instead.
To restore the original branch and stop patching, run "git am --abort".

Here we can see patch 1 is applied successfully by chance, but patch 2 could not be applied cleanly. The reason is, the second patch is diff between "t1" and "t2", but we are applying it to a work tree which encompass the change of "m1/m2/t1".  git simply reject to apply this patch. We can verify this as follows:
[luke@rmbp patch]$ git l
14aef43 t1
e1a07b7 m2
ef25953 m1
[luke@rmbp patch]$ cat m1.txt 
t1
m1
m2
[luke@rmbp patch]$ cat 0002-t2.patch 
From fb588ebafc406993cbebbfdd24fe8cc005b0b9d2 Mon Sep 17 00:00:00 2001
From: Luke Luo <luke.jf.luo@gmail.com>
Date: Sat, 14 Jun 2014 17:49:51 +0800
Subject: [PATCH 2/2] t2

---
 m1.txt | 1 +
 1 file changed, 1 insertion(+)

diff --git a/m1.txt b/m1.txt
index c682859..72150d7 100644
--- a/m1.txt
+++ b/m1.txt
@@ -1,2 +1,3 @@
 t1
 m1
+t2
-- 
2.0.0.rc4.dirty

Instead of a simple rejection by git, we can try a more constructive "3 way" merge to try to consolidate the discrepancy introduced by the second patch.  At current stage, we have three related commit node:

t1:  the node this patch is diffed against
t2:  the node this patch is diffed onto
new t1: the node we try to apply this patch. 

This is a typical 3 way merge scenario, as depicted in next picture:
Thanks to the extra information carried by git patch (index c682859..72150d7 100644), we can ask git to do a 3 way merge for us when patch could not be applied cleanly.  Even if conflict still exists, we can have a more sensible context to decide how to continue the patch process:
[luke@rmbp patch]$ git am --abort
[luke@rmbp patch]$ git am --3way 0002-t2.patch
Applying: t2
Using index info to reconstruct a base tree...
Mm1.txt
Falling back to patching base and 3-way merge...
Auto-merging m1.txt
CONFLICT (content): Merge conflict in m1.txt
Failed to merge in the changes.
Patch failed at 0001 t2
The copy of the patch that failed is found in:
   /tmp/git/patch/.git/rebase-apply/patch
When you have resolved this problem, run "git am --continue".
If you prefer to skip this patch, run "git am --skip" instead.
To restore the original branch and stop patching, run "git am --abort".
[luke@rmbp patch]$ cat m1.txt 
t1
m1
<<<<<<< HEAD
m2
=======
t2
>>>>>>> t2
[luke@rmbp patch]$ vi m1.txt
[luke@rmbp patch]$ git s
## master
UU m1.txt
?? 0001-t1.patch
?? 0002-t2.patch
[luke@rmbp patch]$ git add m1.txt
[luke@rmbp patch]$ git s
## master
M  m1.txt
?? 0001-t1.patch
?? 0002-t2.patch
[luke@rmbp patch]$ git am --continue
Applying: t2
[luke@rmbp patch]$ git l
adea20c t2
14aef43 t1
e1a07b7 m2

ef25953 m1
After we resolve the conflict, we can continue to apply the patch successfully. 

Git as I understand (6): Search

$
0
0
If you are working in a big open source project, like Linux kernel, you definitely need some search capability to get what you want. Even if you are doing some very small project, every once in a while, you forget where and when you make some change, you also need efficient way to find out where you are.

1. branch and tag

Within a repository, in the highest level, git organize artifacts via branch.  Release points are only marked via "tag" and bug fix will happen on specific release branch. It is always a good idea to get a bird eye's view for a git repository before you dive into detail.  Use Linux Kernel tree as an example:
[luke@rmbp linux]$ git branch -avv
* master                        1860e37 [origin/master] Linux 3.15
  remotes/origin/HEAD           -> origin/master
  remotes/origin/linux-2.6.11.y 8e63197 Linux 2.6.11.12
  remotes/origin/linux-2.6.12.y d04a379 Linux 2.6.12.6
  remotes/origin/linux-2.6.13.y 816e9c6 Linux 2.6.13.5
  remotes/origin/linux-2.6.14.y 789f444 Linux 2.6.14.7
.....................
  remotes/origin/linux-2.6.38.y 4b7a6d2 Linux 2.6.38.8
  remotes/origin/linux-2.6.39.y ea0dc0d Linux 2.6.39.4
  remotes/origin/linux-3.0.y    5dba9dd Linux 3.0.101
  remotes/origin/linux-3.1.y    9bb1282 Linux 3.1.10
  remotes/origin/linux-3.10.y   c2f7eb8 Linux 3.10.42
  remotes/origin/linux-3.11.y   5ee54f3 Linux 3.11.10
  remotes/origin/linux-3.12.y   80e7980 Linux 3.12.21
  remotes/origin/linux-3.13.y   2d20120 Linux 3.13.11
.................
  remotes/origin/master         1860e37 Linux 3.15

Here we can see linux will have separate branch for a specific release.  We can also specify a pattern to limit the branch output:

[luke@rmbp linux]$ git branch --list -avv  *3.1*
  remotes/origin/linux-3.1.y  9bb1282 Linux 3.1.10
  remotes/origin/linux-3.10.y c2f7eb8 Linux 3.10.42
  remotes/origin/linux-3.11.y 5ee54f3 Linux 3.11.10
  remotes/origin/linux-3.12.y 80e7980 Linux 3.12.21
  remotes/origin/linux-3.13.y 2d20120 Linux 3.13.11
  remotes/origin/linux-3.14.y a1bc295 Linux 3.14.6
  remotes/origin/linux-3.15.y 1860e37 Linux 3.15

Linux use "tag" to mark release. Here is all the tags:
[luke@rmbp linux]$ git tag --list
latest
v2.6.11
v2.6.11-tree
v2.6.12
v2.6.12-rc2
v2.6.12-rc3
v2.6.12-rc4
.......

We can also limit the tag list output with a "pattern":

[luke@rmbp linux]$ git tag --list v3.14.?
v3.14.1
v3.14.2
v3.14.3
v3.14.4
v3.14.5
v3.14.6
The linux kernel employs version format of "version-patch level-subpatch level-correction-extraversion".  For example, 

v2.6.17-rc6:  version 2  patch level 6  subpatch level 17  extraversion rc6


v2.6.17.10:    version 2  patch level 6  subpatch level 17  correction 10

For a specific commit/tag, we can ask git to list all branches which contains this commit/tag:
[luke@rmbp linux]$ git branch  -avv --contains v3.8.9
  remotes/origin/linux-3.8.y dbf932a Linux 3.8.13
[luke@rmbp linux]$ git branch  -avv --contains v3.8
* master                      1860e37 [origin/master] Linux 3.15
  remotes/origin/HEAD         -> origin/master
  remotes/origin/linux-3.10.y 8537711 Linux 3.10.43
  remotes/origin/linux-3.11.y 5ee54f3 Linux 3.11.10
  remotes/origin/linux-3.12.y fe7b290 Linux 3.12.22
  remotes/origin/linux-3.13.y 2d20120 Linux 3.13.11
  remotes/origin/linux-3.14.y fce5b5f Linux 3.14.7
  remotes/origin/linux-3.15.y 1860e37 Linux 3.15
  remotes/origin/linux-3.8.y  dbf932a Linux 3.8.13
  remotes/origin/linux-3.9.y  896f500 Linux 3.9.11
  remotes/origin/master       1860e37 Linux 3.15
[luke@rmbp linux]$ git branch  -avv --contains v3.8.9
  remotes/origin/linux-3.8.y dbf932a Linux 3.8.13

From the output, we can see the major linux kernel version like v3.8/v3.9 are tagged  on master branch, while minor bug fix version like v3.8.9 are only tagged on specific release branch. 
We can glean the time stamp information for all the tags, so we can draw a high level picture of Linux Kernel release schedule:
[luke@rmbp linux]$ git tag --list v3.1[34]-rc* > tags
[luke@rmbp linux]$ vi tags
[luke@rmbp linux]$ cat tags
v3.12
v3.13-rc1
v3.13-rc2
v3.13-rc3
v3.13-rc4
v3.13-rc5
v3.13-rc6
v3.13-rc7
v3.13-rc8
v3.13
v3.14-rc1
v3.14-rc2
v3.14-rc3
v3.14-rc4
v3.14-rc5
v3.14-rc6
v3.14-rc7
v3.14-rc8
v3.14
v3.15-rc1
[luke@rmbp linux]$ cat tags | xargs git show --pretty=medium --date=iso | grep ^tag -a3 | grep ^Date | cut -d '' -f 4
2013-11-03  (v3.12)
2013-11-22  (v3.13-rc1)
2013-11-29
2013-12-06
2013-12-15
2013-12-22
2013-12-29
2014-01-04
2014-01-12
2014-01-19 (v3.13)
2014-02-02 (v3.14-rc1)
2014-02-09
2014-02-16
2014-02-23
2014-03-02
2014-03-09
2014-03-16
2014-03-24
2014-03-30 (v3.14)
2014-04-13  (v3.15-rc1)

From the above information, we can say:
a. For every major linux release, there are about 8 rc version, every rc will last about one week;
b. between a major version release and next version's first rc release is called a "merge window". During this period, Linus Torvalds will pull staged commits from his "lieutenants" into master branch and form the first rc version.  After the first rc, no major new features will be merged in principle, only bug fixes will be adopted. 
c. a major kernel version  release will occupy about 10 weeks period; 
d. After a linux major version is released, a new release branch will be created, like "linux-3.14.y". All bug fixes for this version should come into this branch. 

Git provides a so called "history simplification" in "git log/rev-list/" and "gitk" to help us gain a summary view on project history.  Use the Linux Kernel project for example again:
[luke@rmbp linux]$ gitk -all --simplify-by-decoration -n 40

2. file grep
Just like normal unix command "grep", git provides "git grep" to search text pattern in text files. The text file could reside in work tree, index tree, or committed tree object. 
[luke@rmbp linux]$ git grep -i "mac book" v3.15 -- Documentation
v3.15:Documentation/sound/alsa/HD-Audio-Models.txt:  macbook    Intel Mac Book (eq. type 5)
v3.15:Documentation/sound/alsa/HD-Audio-Models.txt:  macbook-pro-v1 Intel Mac Book Pro 1st generation (eq. type 3)
v3.15:Documentation/sound/alsa/HD-Audio-Models.txt:  macbook-pro        Intel Mac Book Pro 2nd generation (eq. type 3)
In the above example, I search for files under "v3.15" which has the pattern "mac book" (case ignored). Only file under path "Documentation/" will be listed. 

3.  Search for commits

Per git's design, commits are always organized via branch, or in a more general sense, via "reference".  When we want to search for commits, we first need to identify in which branch/branches to search for commit.  A branch is git is actually two thing:
a. A reference to a commit, implied as the branch tip;
b. a commit set which is reachable in commit DAG from the reference(branch tip)

Git provide "git rev-list" to help you get the commits set associated with a branch.  You can provide several branch tips to "git rev-list", and it will merge all the commits to form a "super" commit set.  In "git log" , you can also use "--branches=[glob]/--tags=[glob]/--remotes=[glob]" to select local branches, tags, or remote branches. For example:
[luke@rmbp patchid]$ git lg
* 660218f (middle) k3
* ed5e5b4 k2
* 28b3682 k1
| * 5928e12 (left) l3
| * 89e4290 l2
| * e0c5392 l1
|/  
| * edc7654 (right) r3
| * 0e2ca07 r2
| * cdf1d1f r1
|/  
* 9be22c6 (HEAD, master) m2
* 875d734 m1
[luke@rmbp patchid]$ git l --branches=l*
5928e12 l3
89e4290 l2
e0c5392 l1
9be22c6 m2
875d734 m1
[luke@rmbp patchid]$ git l --branches=m*
660218f k3
ed5e5b4 k2
28b3682 k1
9be22c6 m2
875d734 m1
[luke@rmbp patchid]$ git l --branches=r*
edc7654 r3
0e2ca07 r2
cdf1d1f r1
9be22c6 m2
875d734 m1

More interestingly, "gir rev-list" allows you to do set operation on the identified commit sets, and output the set operation result as final super commit set.  For example, if we have branch tip b1.....bn, here are some typical set operation:

Union:
git rev-list  b1 b2 b3   (b1 ∪ b2 ∪ b3  or b1+b2+b3)

Complement:
git rev-list b1 ^b2  (b1\b2  or b1  b2)
git rev-list  b2..b1

Symmetric Difference:
git rev-list  b1...b2  (  (b1  b2)   (b2 - b1) )

Git does not provide direct support for "Intersect" set operation.  If definitely necessary, you can derive "intersect" operation via the help from "git merge-base --all":

Intersect:

git rev-list  $(git merge-base --all b1 b2)   (b1 ∩ b2)

After the "super set of commits" are identified, git rev-list allow you to further filters this commit sets based on the meta data of commit objects.   Commit object has many meta data, like author, committer, date, commit message, etc. We can use these meta-info to limit the output of commit search.   Since git log relies on "git rev-list", we will use "git log" to show the commit filter options in "rev-list":

a. author
[luke@rmbp linux]$ git log  --author="linus t*" -i | grep ^Author
Author: Linus Torvalds <torvalds@linux-foundation.org>
.................. 
b. committer
[luke@rmbp linux]$ git log  --committer="Nicholas Bellinger" --format=full | grep ^Commit
Commit: Nicholas Bellinger <nab@linux-iscsi.org>

c. date
we can limit the log output via commit date:
[luke@rmbp linux]$ git log --format=fuller  --since=2014-06-05 --until=2014-06-07 --date=iso | grep -E '^CommitDate'
CommitDate: 2014-06-06 13:21:16 -0700
CommitDate: 2014-06-06 12:00:46 -0700
CommitDate: 2014-06-06 09:53:32 -0700
CommitDate: 2014-06-06 08:53:41 -0700
CommitDate: 2014-06-06 01:22:41 -07007040b6d1febfdbd9c1595efb751d492cd2503f96
CommitDate: 2014-06-06 01:21:12 -0700
CommitDate: 2014-06-05 13:09:44 -0700
CommitDate: 2014-06-05 12:51:05 -0700
CommitDate: 2014-06-05 12:31:32 -0700
CommitDate: 2014-06-05 12:31:07 -0700
CommitDate: 2014-06-05 16:33:08 +0200
CommitDate: 2014-06-05 16:33:07 +0200

The date range is [since,until), a semi open semi close set.

d. commit message
[luke@rmbp linux]$ git log -i --grep="macbook pro" | grep -i "macbook pro" --color
    This resulted in macbook pro's no longer finding the rom images, and
      ata_piix: only enable the first port on apple macbook pro
    ata_piix: only enable the first port on apple macbook pro
    ICH8M on apple macbook pro occasionally locks up completely during PCS
    As macbook/macbook pro's also have to live with a single mouse button the
      USB HID: handle multi-interface devices for Apple macbook pro properly
    USB HID: handle multi-interface devices for Apple macbook pro properly

"--grep" will grep the commit message and limit the commit output which match this grep pattern.

e. parent commits
"--merges/--min-parent=2" will select merge commit, "--no-merges/--max-parent=1" will select non-merge commits.

f.  special filer options for "symmetric difference"

When we provide a "A...B" range to rev-list/rev-log, there are special options to select "left/right" sides commits.  Here "A" is considered left-side set, "B" is considered "right-side" set. For example:

[luke@rmbp patchid]$ git lg
* 5928e12 (left) l3
* 89e4290 l2
* e0c5392 l1
| * edc7654 (HEAD, right) r3
| * 0e2ca07 r2
| * cdf1d1f r1
|/  
* 9be22c6 (master) m2
* 875d734 m1
[luke@rmbp patchid]$ git rev-list --left-right left...right
<5928e122c9526222b95f9f4d3f52c7b834cc51dc
>edc765446270655cb97a79422e38c7363eeac4f0
<89e4290979ea0bfb390fe703b9a76ff8020f7b93
<e0c539244ad6635e0ec8036b86946b7de6d6bdcf
>0e2ca071fdebe29d207cf9908c10bff92592eb9b
>cdf1d1f049b5488dcd9a9c790eb57d8a9a9ba7a9
Here "<" marks the commits on left-side, ">" marks the commits on right-side.
[luke@rmbp patchid]$ git rev-list --left-only --left-right left...right
<5928e122c9526222b95f9f4d3f52c7b834cc51dc
<89e4290979ea0bfb390fe703b9a76ff8020f7b93
<e0c539244ad6635e0ec8036b86946b7de6d6bdcf
Here only "left-side" commits are displayed.

Git can compare the "patch SHA1 id" ( refert to "git help patch-id") of commits in left and right sides.  Git can mark such a pair of commits with identical patch id via "--cherry-mark" option:
[luke@rmbp patchid]$ git rev-list --cherry-mark  --left-right left...right
=5928e122c9526222b95f9f4d3f52c7b834cc51dc
=edc765446270655cb97a79422e38c7363eeac4f0
<89e4290979ea0bfb390fe703b9a76ff8020f7b93
<e0c539244ad6635e0ec8036b86946b7de6d6bdcf
>0e2ca071fdebe29d207cf9908c10bff92592eb9b
>cdf1d1f049b5488dcd9a9c790eb57d8a9a9ba7a9

Here commit "5928e" and "edc76" has identical patch id, so they are marked with "=".  You can also skipped such commits via option "--cherry-pick":
[luke@rmbp patchid]$ git rev-list --cherry-pick  --left-right left...right
<89e4290979ea0bfb390fe703b9a76ff8020f7b93
<e0c539244ad6635e0ec8036b86946b7de6d6bdcf
>0e2ca071fdebe29d207cf9908c10bff92592eb9b
>cdf1d1f049b5488dcd9a9c790eb57d8a9a9ba7a9
We can see two commits are excluded from output. 
Under many circumstances, left side is the upstream branch, right side is your feature branch. When you want to find out what commits have been merged/applied into upstream branch already, you can use "--cherry" option. It is equal to options "--right-only --cherry-mark --no-merges". 
[luke@rmbp patchid]$ git rev-list --cherry  left...right
=edc765446270655cb97a79422e38c7363eeac4f0
+0e2ca071fdebe29d207cf9908c10bff92592eb9b
+cdf1d1f049b5488dcd9a9c790eb57d8a9a9ba7a9


4.  search for commit based on diff content

This still searches for commit. Since it is so important, I listed it under a separate title. 

Every commit normally introduces a change. And such changes are embedded in the diff between parent commit and this commit.  This is why a commit is often called a changeset.  Because the diff is based on text lines, we can search/grep the diff text and find out corresponding commits. Here is an example:
[luke@rmbp diffsearch]$ git l
84a8e2c initial commit
[luke@rmbp diffsearch]$ ls
hello.txt
[luke@rmbp diffsearch]$ cat hello.txt 
hello
world
apple
orange
Now we introduce some change into hello.txt, and search the diff:
[luke@rmbp diffsearch]$ cat hello.txt
world
apple
orange tastes good
alice in the wonder land
hello
[luke@rmbp diffsearch]$ git diff
diff --git a/hello.txt b/hello.txt
index 2c4a39a..d86b158 100644
--- a/hello.txt
+++ b/hello.txt
@@ -1,4 +1,5 @@
-hello
 world
 apple
-orange
-orange+orange tastes good
+alice in the wonder land
+hello
[luke@rmbp diffsearch]$ git commit -am "diff commit"
[master 125d730] diff commit
 1 file changed, 3 insertions(+), 2 deletions(-)
[luke@rmbp diffsearch]$ git log --oneline
125d730 diff commit
84a8e2c initial commit

Please be reminded that in the diff output, there are some context lines like "world", "apple".  When we search for diff, we only search for the actually delta, but not within the "context lines".  The most simple search on diff is based on a path name.  In diff content, if a path/file is recorded, then this commit is selected. For example:
[luke@rmbp patchid]$ git log -- r1.txt
commit cdf1d1f049b5488dcd9a9c790eb57d8a9a9ba7a9
Author: Luke Luo <luke.jf.luo@gmail.com>
Date:   Mon Jun 23 13:40:44 2014 +0800

    r1
[luke@rmbp patchid]$ git show cdf1d1f049b5488dcd9a9c790eb57d8a9a9ba7a9
commit cdf1d1f049b5488dcd9a9c790eb57d8a9a9ba7a9
Author: Luke Luo <luke.jf.luo@gmail.com>
Date:   Mon Jun 23 13:40:44 2014 +0800

    r1

diff --git a/r1.txt b/r1.txt
new file mode 100644
index 0000000..f7d55cf
--- /dev/null
+++ b/r1.txt
@@ -0,0 +1 @@
+r1

Here we search for commits which change the file/path "r1.txt".  Since the commit touch "r1.txt"(add r1.txt into repository) so it is selected.  

There are another two advanced ways to search for commits based on  diffs:

a. pickaxe

This is done via the "git log " with options "-S" or "-G".

For "-S", we specify a literal string, and search for commit's diffs. For one commit, it might have diff lines which contain this "literal string".  For all "delete" diff lines ("-"), we sum the times of appearance of this literal strings as "d"; For all "add" diff lines ("+"), we also sum the times of appearance of this literal strings as "a".  If "a-d" (a minus d) is not zero, then we can conclude that the number of literal string instances varied before and after this commit. That means, we use "-S" options to search for commits where "literal string" is added or deleted, but not the commits where "literal string" is only moved within the text.
[luke@rmbp diffsearch]$ git log -S "hello" -p 
commit 84a8e2c4b82351a347aa0fbc273bcb5bec5dbe39
Author: Luke Luo <luke.jf.luo@gmail.com>
Date:   Mon Jun 16 10:59:01 2014 +0800

    initial commit

diff --git a/hello.txt b/hello.txt
new file mode 100644
index 0000000..2c4a39a
--- /dev/null
+++ b/hello.txt
@@ -0,0 +1,4 @@
+hello
+world
+apple
+orange


In this example, we search for literal string "hello". We only find the "initial commit" where we add "hello". For commit "diff commit", since it delete one instance of "hello" and add another instance of "hello" in another line, the net effect is a movement of "hello" within file, so "diff commit" is not selected in "git log -S hello" output.
If we add "--pickaxe-regex" option, then "-S xxx" will be treated as search for an regular expression.
[luke@rmbp diffsearch]$ git log -S "hell?" -p --pickaxe-regex
commit 84a8e2c4b82351a347aa0fbc273bcb5bec5dbe39
Author: Luke Luo <luke.jf.luo@gmail.com>
Date:   Mon Jun 16 10:59:01 2014 +0800

    initial commit

diff --git a/hello.txt b/hello.txt
new file mode 100644
index 0000000..2c4a39a
--- /dev/null
+++ b/hello.txt
@@ -0,0 +1,4 @@
+hello
+world
+apple
+orange

Although we are searching for a regular expression, the search algorithm is still the same as before, so only "initial commit" is selected for log output. 

For options "-G", it will search for an regular expression. But different from "-S", "-G" will "grep" all the diff (add or delete) lines, whenever there is a reg match, it will select this commit as output. So "-G" will select the "move" case in additions to "add" and "delete" cases.
[luke@rmbp diffsearch]$ git log -G "hell?" -p 
commit 125d7308f62e8516093cac83d83e1c42363fa618
Author: Luke Luo <luke.jf.luo@gmail.com>
Date:   Mon Jun 16 11:02:39 2014 +0800

    diff commit

diff --git a/hello.txt b/hello.txt
index 2c4a39a..d86b158 100644
--- a/hello.txt
+++ b/hello.txt
@@ -1,4 +1,5 @@
-hello
 world
 apple
-orange
+orange tastes good
+alice in the wonder land
+hello

commit 84a8e2c4b82351a347aa0fbc273bcb5bec5dbe39
Author: Luke Luo <luke.jf.luo@gmail.com>
Date:   Mon Jun 16 10:59:01 2014 +0800

    initial commit

diff --git a/hello.txt b/hello.txt
new file mode 100644
index 0000000..2c4a39a
--- /dev/null
+++ b/hello.txt
@@ -0,0 +1,4 @@
+hello
+world
+apple
+orange


    initial commit
In this case with "-G", both "initial commit" and "diff commit" are selected for output. 

b. blame

Once in a while, you will stare at some lines of a specific file, and wonders why these lines come into being as current status. The reason you have interest in these lines might be they introduce bugs or new feature, or they work just well, but without enough comments to illustrate how they work. For such scenario, git provides a command "blame". With the help from blame, you can find out in which commit each line is last edited.   For us to see this line in this file, the last "edit" must be "add"(+) instead of "delete"(-) or we just can see this line.  So I think the algorithm for blame is:

.  for each line in file:
       . find in the diff of current commit, and only in "add"(+) part;
       . If not found, find it in parent commit diff, until it is found
       . record the found commit with this line in the "blame" output

Here is an example.
[luke@rmbp blame]$ git l
d76ddb9 m4
bf0599d m3
4991d56 m2
0a17a1e m1
[luke@rmbp blame]$ cat blame.txt 
a
b
c
d
[luke@rmbp blame]$ git blame blame.txt
^0a17a1e (Luke Luo 2014-06-16 22:44:45 +0800 1) a
4991d567 (Luke Luo 2014-06-16 22:44:57 +0800 2) b
bf0599d2 (Luke Luo 2014-06-16 22:45:08 +0800 3) c
d76ddb98 (Luke Luo 2014-06-16 22:45:24 +0800 4) d

In this example, we add a line each time in each commit. To verify git really find out the commit where a line is edited, we delete "a" from file, commit it, then add "a" into file again, then commit. We will blame this file again to see if "a" is bound with the last commit:
[luke@rmbp blame]$ vi blame.txt 
[luke@rmbp blame]$ cat blame.txt 
b
c
d
[luke@rmbp blame]$ git commit -am "m5"
[master 2c61ee6] m5
 1 file changed, 1 deletion(-)
[luke@rmbp blame]$ vi blame.txt 
[luke@rmbp blame]$ cat blame.txt 
a
b
c
d
[luke@rmbp blame]$ git commit -am "m6"
[master d87a09a] m6
 1 file changed, 1 insertion(+)
[luke@rmbp blame]$ git l
d87a09a m6
2c61ee6 m5
d76ddb9 m4
bf0599d m3
4991d56 m2
0a17a1e m1
[luke@rmbp blame]$ git blame blame.txt
d87a09ab (Luke Luo 2014-06-16 22:51:19 +0800 1) a
4991d567 (Luke Luo 2014-06-16 22:44:57 +0800 2) b
bf0599d2 (Luke Luo 2014-06-16 22:45:08 +0800 3) c
d76ddb98 (Luke Luo 2014-06-16 22:45:24 +0800 4) d

We can see git did find out the last commit(m6)  where line "a" is added into file. 

c. reverse blame

by default, blame find out the commit where a line is lastly added. You use it to find out why a line "appears".  blame also provide a search way called "reverse", where you use it to find out why a line in original file "disappear".  We give git a starting point, git will use the lines in this start snapshot. It will traverse forward via the branch, and check the "delete"(-) content of diff. If a diff thunk contains a delete for a line, it will mark its parent commit. This parent commit will be the commit where this line last exists. After this commit, it will disappear. 

Here is an example. We have a blame.txt will line "a/b/c/d/e" in original state. In following commit, we will delete a line per commit, until the blame.txt is empty. Then we will add line "a" again in next commit, then delete line "/a" again in another commit, then delete line "/a" again yet in another commit:

[luke@rmbp blame]$ git log --oneline
894f984 m8
9f49277 m7
2a84f46 m6
a95b8da m5
bafa147 m4
506a364 m3
314a3c6 m2
805836b m1
[luke@rmbp blame]$ git rev-list master
894f9844872abdfab6dd5d428f7744916cde679c
9f492775826c9051c69ee75552e976b52775f22b
2a84f468c5cdabeee736dd83818701ac36b9982c
a95b8daa1eed2e097a8f3a8e7575ef8eca172a24
bafa1476f1c3e99859415f5943f5d467f1409b44
506a364117e00894b1e8692e4b48f22c1d934050
314a3c6ed8c8190d22677cfcdf6b65d37657f6cb
805836b160b1817b4883faa36d9e5aa24fc94c9c
[luke@rmbp blame]$ git rev-list master | xargs git log -p 
commit 894f9844872abdfab6dd5d428f7744916cde679c
Author: Luke Luo <luke.jf.luo@gmail.com>
Date:   Tue Jun 17 09:13:28 2014 +0800

    m8

diff --git a/blame.txt b/blame.txt
index 7898192..e69de29 100644
--- a/blame.txt
+++ b/blame.txt
@@ -1 +0,0 @@
-a

commit 9f492775826c9051c69ee75552e976b52775f22b
Author: Luke Luo <luke.jf.luo@gmail.com>
Date:   Tue Jun 17 09:13:14 2014 +0800

    m7

diff --git a/blame.txt b/blame.txt
index e69de29..7898192 100644
--- a/blame.txt
+++ b/blame.txt
@@ -0,0 +1 @@
+a

commit 2a84f468c5cdabeee736dd83818701ac36b9982c
Author: Luke Luo <luke.jf.luo@gmail.com>
Date:   Tue Jun 17 08:57:28 2014 +0800

    m6

diff --git a/blame.txt b/blame.txt
index d905d9d..e69de29 100644
--- a/blame.txt
+++ b/blame.txt
@@ -1 +0,0 @@
-e

commit a95b8daa1eed2e097a8f3a8e7575ef8eca172a24
Author: Luke Luo <luke.jf.luo@gmail.com>
Date:   Tue Jun 17 08:57:19 2014 +0800

    m5

diff --git a/blame.txt b/blame.txt
index 5ded0a3..d905d9d 100644
--- a/blame.txt
+++ b/blame.txt
@@ -1,2 +1 @@
-d
 e

commit bafa1476f1c3e99859415f5943f5d467f1409b44
Author: Luke Luo <luke.jf.luo@gmail.com>
Date:   Tue Jun 17 08:57:06 2014 +0800

    m4

diff --git a/blame.txt b/blame.txt
index df3846e..5ded0a3 100644
--- a/blame.txt
+++ b/blame.txt
@@ -1,3 +1,2 @@
-c
 d
 e

commit 506a364117e00894b1e8692e4b48f22c1d934050
Author: Luke Luo <luke.jf.luo@gmail.com>
Date:   Tue Jun 17 08:56:55 2014 +0800

    m3

diff --git a/blame.txt b/blame.txt
index c677cc0..df3846e 100644
--- a/blame.txt
+++ b/blame.txt
@@ -1,4 +1,3 @@
-b
 c
 d
 e

commit 314a3c6ed8c8190d22677cfcdf6b65d37657f6cb
Author: Luke Luo <luke.jf.luo@gmail.com>
Date:   Tue Jun 17 08:56:47 2014 +0800

    m2

diff --git a/blame.txt b/blame.txt
index 9405325..c677cc0 100644
--- a/blame.txt
+++ b/blame.txt
@@ -1,4 +1,3 @@
-a
 b
 c
 d

commit 805836b160b1817b4883faa36d9e5aa24fc94c9c
Author: Luke Luo <luke.jf.luo@gmail.com>
Date:   Tue Jun 17 08:56:31 2014 +0800

    m1

diff --git a/blame.txt b/blame.txt
new file mode 100644
index 0000000..9405325
--- /dev/null
+++ b/blame.txt
@@ -0,0 +1,5 @@
+a
+b
+c
+d
+e
[luke@rmbp blame]$ git blame --reverse master~7..master -- blame.txt
^805836b (Luke Luo 2014-06-17 08:56:31 +0800 1) a
314a3c6e (Luke Luo 2014-06-17 08:56:47 +0800 2) b
506a3641 (Luke Luo 2014-06-17 08:56:55 +0800 3) c
bafa1476 (Luke Luo 2014-06-17 08:57:06 +0800 4) d
a95b8daa (Luke Luo 2014-06-17 08:57:19 +0800 5) e

As we can see from the example above, git use the lines in  <start> commit (805836b). Then for line "a", it  find out the first commit where "a" exists but disappear in next commit. Although "a" appears in commit m7 and disappears in commit m8 again, git only find out commit m1/m2 where line "a" appears and disappears.  So we can see "git blame --reverse" only mark the first commit where a line has the first "appears/disappears" toggle state. 

Semantically, "git blame" find out the commit where a line first exists, and "git blame --reverse" find out the commit where a line last exists. 


d. git log -L <start>,<end>:file

Since "git blame" is such a popular command among geek developers, newer version of git provides a similar functionality in "git log -L":

git log -L <start-line>,<end-line>:file

is semantically equal to :

git blame -L <start-line>,<end-line>  -- file

But the output format is different. Here is an example:
[luke@rmbp l]$ git blame -L 1, -- blame.txt
d310a0fe (Luke Luo 2014-06-17 09:42:39 +0800 1) a
624158af (Luke Luo 2014-06-17 09:41:58 +0800 2) b
e5f3da10 (Luke Luo 2014-06-17 09:42:05 +0800 3) c
[luke@rmbp l]$ git log -L 1,:blame.txt --oneline
d310a0f m5

diff --git a/blame.txt b/blame.txt
--- a/blame.txt
+++ b/blame.txt
@@ -1,2 +1,3 @@
+a
 b
 c
e5f3da1 m3

diff --git a/blame.txt b/blame.txt
--- a/blame.txt
+++ b/blame.txt
@@ -2,1 +2,2 @@
 b
+c
624158a m2

diff --git a/blame.txt b/blame.txt
--- a/blame.txt
+++ b/blame.txt
@@ -2,0 +2,1 @@
+b

Git as I understand (8): Subtree and Submodule

$
0
0
1. Module in Software

"Divide and conquer", "Separation of concerns" are heavily used strategy utilized in software design and implementation.Under such design philosophy, We might have well defined class interface,  or java/c++ package which provides clear-cut functionality, a binary jar/share library(so), or even a sub-system which can run on its own. Per my understanding, any software artifacts which can provide a well defined and relatively stable interface and provide services for other software should ultimately be re-factored into a module in different level (class/package/share library/standalone system).

Accordingly, we have the requirement to manage modules during software requirement.  For version control perspective, if part of software have stable API interface, could be delivered in its own release plan, then there is reason to manage it in a separate module.  Modulation brings benefits like:

a. Less integration build failure
If code change of all modules of different maturation level  are propagated into integrate branch without any control, developer might face daily build failure brought about by other modules.  It is a productivity killer; With module, we can avoid a error-prone integration and release window;

b. Less source code in one sub-project
If modules is loosely coupled, we might use the built binary of other modules instead of introducing a bunch of source code that we are not responsible for

c. Third party project
We might use third party project which is out of our control.  We should have module support for such project

2. Git and Linux Kernel

Git was first designed to support Linux Kernel development.  Linux Kernel is a huge project in itself, and Git maintains it under one repository. Via the help of branch, we can avoid the interference of various parallel development activities.  With the help of distributed repositories and "lieutenant/dictator" work flow, Linux Kernel can manage its integration and release cycle very well.  Linux Kernel is itself very modular. With the help of its make file build system, developer could build their modules easily without the headache of maintaining convoluted make files.  The source code base of Linux Kernel is huge. But with help of tools mentioned above (branch, distributed repository and highly efficient distributed workflow, and more important, highly skilled kernel developers), Linux Kernel has evolved with  reputation of stable quality and well-organized release cycles.

The success of Git in managing Linux Kernel manifests Git could handle very, very huge and complex project. In essence, Linux Kernel manages modules via file system directories and a hierarchic make-file based build system. Linux Kernel manages development activities via branch and a well-organized distributed work flow.

3. Requirement of sub-project management

Git works so well in managing Linux Kernel via one project/one repository, why some people have the the concept of "sub-project" at any rate?  Why not just adopt Linux Kernel's model? Do they have project which is more complex than Linux Kernel?

Most likely not.  The reason to raise the request for "sub-project" in Git, per my understanding, resides in:

a. organization model of development activity

No single organization is fully responsible for Linux Kernel.  There are more than 200 organization and more individual developers who actively involve in development and maintenance of Linux Kernel.  With so many stakeholders, Linux Kernel is still a single project with well defined unified release schedule.  It is fair to say Linux Kernel is developed by one huge "virtual organization".

For our humble project, the story is different. Nowadays, no one would like to create a new wheel if he can find support from  open source projects.  We won't create our own xml parser, font rendering library, work flow engine, etc, etc.  When we employed third party module into our small humble project,  We naturally have the needs to manage a separate "sub-project" since:

. Third party project has its own organization of development activity and release cycle.  It is not necessary or always possible to synchronize its development/release with our project;
. Third party module has clear interface, and we are not responsible of its development. We just use them. Many times, a stable release of such project suffices to support our project.

Even within an software organization which will deliver a suite product, although there is a unified release schedule for the whole suite, there might be different release cycle for sub-system or sub modules. It is a time and complexity saver to have different sub-projects under one big umbrella in version control system. Such organization will reduce the risk of integration hazard and increase overall product delivery, since we can have separate control over sub-system/module with various naturalization levels.

b. human resource and skill set

Even with the requirement mentioned in item a, some might still argue the Linux Kernel model still works.  In Linux Kernel, sub-systems are handled by various level of "gatekeeper".  They are responsible for what should be integrated into Kernel mainline via delicate work flow in a distributed manner.  Unfortunately, seldom software organization could attract so many software genius like in Linux Kernel, and very few of them could handle the complex yet efficient distributed work flow model of Linux Kernel. Many product might leverage disparate  development environment while Linux Kernel is almost based in C. It is highly impossible to maintain a unified build system like Linux Kernel.

All in all, because of impact of a and b, many organizations/individuals will resort back to traditional project/sub-project model to handle complexity and alleviate management burden.

4. subtree project support in Git

Per my understanding, sub-project support in Git is an "afterthought".  It is a high level "patch" for software organizations who are accustomed to traditional "sub-project" work flow.  Sub-projects often appears as a sub-directory under parent project. There is no difference under Git for this convention.

a. One repository, different branch, read-tree/update-index

In this case,  different sub projects resides in different branch.  In local development branch, we use "read-index/update-index" to implant sub-project root tree object into a sub-directory of dev branch's root tree. Every time sub-project upstream has updates, we implant another version of the sub-project root tree into our dev branch' root tree.

Here we have two remote projects.  We will fetch them onto remote tracking branch in "parent" repository. Then we will find out the tree objects of different sub-projects via remote tracking branch heads. Then we will import these tree objects into local master branch via "read-index/update-index" plumb commands:
[luke@rmbp git]$ git init parent
Initialized empty Git repository in /tmp/git/parent/.git/
[luke@rmbp git]$ git init projA
Initialized empty Git repository in /tmp/git/projA/.git/
[luke@rmbp git]$ git init projB
Initialized empty Git repository in /tmp/git/projB/.git/
[luke@rmbp git]$ cd projA/
[luke@rmbp projA]$ git simple-commit a1 a2 
[master (root-commit) f08acc1] a1
 1 file changed, 1 insertion(+)
 create mode 100644 a1.txt
[master ca28b1c] a2
 1 file changed, 1 insertion(+)
 create mode 100644 a2.txt
[luke@rmbp projA]$ cd ../projB
[luke@rmbp projB]$ git simple-commit b1 b2 3
[master (root-commit) 8383efc] b1
 1 file changed, 1 insertion(+)
 create mode 100644 b1.txt
[master 4458f31] b2
 1 file changed, 1 insertion(+)
 create mode 100644 b2.txt
[master 8c012ef] 3
 1 file changed, 1 insertion(+)
 create mode 100644 3.txt
[luke@rmbp projB]$ cd ../parent/

[luke@rmbp parent]$ git remote add a /tmp/git/projA 
[luke@rmbp parent]$ git remote add b /tmp/git/projB
[luke@rmbp parent]$ git fetch a
remote: Counting objects: 6, done.
remote: Compressing objects: 100% (3/3), done.
remote: Total 6 (delta 0), reused 0 (delta 0)
Unpacking objects: 100% (6/6), done.
From /tmp/git/projA
 * [new branch]      master     -> a/master
[luke@rmbp parent]$ git fetch b
warning: no common commits
remote: Counting objects: 9, done.
remote: Compressing objects: 100% (5/5), done.
remote: Total 9 (delta 0), reused 0 (delta 0)
Unpacking objects: 100% (9/9), done.
From /tmp/git/projB
 * [new branch]      master     -> b/master
[luke@rmbp parent]$ gitk --all
Here we can see we have two disparate remote tracking branches.  They don't even share a common commit.  Now let us add some commits in our local master branch:
[master (root-commit) 1f77b3f] m1
 1 file changed, 1 insertion(+)
 create mode 100644 m1.txt
[master 0ebbc4a] m2
 1 file changed, 1 insertion(+)
 create mode 100644 m2.txt
[luke@rmbp parent]$ git l
0ebbc4a m2
1f77b3f m1
[luke@rmbp parent]$ git cat-file -p master
tree c2698574830f59f48b76cf039506cee89e74e3fe
parent 1f77b3f692cd2837f801dddaa9f3d1c4e8922501
author Luke Luo <luke.jf.luo@gmail.com> 1403160313 +0800
committer Luke Luo <luke.jf.luo@gmail.com> 1403160313 +0800

m2
[luke@rmbp parent]$ git ls-tree c2698574830f59f48b76cf039506cee89e74e3fe
100644 blob 63a911f26fe84ea7fd8a863a636cfac908895ec9m1.txt
100644 blob 08bb2331e777f431177c40df6841c0034f89fb58m2.txt
[luke@rmbp parent]$ git ls-files -s
100644 63a911f26fe84ea7fd8a863a636cfac908895ec9 0m1.txt
100644 08bb2331e777f431177c40df6841c0034f89fb58 0m2.txt

Here we can see the master HEAD's root tree have "m1.txt/m2.txt".  Now let add sub-projects' root tree into master's tree:
[luke@rmbp parent]$ git cat-file -p remotes/a/master
tree 09efc7e59a839528ac7bda9fa020dc9101278680
parent f08acc1d1093999bd203a0efb70d10d492bb409b
author Luke Luo <luke.jf.luo@gmail.com> 1403159999 +0800
committer Luke Luo <luke.jf.luo@gmail.com> 1403159999 +0800

a2
[luke@rmbp parent]$ git cat-file -p remotes/b/master
tree d6e6a288ee17ef844941e21d3f94ce6a79f8bfb0
parent 4458f31a5dff2bd32dfeb86b491d26edca48b49a
author Luke Luo <luke.jf.luo@gmail.com> 1403160011 +0800
committer Luke Luo <luke.jf.luo@gmail.com> 1403160011 +0800

3

[luke@rmbp parent]$ git ls-files -s
100644 63a911f26fe84ea7fd8a863a636cfac908895ec9 0m1.txt
100644 08bb2331e777f431177c40df6841c0034f89fb58 0m2.txt
[luke@rmbp parent]$ git ls-tree master
100644 blob 63a911f26fe84ea7fd8a863a636cfac908895ec9m1.txt
100644 blob 08bb2331e777f431177c40df6841c0034f89fb58m2.txt
[luke@rmbp parent]$ git read-tree --prefix=projA/ remotes/a/master^{tree}
[luke@rmbp parent]$ git ls-files -s
100644 63a911f26fe84ea7fd8a863a636cfac908895ec9 0m1.txt
100644 08bb2331e777f431177c40df6841c0034f89fb58 0m2.txt
100644 da0f8ed91a8f2f0f067b3bdf26265d5ca48cf82c 0projA/a1.txt
100644 c1827f07e114c20547dc6a7296588870a4b5b62c 0projA/a2.txt
[luke@rmbp parent]$ git read-tree --prefix=projB/ remotes/b/master^{tree}
[luke@rmbp parent]$ git ls-files -s
100644 63a911f26fe84ea7fd8a863a636cfac908895ec9 0m1.txt
100644 08bb2331e777f431177c40df6841c0034f89fb58 0m2.txt
100644 da0f8ed91a8f2f0f067b3bdf26265d5ca48cf82c 0projA/a1.txt
100644 c1827f07e114c20547dc6a7296588870a4b5b62c 0projA/a2.txt
100644 00750edc07d6415dcc07ae0351e9397b0222b7ba 0projB/3.txt
100644 c9c6af7f78bc47490dbf3e822cf2f3c24d4b9061 0projB/b1.txt
100644 e6bfff5c1d0f0ecd501552b43a1e13d8008abc31 0projB/b2.txt
[luke@rmbp parent]$ git status
On branch master
Changes to be committed:
  (use "git reset HEAD <file>..." to unstage)

new file:   projA/a1.txt
new file:   projA/a2.txt
new file:   projB/3.txt
new file:   projB/b1.txt
new file:   projB/b2.txt

Changes not staged for commit:
  (use "git add/rm <file>..." to update what will be committed)
  (use "git checkout -- <file>..." to discard changes in working directory)

deleted:    projA/a1.txt
deleted:    projA/a2.txt
deleted:    projB/3.txt
deleted:    projB/b1.txt
deleted:    projB/b2.txt
[luke@rmbp parent]$ git checkout-index -a
[luke@rmbp parent]$ tree
.
├── m1.txt
├── m2.txt
├── projA
│   ├── a1.txt
│   └── a2.txt
└── projB
    ├── 3.txt
    ├── b1.txt
    └── b2.txt
[luke@rmbp parent]$ git s
## master
A  projA/a1.txt
A  projA/a2.txt
A  projB/3.txt
A  projB/b1.txt
A  projB/b2.txt


[luke@rmbp parent]$ git commit -m "add sub project A/B tree into master"
On branch master
nothing to commit, working directory clean
[luke@rmbp parent]$ git l
6d64ab3 add sub project A/B tree into master
0ebbc4a m2
1f77b3f m1

Now both projA and projB have a snapshot under master HEAD's root tree. 
Suppose upstream has changes for A/B, we just need to fetch these updates from upstream and re-align sub project tree under master's root dir to current sub project tree version.

[luke@rmbp git]$ cd projA
[luke@rmbp projA]$ git simple-commit a3 a4
[master d7d8e7c] a3
 1 file changed, 1 insertion(+)
 create mode 100644 a3.txt
[master 1a53479] a4
 1 file changed, 1 insertion(+)
 create mode 100644 a4.txt
[luke@rmbp projA]$ cd ../projB
[luke@rmbp projB]$ git l
8c012ef 3
4458f31 b2
8383efc b1
[luke@rmbp projB]$ git simple-commit b4 b5
[master 0683a8e] b4
 1 file changed, 1 insertion(+)
 create mode 100644 b4.txt
[master 66ede3b] b5
 1 file changed, 1 insertion(+)
 create mode 100644 b5.txt
[luke@rmbp projB]$ cd ../parent
[luke@rmbp parent]$ git fetch a
remote: Counting objects: 6, done.
remote: Compressing objects: 100% (4/4), done.
remote: Total 6 (delta 1), reused 0 (delta 0)
Unpacking objects: 100% (6/6), done.
From /tmp/git/projA
   ca28b1c..1a53479  master     -> a/master
[luke@rmbp parent]$ git fetch b
remote: Counting objects: 6, done.
remote: Compressing objects: 100% (4/4), done.
remote: Total 6 (delta 1), reused 0 (delta 0)
Unpacking objects: 100% (6/6), done.
From /tmp/git/projB
   8c012ef..66ede3b  master     -> b/master


Now both projA and projB has new change, let us update our master head's index to reflect this change:
[luke@rmbp parent]$ git rm -r --cached projA projB
rm 'projA/a1.txt'
rm 'projA/a2.txt'
rm 'projB/3.txt'
rm 'projB/b1.txt'
rm 'projB/b2.txt'
[luke@rmbp parent]$ git s
## master
D  projA/a1.txt
D  projA/a2.txt
D  projB/3.txt
D  projB/b1.txt
D  projB/b2.txt
?? projA/
?? projB/
[luke@rmbp parent]$ git read-tree --prefix=projA a/master^{tree}
[luke@rmbp parent]$ git read-tree --prefix=projB b/master^{tree}
[luke@rmbp parent]$ git ls-files --stage
100644 63a911f26fe84ea7fd8a863a636cfac908895ec9 0m1.txt
100644 08bb2331e777f431177c40df6841c0034f89fb58 0m2.txt
100644 da0f8ed91a8f2f0f067b3bdf26265d5ca48cf82c 0projA/a1.txt
100644 c1827f07e114c20547dc6a7296588870a4b5b62c 0projA/a2.txt
100644 d616f7380ad325123fed6f628d02fa76e1ce77c3 0projA/a3.txt
100644 88ba23dca8c8529f8165539c369925a99391a4d1 0projA/a4.txt
100644 00750edc07d6415dcc07ae0351e9397b0222b7ba 0projB/3.txt
100644 c9c6af7f78bc47490dbf3e822cf2f3c24d4b9061 0projB/b1.txt
100644 e6bfff5c1d0f0ecd501552b43a1e13d8008abc31 0projB/b2.txt
100644 8e953e84d803f13fd06416a1bd8161dcd93cfd00 0projB/b4.txt
100644 90a5159bf020296276ea5ca1bcd292a9b1de9947 0projB/b5.txt

 First, we remove the existing tree (projA/projB), then we use "git read-tree" to add the new version of trees. 

b.  subtree merge strategy

In case a, with the help from "read-tree", we already can separate sub-project into remote tracked branch, and we can select which version from upstream and "read-tree" it into our dev branch.  In Git merge, with the "subtree" merge strategy and "--squash" option, we can achieve same effect via high level porcelain  command. For detailed information on git subtree merge, you can refer to previous post :
http://lukeluo.blogspot.com/2014/05/git-as-i-understand-3-diff-and-merge.html

Suppose we have set up remote repository as in case a:
[luke@rmbp parent]$ git remote 
a
[luke@rmbp parent]$ git remote -v
a/tmp/git/projA/ (fetch)
a/tmp/git/projA/ (push)
[luke@rmbp parent]$ git branch -avv
  remotes/a/master 9f527d9 a2

We still need to "read-tree" the remote branch into master branch:
[luke@rmbp parent]$ git read-tree -u --prefix=projA a/master^{tree}
[luke@rmbp parent]$ ls
projA
[luke@rmbp parent]$ git status 
On branch master

Initial commit

Changes to be committed:
  (use "git rm --cached <file>..." to unstage)

new file:   projA/a1.txt
new file:   projA/a2.txt

[luke@rmbp parent]$ git commit -m "read-tree sub projA"
[master (root-commit) 9de4739] read-tree sub projA
 2 files changed, 2 insertions(+)
 create mode 100644 projA/a1.txt
 create mode 100644 projA/a2.txt
Now we will add more commits in remote projA, then we will fetch the update from parent repository:
[luke@rmbp git]$ cd projA/
[luke@rmbp projA]$ git simple-commit a3 a4
[master 1c8922f] a3
 1 file changed, 1 insertion(+)
 create mode 100644 a3.txt
[master 12fd0d0] a4
 1 file changed, 1 insertion(+)
 create mode 100644 a4.txt

[luke@rmbp projA]$ cd ../parent/

[luke@rmbp parent]$ git fetch a

remote: Counting objects: 6, done.

remote: Compressing objects: 100% (4/4), done.
remote: Total 6 (delta 1), reused 0 (delta 0)
Unpacking objects: 100% (6/6), done.
From /tmp/git/projA
   9f527d9..12fd0d0  master     -> a/master

At this time, we would like to merge the new update into our "subtree" project. Instead using "git rm" and "git read-tree", we would use the subtree merge:
[luke@rmbp parent]$ tree
.
└── projA
    ├── a1.txt
    └── a2.txt

1 directory, 2 files
[luke@rmbp parent]$ git merge -s recursive -X subtree=projA --no-commit --squash a/master
Squash commit -- not updating HEAD
Automatic merge went well; stopped before committing as requested
[luke@rmbp parent]$ tree
.
└── projA
    ├── a1.txt
    ├── a2.txt
    ├── a3.txt
    └── a4.txt

1 directory, 4 files
[luke@rmbp parent]$ git s
## master
A  projA/a3.txt
A  projA/a4.txt
[luke@rmbp parent]$ git commit -am "merge subproject projA"
[master d5d0456] merge subproject projA
 2 files changed, 2 insertions(+)
 create mode 100644 projA/a3.txt
 create mode 100644 projA/a4.txt

[luke@rmbp parent]$ git l

d5d0456 merge subproject projA

9de4739 read-tree sub projA


If we want to make change in master branch under "projA", then push change back to remote repository, we need to make a local tracking branch. We then merge change back to local tracking branch, then we push local tracking branch back to remote repository:
[luke@rmbp parent]$ cd projA/
[luke@rmbp projA]$ ls
a1.txt  a2.txt  a3.txt  a4.txt
[luke@rmbp projA]$ echo m1 > m1.txt
[luke@rmbp projA]$ cd ..
[luke@rmbp parent]$ git add projA/
[luke@rmbp parent]$ git commit -m "master change back"
[master 07e59c1] master change back
 1 file changed, 1 insertion(+)
 create mode 100644 projA/m1.txt
[luke@rmbp parent]$ git checkout -b projA a/master
Branch projA set up to track remote branch master from a.
Switched to a new branch 'projA'
[luke@rmbp parent]$ git b
  master
* projA
[luke@rmbp parent]$ git l
12fd0d0 a4
1c8922f a3
9f527d9 a2
ca76a50 a1
[luke@rmbp parent]$ git merge -s recursive -X subtree=projA --no-commit --squash master
Squash commit -- not updating HEAD
Automatic merge went well; stopped before committing as requested
[luke@rmbp parent]$ ls
a1.txt  a2.txt  a3.txt  a4.txt  m1.txt
[luke@rmbp parent]$ git s
## projA...a/master
A  m1.txt
[luke@rmbp parent]$ git commit -m "revert change back to remote projA"
[projA 388c813] revert change back to remote projA
 1 file changed, 1 insertion(+)
 create mode 100644 m1.txt
[luke@rmbp parent]$ git push a projA:master
Counting objects: 3, done.
Delta compression using up to 8 threads.
Compressing objects: 100% (2/2), done.
Writing objects: 100% (3/3), 284 bytes | 0 bytes/s, done.
Total 3 (delta 1), reused 0 (delta 0)
To /tmp/git/projA/
   12fd0d0..388c813  projA -> master

5. submodule support in Git

When we employ a subtree project in Git, we are dealing with different branches in Git.  sub-project lives in separate branch, and we leverage "git rm/read-tree" or "git read-tree/merge -X subtree" to exchange information with imported sub-project.
"git submodule" provides another approach to handle sub project. This time, sub-project is store in separate repository.  Sub-project wise, it does not feel any difference when it acts as a sub-project.  We operate in sub-project repository just as we do in a normal git repository.  Since sub-project repository lives in a sub directory of parent project repository, git needs to provide extra information for parent repository so we do operation in parent repository, git will know how to handle the sub directory with a  repository in it.
A typical workflow of "git submodule" is like this:

a.  add submodule definition in git

[luke@rmbp parent]$ git submodule add  /tmp/git/projA projA
Cloning into 'projA'...
done.

[luke@rmbp parent]$ git s
## Initial commit on master
A  .gitmodules

A  projA

[luke@rmbp parent]$ cat .gitmodules 
[submodule "projA"]
path = projA
url = /tmp/git/projA

[luke@rmbp parent]$ cd projA/
[luke@rmbp projA]$ la
.  ..  a1.txt  a2.txt  .git
[luke@rmbp projA]$ cat .git
gitdir: ../.git/modules/projA
[luke@rmbp projA]$ tree ../.git/modules/projA
../.git/modules/projA
├── branches
├── config
├── description
├── HEAD
├── hooks
│   ├── applypatch-msg.sample
.....
├── index
├── info
│   └── exclude
├── logs
│   ├── HEAD
│   └── refs
│       ├── heads
│       │   └── master
│       └── remotes
│           └── origin
│               └── HEAD
├── objects
│   ├── 09
│   │   └── efc7e59a839528ac7bda9fa020dc9101278680
│   ├── 61
...........

[luke@rmbp projA]$ git l

99a71cf a2

61a0159 a1

[luke@rmbp projA]$ cd ../.git/modules/projA/
[luke@rmbp projA]$ la
.  ..  branches  config  description  HEAD  hooks  index  info  logs  objects  packed-refs  refs
[luke@rmbp projA]$ cat config
[core]
repositoryformatversion = 0
filemode = true
bare = false
logallrefupdates = true
worktree = ../../../projA
[remote "origin"]
url = /tmp/git/projA
fetch = +refs/heads/*:refs/remotes/origin/*
[branch "master"]
remote = origin
merge = refs/heads/master


Many interesting things happen after we execute "git submodule add".  First, a ".gitmodule" is added into work tree and index, describing the basic information about the added submodule.  Second,  a sub directory "projA" is added into both work tree and index. Under this sub directory, we can have .git file specifying a git repository path "../.git/modules/projA".   We can see git have pull from remote repository all the history of sub project "projA". Thirdly, when we check the config file of this newly create repository, we can see git also setup corresponding remote for this repository.  "git submodule add" does lots of necessary setup for our sub-project repository. It save us lots of manual typing. 

The most interesting thing is, When we check the index, we found the sub directory "projA" has a new mode "160000" comparing to an ordinary directory tree entry:

[luke@rmbp parent]$ git ls-files --stage
100644 d7585a3154fdd162ef79f8a65b1822d0791ad7f6 0.gitmodules
160000 99a71cf1c6d61ac5f31b75ab5a0f76e383eb1342 0projA

For normal tree entries like the one shown below (testdir), it will have a mode "040000", and generally we can see files under such dir. 

[luke@rmbp c]$ git ls-tree -tr master
100644 blob ce013625030ba8dba906f756967f9e9ca394464ahello.txt
040000 tree 2b297e643c551e76cfa1f93810c50811382f9117testdir
100644 blob 9daeafb9864cf43055ae93beb0afd6c7d144bfa4testdir/test.txt

Now let up commit pending change in index to have a more thorough research.
[luke@rmbp parent]$ git commit -m "add submodule projA"
[master (root-commit) 9526d3e] add submodule projA
 2 files changed, 4 insertions(+)
 create mode 100644 .gitmodules
 create mode 160000 projA

[luke@rmbp parent]$ tree

.

└── projA
    ├── a1.txt
    └── a2.txt

1 directory, 2 files

[luke@rmbp parent]$ git ls-tree -tr master
100644 blob d7585a3154fdd162ef79f8a65b1822d0791ad7f6.gitmodules
160000 commit 99a71cf1c6d61ac5f31b75ab5a0f76e383eb1342projA

We can see this new entry corresponding to our sub-project is actually a commit object.
[luke@rmbp parent]$ cd projA/
[luke@rmbp projA]$ git cat-file -t 99a71cf1c6d61ac5f31b75ab5a0f76e383eb1342
commit
[luke@rmbp projA]$ git cat-file -p 99a71cf1c6d61ac5f31b75ab5a0f76e383eb1342
tree 09efc7e59a839528ac7bda9fa020dc9101278680
parent 61a01592f1a87a7a7eb69a28ea2c00e48aaa6a9c
author Luke Luo <luke.jf.luo@gmail.com> 1403255286 +0800
committer Luke Luo <luke.jf.luo@gmail.com> 1403255286 +0800

a2
[luke@rmbp projA]$ git b
* master
[luke@rmbp projA]$ git rev-parse master
99a71cf1c6d61ac5f31b75ab5a0f76e383eb1342
In our sub repository, we can verify this commit is exactly the master HEAD/tip in sub-project.   We all know a commit object will point to a tree object. This time, git developer use an uncanny knack to embed an commit object into a tree object.  Such special commit within a tree object is called "getlink" in git terminology. Via the help of "getlink", git parent repository can identify a sub repository residing under a sub directory, and act on it accordingly.  This is the most important secret behind "git submodule"!  
Finally, we can check the status of all submodules via "git submodule status":

[luke@rmbp parent]$ git submodule status

 99a71cf1c6d61ac5f31b75ab5a0f76e383eb1342 projA (heads/master)

b.  init/deinit a submodule

init will add submodule information into parent repository config file, so submodule commands like "update/sync" will act on it.  "deinit" will do the reverse:
[luke@rmbp parent]$ git submodule init projA
Submodule 'projA' (/tmp/git/projA) registered for path 'projA'
[luke@rmbp parent]$ cat .git/config 
[core]
repositoryformatversion = 0
filemode = true
bare = false
logallrefupdates = true
[submodule "projA"]
url = /tmp/git/projA
[luke@rmbp parent]$ git submodule deinit projA
Cleared directory 'projA'
Submodule 'projA' (/tmp/git/projA) unregistered for path 'projA'
[luke@rmbp parent]$ cat .git/config 
[core]
repositoryformatversion = 0
filemode = true
bare = false
logallrefupdates = true

c.  update
When we add a new repository, the current sub-project branch's tip/HEAD commit is recorded into the sub-directory entry(i.e. projA) in the root tree. After we commit this sub directory, git will remember on which commit we target our sub-module onto.  In the submodule, we can pull update from upstream, we can change to different branch and add new commits onto it. All in all, we might change the current branch's tip to other commit other than the one recorded in the submodule dir entry.  Whenever we want to checkout the submodule code to our recorded snapshot commit, we can do a "git submodule update". After that, the submodule will be checkout per this commit into a "detach head" state.  So "git submodule update" is like a time machine which revert back to our remembered commit.
[luke@rmbp parent]$ cd projA
[luke@rmbp projA]$ git l
68a2969 a4
62e4ce7 a3
99a71cf a2
61a0159 a1
[luke@rmbp projA]$ cd ../../projA/
[luke@rmbp projA]$ pwd
/tmp/git/projA
[luke@rmbp projA]$ git simple-commit a5 a6
[master ef4ad2c] a5
 1 file changed, 1 insertion(+)
 create mode 100644 a5.txt
[master ee0b527] a6
 1 file changed, 1 insertion(+)
 create mode 100644 a6.txt
[luke@rmbp projA]$ cd /tmp/git/parent/projA/
[luke@rmbp projA]$ git pull
remote: Counting objects: 6, done.
remote: Compressing objects: 100% (4/4), done.
remote: Total 6 (delta 2), reused 0 (delta 0)
Unpacking objects: 100% (6/6), done.
From /tmp/git/projA
   68a2969..ee0b527  master     -> origin/master
Updating 68a2969..ee0b527
Fast-forward
 a5.txt | 1 +
 a6.txt | 1 +
 2 files changed, 2 insertions(+)
 create mode 100644 a5.txt
 create mode 100644 a6.txt
[luke@rmbp projA]$ git b
* master
[luke@rmbp projA]$ cd ..
[luke@rmbp parent]$ git submodule status
+ee0b527ae643d768e8feca50cbd8431fbdedaab6 projA (heads/master)

[luke@rmbp projA]$ git l

ee0b527 a6

ef4ad2c a5
68a2969 a4
62e4ce7 a3
99a71cf a2
61a0159 a1
[luke@rmbp parent]$ git diff
diff --git a/projA b/projA
index 68a2969..ee0b527 160000
--- a/projA
+++ b/projA
@@ -1 +1 @@
-Subproject commit 68a29692ad433c9bbfff34a65c6a47f757d231d1
+Subproject commit ee0b527ae643d768e8feca50cbd8431fbdedaab6
[luke@rmbp parent]$ git status
On branch master
Changes not staged for commit:
  (use "git add <file>..." to update what will be committed)
  (use "git checkout -- <file>..." to discard changes in working directory)

modified:   projA (new commits)


Here we update upstream projA by adding two extra files "a5.txt/a6.txt".  Then within our submodule repository, we do "git pull" to sync it to remote upstream repository.  At this time, the current branch is "master" and tip commit is "ee0b527".  "git submodule status" will identify this discrepancy between remembered commit and current branch tip in submodule, and a "+" sign indicate such discrepancy. git diff or git status also illustrate such discrepancy in their way.  At this time, we have two options:

. revert submodule back to remembered commit via "git submodule update"

[luke@rmbp parent]$ git submodule update projA
Submodule path 'projA': checked out '68a29692ad433c9bbfff34a65c6a47f757d231d1'
[luke@rmbp parent]$ git submodule status
 68a29692ad433c9bbfff34a65c6a47f757d231d1 projA (68a2969)
[luke@rmbp parent]$ git diff
[luke@rmbp parent]$ git status
On branch master

nothing to commit, working directory clean
[luke@rmbp parent]$ cd projA/
[luke@rmbp projA]$ git b
* (detached from 68a2969)
  master
[luke@rmbp projA]$ git l
68a2969 a4
62e4ce7 a3
99a71cf a2
61a0159 a1

Here we can see submodule is reverted back to remembered commit in a "detached head" branch, "git submodule status" does not signal a "+" sign any more, and "git diff/status" will show a clean state.

. update the remembered commit in sub-project entry and commit it, so we will use this new commit for subproject from now on:
[luke@rmbp parent]$ git submodule status
+ee0b527ae643d768e8feca50cbd8431fbdedaab6 projA (heads/master)
[luke@rmbp parent]$ git ls-files -s
100644 88f27c789175da080dcf027afea293b2388e0b1e 0.gitmodules
160000 68a29692ad433c9bbfff34a65c6a47f757d231d1 0projA
[luke@rmbp parent]$ git add projA/
[luke@rmbp parent]$ git ls-files -s
100644 88f27c789175da080dcf027afea293b2388e0b1e 0.gitmodules
160000 ee0b527ae643d768e8feca50cbd8431fbdedaab6 0projA
[luke@rmbp parent]$ git commit -m "move to new commit for submodule"
[master 5858b22] move to new commit for submodule
 1 file changed, 1 insertion(+), 1 deletion(-)
[luke@rmbp parent]$ git submodule status
 ee0b527ae643d768e8feca50cbd8431fbdedaab6 projA (heads/master)


Linux Virtual Console(5): socat the bridging software

$
0
0

Many full-fledged application will open more than one input streams and output streams to be a useful application.  They will open a bunch of file descriptors for reading and writing.  When application is running, input information is processed and transformed to the format of output information.  If application itself does not transform information but merely distribute/dispatch incoming information as it is to appropriate output stream, it will act like a software "router" of information.  Such applications specialize in providing a plethora of input/output stream protocols so different other application can pump information into  and suck information out of them via different protocols.  Such a software hub/router acts as bridge which"clue" together different applications so they can talk to each other and cooperate to achieve more advanced features.   In this sense, router/hub/bridge is an upgraded version of Bash pipeline feature. 

socat (Socket-cat) is just such a router application. It can talk many protocols like serial pty,regular file,pipe, ip,tcp,udp,ssl,sctp,unix domain socket,internet socket, socks, tun, etc.  With the help of socat, many applications speaking different "languages" (protocols) can be bridged together transparently. 


To facilitate our explanation, let us formalize our terminology first.  

Endpoint:  entities which will involves in communication with each other;

Channel: A bi-direction or uni-directional medium via which endpoints can communicate with each other. In a specific channel, information exchange follow a specific protocol agreed by all involved parties;

Adapter: components of socat which can acts as endpoints communicating with other endpoints via specific protocol through a channel.

Session: The activity of two endpoints communicating with each other via an established channel of specific protocol;

Session Template: A spec describing how session is created between two endpoints. It specifies protocol, endpoint address, uni-directional or bi-directional channel, connection oriented or connection-less,  how connection is initiated, broadcast/multicast or point to point, etc.

To act as a router/bridge, socat need to create at least two "sessions".   A session consists of two endpoints and a channel.  socat's adapter acts as one endpoint. For a complete session, we still need another endpoint and a channel. There are three ways for socat to create sessions, namely, "passive", "proactive" ,and "self-sufficient".

A.Passive way

socat will create an adapter instance, and "listens" for connection request from remote endpoints. After connection request received, adapter will "accept" such request and a bi-directional channel is setup afterwards.

B. proactive way
socat will create an adapter instance for specific protocol, and will also initiate a connection with existing remote endpoint proactively.  After the connection is set up, the session is created. 

C. Self-Sufficient

socat can spawn new process to act at the remote endpoint, and set up the channel between newly spawned process and its own adapter instance.

In principle, socat  maintains at most two concurrent sessions at the same time.  That is the reason socat is often named "bridge" but not "router" or "hub".  But you can create multiple socat processes and link them together in any way. Such a composite of socat instances in a sense still can act as a "router" of "hub".

3. socat command line syntax 

The command line syntax of socat actually is very simple and fixed. Quoting from socat man page:

socat [options] <address> <address>

Where options is parameter which affects socat's global behavior.  These options does not affect the behavior of the two <address>s. 

I would prefer to regard the socat command line syntax as :

socat [options] <session template I> <session template II>

The two <session template>s tell socat how to create two sessions on both sides.  Session encompasses two endpoints and channel protocol, and is more precise and exact than the word "address".   The session template has  below format:

[Channel Protocol and session creation method]:[local/remote endpoint address part I:part II:....:part N]:[channel option I,II,....M]

We choose "session template" instead of "session" to describe these two parameters, because there are situations where the relationship between socat's adaptors and remote endpoints might be 1 to 1, 1 to many, and many to many.  There might be multiple concurrent session instances  and multiple endpoints per session template.  For each session/channel, there are many options besides the basic address parameters.  All of them are optional, and have default values. You can fine tune this channel/session with these extra options.  Since options are tightly related to protocol, socat categorize them according to channel protocol names.

The concept of socat acting as bridge/broker is simple and well understood. Much of the difficulty of using socat correctly comes from the details of "session template".  If you are proficient in these different communication protocol, socat's command line syntax are self-explanatory. It is just a mapping of different protocol parameters. If you are not versed in some of the protocols, then the best place to learn them is not through socat itself but somewhere else.

We will categorize session template based on below attributes, to help you understand and use these session templates.

Multiple sessions:  Y/N
does this session template permit multiple session instances? That is, whether multiple socat adaptor instances are allowed to be created, and multiple remote end points are allowed to connect to these adapter instances concurrently?

Multiplicity:  integer
For one session and one socat adapter instance, how many counter part endpoints communicate with this actor instance? For connection-less protocol like UDP, one adapter  is allowed to receive messages from multiple remote end points and to send multicast/broadcast messages to multiple anonymous remote endpoints.  We can this N:N multiplicity.


Connection-oriented: Y/N
If this is a connection-oriented (stream) or connection-less (datagram) channel?

connection setup method: passive/proactive/self-sufficient
For connection oriented protocol, this specifies how socat  setup and initialize session.

Connection keep-alive:  Y/N
For connection oriented channel, this specify whether only one round of information exchange then connection is closed or connection is kept alive for multiple rounds of information exchange until  end points disconnect.

Direction: RW/R/W
whether it is a bi-directional or a uni-direction channel.  Read and Write is from socat's perspective.

It is just too abstract to just talk about concept. Let us use concrete examples to demonstrate how these concepts are applied.

4. Serial device

Serial device, like tty, pty, are often used by terminal.  socat can connect to serial device, or create serial device and wait for connection from remote endpoints.  If you start socat in Bash as a front end application, socat will naturally inherit stdio from bash. This is a case of socat connecting to a already established pty.

 The socat in Debian 7 does not enable "READLINE" support.  I download a new copy from:

http://www.dest-unreach.org/socat/download/socat-2.0.0-b6.tar.gz

socat has support for SSL V2.  But in Debian 7, the support for SSL v2 in libssl is disabled.  This source package does not build well when it try to link socat binayr with libssl method "SSLv2_server_method".  I disable all SSLv2 related functions in socat, in "sslcls.c":

/*

SSL_METHOD *sycSSLv2_client_method(void) {
   SSL_METHOD *result;
   Debug("SSLv2_client_method()");
   result = SSLv2_client_method();
   Debug1("SSLv2_client_method() -> %p", result);
   return result;
}
SSL_METHOD *sycSSLv2_server_method(void) {
   SSL_METHOD *result;
   Debug("SSLv2_server_method()");
   result = SSLv2_server_method();
   Debug1("SSLv2_server_method() -> %p", result);
   return result;
}

*/

and in "xio-openssl.c":

799    if (!server) {
 800       if (me_str != 0) {
 801          if (!strcasecmp(me_str, "SSLv2") || !strcasecmp(me_str, "SSL2")) {
 802          //   method = sycSSLv2_client_method();
............

819       if (me_str != 0) {
 820          if (!strcasecmp(me_str, "SSLv2") || !strcasecmp(me_str, "SSL2")) {
 821           //  method = sycSSLv2_server_method();

Then it builds O.K.

../configure --enable-readline
make -j4 2>&1 | tee make.log
sudo make install

The first example of socat is like this:

socat - exec:"bash -li",pty,setsid,ctty,stderr

After command executed, it seem nothing happened, and you are still in a bash prompt.  But actually you are working under the new spawned "bash":

luke@luke-debian:~$ ps
  PID TTY          TIME CMD
10700 pts/1    00:00:00 bash
11331 pts/1    00:00:00 ps
luke@luke-debian:~$ pstree -sunpl 10700
init(1)───wmiirc(10681,luke)───gnome-terminal(10682)───bash(10700)───pstree(11416)
luke@luke-debian:~$ socat -  exec:"bash -i",pty,setsid,ctty,stderr
luke@luke-debian:~$ ps
  PID TTY          TIME CMD
11474 pts/2    00:00:00 bash
11531 pts/2    00:00:00 ps
luke@luke-debian:~$ pstree -sunpl 11474
init(1)───wmiirc(10681,luke)───gnome-terminal(10682)───bash(10700)───socat(11473)───bash(11474)───pstree(11860)
luke@luke-debian:~$ 

We can see the pid of two "bash" are different, and the new bash is spawned by socat.  These two "bash" also have different controlling ttys, "pts/1" versus "pts/2". The pipe lines socat created looks like this:

In this case, socat created a PTY device for the spawned "bash" process, via the "pty" session option. The "stderr" tell socat also redirect sub bash's stderr to this PTY device, since by default the stderr is not redirected. "setpid,ctty" make this pty as the bash's controlling terminal.  The original bash still connects to pts/1, but since socat is now the foreground process, so socat take control of the terminal. 

Another example illustrate the use of "PTY":
[luke@rmbp ~]$ socat -d -d  pty pty
2014/06/21 19:10:53 socat[17735] N PTY is /dev/pts/6
2014/06/21 19:10:53 socat[17735] N PTY is /dev/pts/7
2014/06/21 19:10:53 socat[17735] N starting data transfer loop with FDs [3,3] and [5,5]
In one terminal, we create two ptys  and they are connected via socat.  socat connect to the master side of these ptys.  
[luke@rmbp ~]$ cat < /dev/pts/6

[luke@rmbp ~]$ cat > /dev/pts/7
hello world
In another two terminal, we use "cat" to read from and write to one of the ptys.  We can see the text typed into /dev/pts/7 will be display in /dev/pts/6.

One typical use of socat is to connect to a serial port, especially in embedded world. I have a ARM board which provide a serial port. Generally I use "minicom/picocom" to connect to this serial port:

[luke@rmbp ~]$ sudo picocom -b 115200 /dev/ttyUSB0  
picocom v1.7

port is        : /dev/ttyUSB0
flowcontrol    : none
baudrate is    : 115200
parity is      : none
databits are   : 8
escape is      : C-a
local echo is  : no
noinit is      : no
noreset is     : no
nolock is      : no
send_cmd is    : sz -vv
receive_cmd is : rz -vv
imap is        : 
omap is        : 
emap is        : crcrlf,delbs,

Terminal ready
big data a revolution filetype:pdf
pwd
/
ls
acct
cache
config
d
data
default.prop

We can use socat to do the same thing:
[luke@rmbp ~]$ sudo socat readline /dev/ttyUSB0,b115200,raw,echo=0
df
df
Filesystem             Size   Used   Free   Blksize
/dev                   938M    32K   937M   4096
/mnt/secure            938M     0K   938M   4096
/mnt/asec              938M     0K   938M   4096
/mnt/obb               938M     0K   938M   4096
/system                504M   437M    66M   4096
/data                  504M   134M   369M   4096
/cache                 315M     5M   309M   4096
/mnt/private            15M     8K    15M   4096

5. Protocol analyzer and emulator

In Internet, many application level protocols are ascii based.  For example, http, telnet,ftp,smpt, dns,etc.  If we are doing network programming, socat is a great tool to help us understand the bolts and nuts of various protocols.  The best feature I like is to let socat connect one side to a terminal and another side to a network service. After that, you can type in terminal to emulate a network client or server. The feeling of actually "talking" to network via dancing fingers is an hilarious experience.

In a network path, socat can act as a client or a server, or a relay (man in the middle).  When acting as a relay, socat can display all the interaction happening en route; When acting as client or server, socat can help you verify the correctness of your client or server program.  Thanks to socat, you can passively observe the traffic, and you can also actively involves in it.

Here is an example of HTTP.  First, we would like to "watch" the message exchange between a browser and a http server.  socat acts as "man in middle" in this case. First, I start a web server for a git repository in my local machine:
[luke@rmbp git]$ git instaweb 
[luke@rmbp ~]$ netstat -anp | grep 1234
(Not all processes could be identified, non-owned process info
 will not be shown, you would have to be root to see it all.)
tcp        0      0 0.0.0.0:1234            0.0.0.0:*               LISTEN      9535/lighttpd       
Then socat will create a tcp relay in our local machine:

[luke@rmbp ~]$ sudo socat -v tcp-listen:80,fork,reuseaddr tcp:localhost:1234

socat will listen on local 80 and accept browser connection. It will relay bi-direction between your browser and web server at localhost:1234.  the "-v" option will make socat display all the messages it sees en-route.  Now we have our web browser point to "http://localhost:80":

[luke@rmbp ~]$ sudo socat -v tcp-listen:80,fork,reuseaddr tcp:localhost:1234

> 2014/06/22 12:38:47.977948  length=352 from=0 to=351
GET / HTTP/1.1\r
Host: localhost\r
Connection: keep-alive\r
Accept: text/html,application/xhtml+xml,application/xml;q=0.9,image/webp,*/*;q=0.8\r
User-Agent: Mozilla/5.0 (X11; Linux x86_64) AppleWebKit/537.36 (KHTML, like Gecko) Chrome/34.0.1847.116 Safari/537.36\r
Accept-Encoding: gzip,deflate,sdch\r
Accept-Language: en-US,en;q=0.8,zh-CN;q=0.6,zh;q=0.4\r
\r
< 2014/06/22 12:38:48.065454  length=1809 from=0 to=1808
HTTP/1.1 200 OK\r
Status: 200 OK\r
Content-Type: application/xhtml+xml; charset=utf-8\r
Transfer-Encoding: chunked\r
Date: Sun, 22 Jun 2014 04:38:47 GMT\r
Server: lighttpd/1.4.35\r
\r
659\r
<?xml version="1.0" encoding="utf-8"?>
<!DOCTYPE html PUBLIC "-//W3C//DTD XHTML 1.0 Strict//EN""http://www.w3.org/TR/xhtml1/DTD/xhtml1-strict.dtd">
<html xmlns="http://www.w3.org/1999/xhtml" xml:lang="en-US" lang="en-US">

....................................
<script type="text/javascript">
window.onload = function () {
var tz_cookie = { name: 'gitweb_tz', expires: 14, path: '/' };
onloadTZSetup('local', tz_cookie, 'datetime');
};
</script>
</body>
</html>\r
< 2014/06/22 12:38:48.071008  length=5 from=2946 to=2950
0\r
\r

Here we capture two messages in two directions.  socat will have two address/session parameters. If message flow from first address to second one, it will be denoted in log via ">".  The reverse direction of message flow will be marked as "<".

Now we know what happens on the network, let us use socat to emulate the client (browser):
[luke@rmbp ~]$ socat readline tcp:localhost:8000,crlf
GET / HTTP/1.1
Host: localhost:8000
Connection: keep-alive
Accept: text/html,application/xhtml+xml,application/xml;q=0.9,image/webp,*/*;q=0.8
User-Agent: Mozilla/5. 5u   CHR                5,2      0t0    1110 /dev/ptmx
socat   4786 luke    6u   CHR              136,4      0t0       7 /dev/pts/4
socat   4786 luke    7u   CHR                5,2      0t0    1110 /dev/ptmx
0 (X11; Linux x86_64) AppleWebKit/537.36 (KHTML, like Gecko) Chrome/34.0.1847.116 Safari/537.36
Accept-Encoding: gzip,deflate,sdch
Accept-Language: en-US,en;q=0.8,zh-CN;q=0.6,zh;q=0.4

HTTP/1.1 200 OK
Status: 200 OK
Content-Type: application/xhtml+xml; charset=utf-8
Transfer-Encoding: chunked
Date: Sun, 22 Jun 2014 10:07:19 GMT
Server: lighttpd/1.4.35

659
<?xml version="1.0" encoding="utf-8"?>
<!DOCTYPE html PUBLIC "-//W3C//DTD XHTML 1.0 Strict//EN""http://www.w3.org/TR/xhtml1/DTD/xhtml1-strict.dtd">
<html xmlns="http://www.w3.org/1999/xhtml" xml:lang="en-US" lang="en-US">
<!-- git web interface version 2.0.0, (C) 2005-2006, Kay Sievers <kay.sievers@vrfy.org>, Christian Gierke -->
<!-- git core binaries version 2.0.0 -->
<head>
..........................

Actually, I just copy the request lines sent by my chrome browser and paste into command line, then web server will just send back the exact response, as if it is talking to a real web browser.  One catch here: I add "crlf" parameter to socat, to ask socat to transform a "lf (0x0a)" into "crlf(0x0d 0x0a)", since in Linux, only "lf" is use to end a text line, but in HTTP protocol, "crlf" is necessary to mark the end of a text line.

We can also have socat to act as a server.  Our fake web server just echo back whatever it received. First we start an socat to act as an echo server:
[luke@rmbp ~]$ socat tcp-listen:8000,fork,reuseaddr exec:cat
Then we start a client using socat:
[luke@rmbp ~]$ socat readline tcp:localhost:8000,crnl
GET / HTTP1.1/
GET / HTTP1.1/
hello world
hello world
We can see every thing we entered will be echoed back. 

6. dns lookup (UDP) example

Here socat listen on localhost:1234 and forward udp package to google dns server "8.8.8.8". 

[luke@rmbp ~]$ socat -x -v udp-listen:1234,fork,reuseaddr  udp:8.8.8.8:53
> 2014/06/22 21:05:53.671370  length=39 from=0 to=38
 54 a9 01 20 00 01 00 00 00 00 00 01 06 67 6f 6f  T.. .........goo
 67 6c 65 03 63 6f 6d 00 00 01 00 01 00 00 29 10  gle.com.......).
 00 00 00 00 00 00 00                             .......
--
< 2014/06/22 21:05:54.096106  length=135 from=0 to=134
 54 a9 81 80 00 01 00 06 00 00 00 01 06 67 6f 6f  T............goo
 67 6c 65 03 63 6f 6d 00 00 01 00 01 c0 0c 00 01  gle.com.........
 00 01 00 00 01 2b 00 04 4a 7d 1f 65 c0 0c 00 01  .....+..J}.e....
 00 01 00 00 01 2b 00 04 4a 7d 1f 66 c0 0c 00 01  .....+..J}.f....
 00 01 00 00 01 2b 00 04 4a 7d 1f 8a c0 0c 00 01  .....+..J}......
 00 01 00 00 01 2b 00 04 4a 7d 1f 64 c0 0c 00 01  .....+..J}.d....
 00 01 00 00 01 2b 00 04 4a 7d 1f 8b c0 0c 00 01  .....+..J}......
 00 01 00 00 01 2b 00 04 4a 7d 1f 71 00 00 29 02  .....+..J}.q..).
 00 00 00 00 00 00 00                             .......
--

[luke@rmbp ~]$ dig @localhost -p 1234 google.com

; <<>> DiG 9.9.2-P2 <<>> @localhost -p 1234 google.com
; (2 servers found)
;; global options: +cmd
;; Got answer:
;; ->>HEADER<<- opcode: QUERY, status: NOERROR, id: 21673
;; flags: qr rd ra; QUERY: 1, ANSWER: 6, AUTHORITY: 0, ADDITIONAL: 1

;; OPT PSEUDOSECTION:
; EDNS: version: 0, flags:; udp: 512
;; QUESTION SECTION:
;google.com.INA

;; ANSWER SECTION:
google.com.299INA74.125.31.101
google.com.299INA74.125.31.102
google.com.299INA74.125.31.138
google.com.299INA74.125.31.100
google.com.299INA74.125.31.139
google.com.299INA74.125.31.113

;; Query time: 426 msec
;; SERVER: 127.0.0.1#1234(127.0.0.1)
;; WHEN: Sun Jun 22 21:05:54 2014
;; MSG SIZE  rcvd: 135

7. monitor the traffic telnet protocol 

Here socat acts as tcp relay and dump the traffic for us.  We use the "-x" option so socat will dump a hex format . 

[luke@rmbp ~]$ socat -v -x tcp-l:1234,fork,reuseaddr tcp:localhost:23
< 2014/06/22 21:16:39.290501  length=15 from=0 to=14
 ff fd 18 ff fd 20 ff fd 23 ff fd 27 ff fd 24     ..... ..#..'..$
--
> 2014/06/22 21:16:39.290930  length=15 from=0 to=14
 ff fb 18 ff fb 20 ff fb 23 ff fb 27 ff fc 24     ..... ..#..'..$
--
< 2014/06/22 21:16:39.291239  length=24 from=15 to=38
 ff fa 20 01 ff f0 ff fa 23 01 ff f0 ff fa 27 01  .. .....#.....'.
 ff f0 ff fa 18 01 ff f0                          ........
--
> 2014/06/22 21:16:39.291863  length=61 from=15 to=75
 ff fa 20 00 33 38 34 30 30 2c 33 38 34 30 30 ff  .. .38400,38400.
 f0 ff fa 23 00 72 6d 62 70 3a 30 ff f0 ff fa 27  ...#.rmbp:0....'
 00 00 44 49 53 50 4c 41 59 01 72 6d 62 70 3a 30  ..DISPLAY.rmbp:0
 ff f0 ff fa 18 00 58 54 45 52 4d ff f0           ......XTERM..
--
< 2014/06/22 21:16:39.293136  length=18 from=39 to=56
 ff fb 03 ff fd 01 ff fd 22 ff fd 1f ff fb 05 ff  ........".......
 fd 21                                            .!
--
...........................

< 2014/06/22 21:16:50.479737  length=33 from=785 to=817
 00 1b 5d 30 3b 6c 75 6b 65 40 72 6d 62 70 3a 7e  ..]0;luke@rmbp:~
 07 00 5b 6c 75 6b 65 40 72 6d 62 70 20 7e 5d 24  ..[luke@rmbp ~]$
.......................................
 0d                                               .
--
< 2014/06/22 21:16:58.604144  length=11 from=826 to=836
 00 0d 0a                                         ...
 6c 6f 67 6f 75 74 0d 0a                          logout..
--


[luke@rmbp xinetd.d]$ telnet 127.0.0.1 1234
Trying 127.0.0.1...
Connected to 127.0.0.1.
Escape character is '^]'.

Linux 3.14.1-ARCH (rmbp) (pts/2)

rmbp login: luke
Password: 
Last login: Sun Jun 22 21:16:05 from localhost.localdomain
[luke@rmbp ~]$ ls
Calibre Library  diff       Downloads  kbd   Maildir  Music   Pictures  proxy.vpn  sudo  tp         Videos  vpn.def    work  you
Desktop          Documents  json       Mail  me       my.txt  pm        so.txt     test  tree.data  vmware  wallpaper  xkb
[luke@rmbp ~]$ exit
logout
Connection closed by foreign host.

8.  Unix domain control socket
Many unix server use a unix domain socket as control port.  In my archlinux desktop, I use "i3" as my window manager. i3 has a unix socket control interface, and its control command are all ascii based. We can use socat to monitor these control commands.
[luke@rmbp tmp]$ socat unix-listen:/tmp/i3-socat.socket,fork  unix-client: /run/user/1000/i3/ipc-socket.1947
2014/06/22 21:37:02 socat[30253] E exactly 2 addresses required (there are 3); use option "-h" for help
[luke@rmbp tmp]$ socat unix-listen:/tmp/i3-socat.socket,fork  unix-client:/run/user/1000/i3/ipc-socket.1947
^C[luke@rmbp tmp]$ socat -x -v unix-listen:/tmp/i3-socat.socket,fork  unix-client:/run/user/1000/i3/ipc-socket.1947
> 2014/06/22 21:38:05.118237  length=14 from=0 to=13
 69 33 2d 69 70 63 00 00 00 00 01 00 00 00        i3-ipc........
--
< 2014/06/22 21:38:05.118656  length=145 from=0 to=144
 69 33 2d 69 70 63 83 00 00 00 01 00 00 00 5b 7b  i3-ipc........[{
 22 6e 75 6d 22 3a 32 2c 22 6e 61 6d 65 22 3a 22  "num":2,"name":"
 32 22 2c 22 76 69 73 69 62 6c 65 22 3a 74 72 75  2","visible":tru
 65 2c 22 66 6f 63 75 73 65 64 22 3a 74 72 75 65  e,"focused":true
 2c 22 72 65 63 74 22 3a 7b 22 78 22 3a 30 2c 22  ,"rect":{"x":0,"
 79 22 3a 30 2c 22 77 69 64 74 68 22 3a 32 38 38  y":0,"width":288
 30 2c 22 68 65 69 67 68 74 22 3a 31 37 36 30 7d  0,"height":1760}
 2c 22 6f 75 74 70 75 74 22 3a 22 65 44 50 31 22  ,"output":"eDP1"
 2c 22 75 72 67 65 6e 74 22 3a 66 61 6c 73 65 7d  ,"urgent":false}
 5d                                               ]
--
> 2014/06/22 21:38:53.950450  length=25 from=0 to=24
 69 33 2d 69 70 63 0b 00 00 00 00 00 00 00 77 6f  i3-ipc........wo
 72 6b 73 70 61 63 65 20 31                       rkspace 1
--
< 2014/06/22 21:38:53.951357  length=32 from=0 to=31
 69 33 2d 69 70 63 12 00 00 00 00 00 00 00 5b 7b  i3-ipc........[{
 22 73 75 63 63 65 73 73 22 3a 74 72 75 65 7d 5d  "success":true}]
--

[luke@rmbp tmp]$  i3-msg -s /tmp/i3-socat.socket -t get_workspaces
[{"num":2,"name":"2","visible":true,"focused":true,"rect":{"x":0,"y":0,"width":2880,"height":1760},"output":"eDP1","urgent":false}]
[luke@rmbp tmp]$  i3-msg -s /tmp/i3-socat.socket -t get_workspaces
[{"num":2,"name":"2","visible":true,"focused":true,"rect":{"x":0,"y":0,"width":2880,"height":1760},"output":"eDP1","urgent":false}]
[luke@rmbp tmp]$  i3-msg -s /tmp/i3-socat.socket "workspace 1"
[{"success":true}]

Git as I understand (9): Patch

$
0
0
Git is designed as a snapshot based object store, patch(or diff) is NOT a native object. When we need a diff/patch of different nodes, we ask git to compute it on the fly.  When it comes to remote collaboration, if both sides employ git as version control, we can use "git merge" to exchange information.  But interestingly, many projects still employ patch file as a tool for code delivery, including Linux Kernel.  Per my understanding, using patch as delivery mechanism has below advantages:

a. For those who did not use git as version control, diff/patch is still a valid universal tools;
b. For code review, developers often tend to review a patch file. Such a patch file provides more necessary context for an efficient code review.  A patch file is just a text file, you can view it even if you don't use git.
c. git provides extra support for patch when comparing to traditional "diff/patch" program. One of the critical extra support is "git diff/format-patch" record the object id of involved tree/blog objects.  When you apply patch into git again, such information would make a 3-way merge possible. A traditional patch will just fail if patch can not apply cleanly;
d. "git format-patch" will record complete information for a commit. So when you apply the patch via "git am",all commit history will be preserved in addition to code change.


There are two pairs of git command to generate and apply patch. They are "git diff/apply" and "git format-patch/am".

1. git diff/apply

This works just like traditional "diff/patch".  The patch generated only reflects difference between two commits. All interim commits change will be squash into one patch file. The git diff always generate  diff from the root tree of a commit. You don't need to align the directory level when you do "git apply", as you generally did in a traditional "patch -pN".

When you apply this patch, index or work tree ( or both) are updated. You need to commit these change to form a totally new commit. The original commit history is not brought into your new commit.  Since the object id is also carried with the diff, when a patch does not apply cleanly, it is possible to resort back to a "3 way merge" via "git apply --3way".

2. git format-patch/am

When you use "git format-patch" , a series of patch files will be generated, one per commit you selected.  In addition to the code change, the commit information is also included into the generated patch file, like author, commit message, commit date, etc.  The patch file is in email format so you can send them via email conveniently.  When you apply the patch series via "git am",  new commit will be generated per the commit information in patch file. So you preserve the whole code change history.

3. patch SHA1 id: git patch-id

Git  allows you to compute a SHA1 id for a diff/patch.  If two commits have identical patch SHA1 id, we can basically ensure that they provide identical contribution to repository. Such case happens when:

a. You cherry-pick a commit from another branch. So the patch SHA1 of these different commits are the same;
b. you apply a patch in your branch. When compare the patch id of generated commit in your branch versus the original commit which generate the patch, these two patch id are the same

Here is an example:
[luke@rmbp patchid]$ git b
  left
  master
* right
[luke@rmbp patchid]$ git lg
* edc7654 (HEAD, right) r3
* 0e2ca07 r2
* cdf1d1f r1
| * 89e4290 (left) l2
| * e0c5392 l1
|/  
* 9be22c6 (master) m2
* 875d734 m1
[luke@rmbp patchid]$ git diff right^ right
diff --git a/m1.txt b/m1.txt
index 63a911f..61c5d64 100644
--- a/m1.txt
+++ b/m1.txt
@@ -1 +1,2 @@
 m1
+change to introduce patch-id
diff --git a/r3.txt b/r3.txt
new file mode 100644
index 0000000..b6693b6
--- /dev/null
+++ b/r3.txt
@@ -0,0 +1 @@
+r3
[luke@rmbp patchid]$ git diff right^ right | git patch-id
4479a1c0b3cf4872d3ab0190e99553e541c8ec09 0000000000000000000000000000000000000000

I have there branches (master/left/right). In the right branch, I generate a patch id for commit "r3"( 4479a1c0b3cf4872d3ab0190e99553e541c8ec09)Next I will "cherry-pick" r3 into left branch.

[luke@rmbp patchid]$ git checkout left
Switched to branch 'left'
[luke@rmbp patchid]$ git cherry-pick --no-commit right
[luke@rmbp patchid]$ git s
## left
M  m1.txt
A  r3.txt
[luke@rmbp patchid]$ git commit -m "l3"
[left 5928e12] l3
 2 files changed, 2 insertions(+)
 create mode 100644 r3.txt
[luke@rmbp patchid]$ git diff left^ left
diff --git a/m1.txt b/m1.txt
index 63a911f..61c5d64 100644
--- a/m1.txt
+++ b/m1.txt
@@ -1 +1,2 @@
 m1
+change to introduce patch-id
diff --git a/r3.txt b/r3.txt
new file mode 100644
index 0000000..b6693b6
--- /dev/null
+++ b/r3.txt
@@ -0,0 +1 @@
+r3
[luke@rmbp patchid]$ git diff left^ left | git patch-id
4479a1c0b3cf4872d3ab0190e99553e541c8ec09 0000000000000000000000000000000000000000

We cherry-pick commit "r3" into branch "left" and generate a new commit "l3".  We have verified above the patch SHA1 id of "r3" and "l3" are identical (4479a1c0b3cf4872d3ab0190e99553e541c8ec09)!

You can also appy commit "r3" on top of branch "left".  The result is still the same.
"git rebase" apply the "patch-id trick" to help to identify the commits which already have been applied  onto upstream.  Quotation from "git help rebase":

"The commits that were previously saved into the temporary area are then reapplied to the current branch, one by one, in order. Note that any commits in HEAD which introduce the same textual
       changes as a commit in HEAD..<upstream> are omitted (i.e., a patch already accepted upstream with a different commit message or timestamp will be skipped)."

"git cherry" is another command to help to do "git rebase".   It will identify the commits in your feature branch which have been applied in upstream branch via "git cherry-pick" or patch application.  For example, when I want to rebase my "right" branch into "left" branch, "git cherry" will tell me "r3" has been applied:
[luke@rmbp patchid]$ git b
  left
  master
* right
[luke@rmbp patchid]$ git l
edc7654 r3
0e2ca07 r2
cdf1d1f r1
9be22c6 m2
875d734 m1
[luke@rmbp patchid]$ git cherry left right
+ cdf1d1f049b5488dcd9a9c790eb57d8a9a9ba7a9
+ 0e2ca071fdebe29d207cf9908c10bff92592eb9b
- edc765446270655cb97a79422e38c7363eeac4f0

Here a "-" sign indicates this commit has already applied into upstream.  In "git rebase", this commit ("r3") will be skipped. 

dnscrypt-proxy in Archlinux

$
0
0
If you suspect that you are facing the problem of potential DNS pollution, you can use the "dnscrypt-proxy" to protect yourself.

http://dnscrypt.org/
https://github.com/jedisct1/dnscrypt-proxy/

Archlinux has provided package for dnscrypt, you can installed it via:

[luke@rmbp vpn]$ pacman -Ss dnscrypt-proxy
community/dnscrypt-proxy 1.4.0-1 
    A tool for securing communications between a client and a DNS resolver
[luke@rmbp vpn]$ sudo pacman -S dnscrypt-proxy 
[luke@rmbp vpn]$  pacman -Ql dnscrypt-proxy 
dnscrypt-proxy /etc/
dnscrypt-proxy /etc/conf.d/
dnscrypt-proxy /etc/conf.d/dnscrypt-proxy
dnscrypt-proxy /usr/
dnscrypt-proxy /usr/bin/
dnscrypt-proxy /usr/bin/dnscrypt-proxy
dnscrypt-proxy /usr/bin/hostip
dnscrypt-proxy /usr/lib/
dnscrypt-proxy /usr/lib/systemd/
dnscrypt-proxy /usr/lib/systemd/system/
dnscrypt-proxy /usr/lib/systemd/system/dnscrypt-proxy.service
dnscrypt-proxy /usr/share/
dnscrypt-proxy /usr/share/dnscrypt-proxy/
dnscrypt-proxy /usr/share/dnscrypt-proxy/dnscrypt-resolvers.csv
dnscrypt-proxy /usr/share/doc/
.........


We need to do some configuration for dnscrypt. First, you need to select a dnscrypt compatible DNS server.   You can refer to two places for these server candidates:

[luke@rmbp vpn]$ cat /usr/share/dnscrypt-proxy/dnscrypt-resolvers.csv
Name,Full name,Description,Location,Coordinates,URL,Version,DNSSEC validation,No logs,Namecoin,Resolver address,Provider name,Provider public key,Provider public key TXT record
cloudns-can,CloudNS Canberra,"CloudNS is an Australian based security focused DNS provider.","Canberra, AU",,https://cloudns.com.au,1.0,yes,yes,yes,113.20.6.2:443,2.dnscrypt-cert.cloudns.com.au,1971:7C1A:C550:6C09:F09B:ACB1:1AF7:C349:6425:2676:247F:B738:1C5A:243A:C1CC:89F4,
cloudns-syd,CloudNS Sydney,"CloudNS is an Australian based security focused DNS provider.","Sydney, AU",,https://cloudns.com.au,1.0,yes,yes,yes,113.20.8.17:443,2.dnscrypt-cert-2.cloudns.com.au,67A4:323E:581F:79B9:BC54:825F:54FE:1025:8B4F:37EB:0D07:0BCE:4010:6195:D94F:E330,
....................

Or you can go to dnscrypt github to the newest server list:

https://github.com/jedisct1/dnscrypt-proxy/blob/master/dnscrypt-resolvers.csv

After you figure out which server to use, you can fill it into "/etc/conf.d/dnscrypt-proxy".

[luke@rmbp conf.d]$ cat dnscrypt-proxy
DNSCRYPT_LOCALIP=127.0.0.1
DNSCRYPT_LOCALPORT=53
DNSCRYPT_USER=nobody
DNSCRYPT_PROVIDER_NAME=2.dnscrypt-cert.ns2.jp.dns.opennic.glue
DNSCRYPT_PROVIDER_KEY=8768:C3DB:F70A:FBC6:3B64:8630:8167:2FD4:EE6F:E175:ECFD:46C9:22FC:7674:A1AC:2E2A
DNSCRYPT_RESOLVERIP=106.186.17.181
DNSCRYPT_RESOLVERPORT=2053

Here I select a server from Japan. Feel free to select your nearby DNS servers.

In Archlinx, the "/etc/resolv.conf" is managed by "resolvconf" (man resolvconf). To force the use of dnscrypt-proxy for all dns lookup, we need to change the configuration file of "resolvconf":

[luke@rmbp etc]$ cat resolvconf.conf 
# Configuration for resolvconf(8)
# See resolvconf.conf(5) for details

resolv_conf=/etc/resolv.conf
# If you run a local name server, you should uncomment the below line and
# configure your subscribers configuration files below.
name_servers=127.0.0.1

Here we specify our DNS to "127.0.0.1", since dnscrypt-proxy is listening on localhost udp port 53, as we configured in above "/etc/conf.d/dnscrypt-proxy":

[luke@rmbp etc]$ sudo netstat -anp | grep udp  | grep 53
udp        0      0 127.0.0.1:53            0.0.0.0:*                           7618/dnscrypt-proxy 

Now let us enable/start "dnscrypt-proxy" via systemd:

[luke@rmbp etc]$ sudo systemctl enable dnscrypt-proxy 
[luke@rmbp etc]$ sudo systemctl start dnscrypt-proxy 
[luke@rmbp etc]$ cat /etc/resolv.conf
# Generated by resolvconf
nameserver 127.0.0.1
[luke@rmbp etc]$ nslookup
> server
Default server: 127.0.0.1
Address: 127.0.0.1#53
> www.google.com.
Server:127.0.0.1
Address:127.0.0.1#53

Non-authoritative answer:
Name:www.google.com
Address: 173.194.37.82
Name:www.google.com
Address: 173.194.37.83
Name:www.google.com
Address: 173.194.37.84
Name:www.google.com
Address: 173.194.37.80
Name:www.google.com
Address: 173.194.37.81

Here, the "/etc/resolv.conf" should always point to "127.0.0.1" since we ask "resolvconf" to do so.

Since dnscrypt does not cache dns query result, you had better use a dns cache before dnscrypt. I use "unbound" for this purpose:

[luke@rmbp ~]$ pacman -Qi unbound
Name           : unbound
Version        : 1.4.22-1
Description    : Validating, recursive, and caching DNS resolver
............................

[luke@rmbp ~]$ cat /etc/unbound/unbound.conf
server:
port: 53
num-threads: 4
username: "unbound"
  directory: "/etc/unbound"
use-syslog: yes

do-not-query-localhost: no
forward-zone:
  name: "."
forward-addr: 127.0.0.1@2053

Since "unbound" listens on port "53", so so need to have "dnscrypt-proxy" listens on some other port. Here I use port "2053" for dnscrypt. 

Happy dnscrytp!

Linux Virtual Console(6): Shell command composition and dispatch

$
0
0
1. Background

Under Unix/Linux, sooner or later, you will have requirement to compose many shell commands and dispatch them to execute in a go.  The most typical scenarios are:

a. You use "find" to list many files you are interested, and want to process them. For example, delete them, compress them, rename them , etc;
b. You have a list of machine in a text file. You want to ping them to validate whether they are alive and measure their response delay;

You can list as many as possible these use cases after you become a veteran Unix user.
The typical process flow of such scenarios are:

a. From the input source ( stdin, a pipe, or a file), segment the input into multiple records according to specific criteria, for example, line breaker (\n , etc);
b. compose a shell command with the segmented input records. You can use one record at a time, or multiple records for one single shell command;
c. After the shell command is composed, you can dispatch it to shell execution.  You can dispatch them in serial or in parallel.

I call this process "Shell command composition and dispatch".
You sure can do some shell programming yourself for this process.  For example, I would like to generate a batch of files with name patter like "A-1.data", "B-2.data" in a run. Here is a simple script to fulfill this requirement:
[luke@rmbp s]$ for i in {A..Z}; do for j in {1..10}; do  touch $i-$j.data ; done; done; 
[luke@rmbp s]$ ll
total 0
-rw-r--r-- 1 luke users 0 Jul  9 17:16 A-10.data
-rw-r--r-- 1 luke users 0 Jul  9 17:16 A-1.data
-rw-r--r-- 1 luke users 0 Jul  9 17:16 A-2.data
-rw-r--r-- 1 luke users 0 Jul  9 17:16 A-3.data
-rw-r--r-- 1 luke users 0 Jul  9 17:16 A-4.data
-rw-r--r-- 1 luke users 0 Jul  9 17:16 A-5.data
-rw-r--r-- 1 luke users 0 Jul  9 17:16 A-6.data
-rw-r--r-- 1 luke users 0 Jul  9 17:16 A-7.data
-rw-r--r-- 1 luke users 0 Jul  9 17:16 A-8.data
-rw-r--r-- 1 luke users 0 Jul  9 17:16 A-9.data
-rw-r--r-- 1 luke users 0 Jul  9 17:16 B-10.data
-rw-r--r-- 1 luke users 0 Jul  9 17:16 B-1.data
-rw-r--r-- 1 luke users 0 Jul  9 17:16 B-2.data
-rw-r--r-- 1 luke users 0 Jul  9 17:16 B-3.data
-rw-r--r-- 1 luke users 0 Jul  9 17:16 B-4.data
-rw-r--r-- 1 luke users 0 Jul  9 17:16 B-5.data
-rw-r--r-- 1 luke users 0 Jul  9 17:16 B-6.data
-rw-r--r-- 1 luke users 0 Jul  9 17:16 B-7.data
-rw-r--r-- 1 luke users 0 Jul  9 17:16 B-8.data
-rw-r--r-- 1 luke users 0 Jul  9 17:16 B-9.data
-rw-r--r-- 1 luke users 0 Jul  9 17:16 C-10.data
-rw-r--r-- 1 luke users 0 Jul  9 17:16 C-1.data
..........

The pro of self made script is flexibility. You can choose how to segment your input into records; You can decide the way how segmented input records are composed into shell command; You can also decide to the execution pattern of these composed shell commands.  The con is,  there are many commonly used patterns in "segment/composition/dispatch" and if you need to program them yourself when requirement comes, it will be a daunting tasks. Furthermore, you are "re-create the wheels" since Linux provides very good support for shell command composition and dispatch already. 

2. "find" and "xargs"

"find" and "xargs" are the only executable files in software package "findutils".  This is not a coincidence.  For "find", its working pattern is to find a whole bunch of files according to selection criteria you provide.  After the files are identified, it is naturally you want to do something with them. The default is to print them out. Or you might want to do something non-trivia, for example , delete them, compress them, etc.  So "find" first prepare the input source, now "find" provides the so called "actions" for you to process these files.  The most relevant actions that "find" provides are:

"-delete":   delete all found files
"--exec command ;"  You can use '{}' (represent the found file name) to compose your command string. the ';' specifies that one found file will cause one command dispatch for shell to execute. For example:

[luke@rmbp s]$ find /usr/share/man/  -exec echo  {} \;
/usr/share/man/
/usr/share/man/fi
/usr/share/man/fi/man1
/usr/share/man/fi/man1/help2man.1.gz
/usr/share/man/man6
/usr/share/man/man6/penrose.6.gz
/usr/share/man/man6/jigglypuff.6.gz
/usr/share/man/man6/circuit.6.gz
/usr/share/man/man6/whirlwindwarp.6.gz
/usr/share/man/man6/cwaves.6.gz
/usr/share/man/man6/boxfit.6.gz
/usr/share/man/man6/morph3d.6.gz
/usr/share/man/man6/gflux.6.gz
/usr/share/man/man6/abstractile.6.gz
/usr/share/man/man6/moebius.6.gz
/usr/share/man/man6/grav.6.gz

.....

Here, all files under "/usr/share/man" are listed. For each file,  an "echo" command will be executed on.  "\;" is to escape the ";" so shell does not treat it as special character.

"--exec command {} +" :   Similar to "--exec command ;", but these time, as many as possible file names are appended into command (within the limit of shell command length).
  
Here you can see many files names are "cramped" into one display lines. 

Since there are so many possibilities to compose shell command, the "action" part of "find" could be fulfilled via another cousin program "xarg".   So "find" will focus on searching for files and output files names in different format so "xargs" can consume.   The work flow of "xargs" is as follows:

First, "xargs" will select its input source.  By default, xargs use its stdin and expect a upstream program to feed it via a pipe.  This is the most typical scenario. For example:
[luke@rmbp man]$ find . -type d | xargs 
. ./fi ./fi/man1 ./man6 ./pt_BR ./pt_BR/man1 ./pt_BR/man5 ./pt_BR/man8 ./ja ./ja/man1 ./ja/man5 ./ja/man8 ./nl ./nl/man1 ./de ./de/man1 ./de/man5 ./de/man8 ./cs/man1 ./cs/man5 ./cs/man8....................
If a "-a filename" option is present, xargs will read its input from file "filename".
Then xargs will segment the input into multiple records. The default  delimiter is "\s\t\n", i.e "space" character.
[luke@rmbp tmp]$ cat me
a b c d
e f g
1 2 

4
[luke@rmbp tmp]$ cat me | xargs --verbose
/bin/echo a b c d e f g 1 2 3 4 
a b c d e f g 1 2 3 4
Here we can see "xargs" assemble all arguments and  "echo" them in one "replace string".  By default, xargs will assemble as many arguments as possible into one replace string on the condition that system limit are not reached.  To show the system limit, you can do:
[luke@rmbp tmp]$ xargs --show-limits
Your environment variables take up 800 bytes
POSIX upper limit on argument length (this system): 2094304
POSIX smallest allowable upper limit on argument length (all systems): 4096
Maximum length of command we could actually use: 2093504
Size of command buffer we are actually using: 131072

If delimiter is the default value, we can use "-L " to limit arguments to be assembled into one replace string.
[luke@rmbp tmp]$ xargs -a me -L 2 --verbose
/bin/echo a b c d e f g 
a b c d e f g
/bin/echo 1 2 3 4 
1 2 3 4
Here every two lines of input are assembled into one replace string.  We can also use "-n " to specify the maximum arguments which could be assembled into one replace string
[luke@rmbp tmp]$ xargs -a me -n 3 --verbose
/bin/echo a b c 
a b c
/bin/echo d e f 
d e f
/bin/echo g 1 2 
g 1 2
/bin/echo 3 4 
3 4
If "-n" is specified, "-L " will be overridden:
[luke@rmbp tmp]$ xargs -a me  -L 2 -n 1 --verbose
/bin/echo a 
a
/bin/echo b 
b
/bin/echo c 
c
/bin/echo d 
d
/bin/echo e 
e
/bin/echo f 
f
/bin/echo g 
g
/bin/echo 1 
1
/bin/echo 2 
2
/bin/echo 3 
3
/bin/echo 4 
4

[luke@rmbp tmp]$ xargs -a me  -L 1 -n 5 --verbosereached
/bin/echo a b c d e 
a b c d e
/bin/echo f g 1 2 3 
f g 1 2 3
/bin/echo 4 
4
If the delimiter is not the default value, then "-L " does not make sense then.  Only "-n " is effective here:
[luke@rmbp tmp]$ cat me
a,b,c,d
e,f,g
1 2
3
4
[luke@rmbp tmp]$ cat me |xargs --verbose -d , -n  2
/bin/echo a b 
a b
/bin/echo c d
c d
e
/bin/echo f g
1 2
3
4
f g
1 2
3
4

We can see although there is a "\n" between "g" and "1 2", but it is not considered the delimiter. So "f g \n 1 2 \n 3 \n 4" will be assembled into one replace string. Because xargs are often used with "find", and find can output file list via delimiter "\0" (null char), xargs can specify the "\0" as delimiter via option "-0".

After the replace string is created, it is used to compose the final command line.  With "", the replace string generated before will be appended to the end of "[command [initial argument]]".  If you don't specify a "command", then the default command will be "echo". 
[luke@rmbp tmp]$ echo A B C D | xargs -n 2  echo hello
hello A B
hello C D

After command line is generated, xargs will dispatch them in parallel to n process if you specify "-P n". The default value is "-P 1", so by default, all generated command lines will be processed in serial. 
[luke@rmbp tmp]$ echo {1..10} | xargs  -n 1  -P 1 
1
2
3
4
5
6
7
8
9
10
[luke@rmbp tmp]$ echo {1..10} | xargs  -n 1  -P 10 
1
4
3
5
7
10
2
6
9
8
Because 10 command lines are executed in parallel, the output order is quite random. 

3. GNU parallel

"parallel" is a more advanced version of "xargs". It is a very powerful Perl script.  Comparing to "xargs", parallel excels in:

a. Multiple input sources
"parallel" can take input from stdin, command line argument (:::), external files (::::). parallel also provides two methods to combine multiple input sources into one unified input, namely "the default" and "--xapply";
b. command composition
In "xargs", replace string could only be appended to the end of "command [initial argument]". In parallel, you can put replace string ({}) any where. There is no default "command" (echo) in parallel. So you need to explicitly specify them, or the replace string itself will be treated as the command;
c. parallel dispatch and execution
"parallel" provide multiple ways to control how to execute generated command lines in parallel, even dispatch command lines to remote machine to execute. That is why it is named "parallel". 

By default, "parallel" will use  argument within one line as replace string, instead as many arguments as possible within the command line length system limit. You can specify "-n x" or "-m" (as many as possible) to change the default behavior. 

"parallel" provides very good documentation. "man parallel" will get you all usage detail, while "man parallel_tutorial" is must read for starter. I have no intention to repeat these good documentation.  After you know how "xargs" works, parallel will only make you feel more powerful in the Linux command line world.

Below are some examples that help me clarify the basics of parallel.

. "parallel" will by default assemble arguments within one line into one command line
localhost:p luke$ parallel echo :::: me
a b c
d e f
localhost:p luke$ parallel --dry-run echo :::: me
echo a\ b\ c

echo d\ e\ f
. add "-L n" will use arguments within "n" lines
localhost:p luke$ parallel --dry-run -L 2 echo :::: me

echo a\ b\ c d\ e\ f
.  "--xargs" will assemble as many arguments into one command line as possible.   If command line length is within system limit, then only one command line/job will be executed
localhost:p luke$ parallel --xargs  --dry-run echo :::: me

echo a\ b\ c d\ e\ f
. "-m" is similar to "--xargs", but if you specify "--jobs/-j", the collected arguments will be split into several jobs:
localhost:p luke$ seq 1 1000 | parallel -m -j5 echo | wc -l
       5
. if you specify both "-L" and "-N", "-N" will override "-L":
localhost:p luke$ seq 1 1000 | parallel -L 2 echo | wc -l
     500
localhost:p luke$ seq 1 1000 | parallel -L 2 -N 4 echo | wc -l
     250
localhost:p luke$ seq 1 1000 | parallel -L 2 -N 1 echo | wc -l
    1000
. flexible command line composition. You have have multiple shell command, and replace string could be put anywhere. "xargs" will only allow you to append replace string onto the end of command:
localhost:p luke$ parallel "echo -n {#}:{%} '' ; echo hello {}"  ::: A B C
2:2  hello B
1:1  hello A
3:3  hello C
. job nubmers. By default, the job number equal to your cpu cores.  Use "-j N" to specify job numbers.  "-j 200%" will be two times of cores number.  "-j 0" will dispatch as many jobs as possible. 
. the output order of jobs are quite random since they are run in parallel. To force the output in order, use "-k"
localhost:p luke$ parallel  echo {#}:{%} {} ::: A B C D
3:3 C
2:2 B
1:1 A
4:4 D
localhost:p luke$ parallel -k echo {#}:{%} {} ::: A B C D
1:1 A
2:2 B
3:3 C
4:4 D
. if you want to know the progress of all jobs running, use "--process":
localhost:p luke$ parallel --progress sleep ::: 1 3 2 2 1 3 3 2 1

Computers / CPU cores / Max jobs to run
1:local / 8 / 8

Computer:jobs running/jobs completed/%of started jobs/Average seconds to complete
local:0/9/100%/0.3s 
. you can have a job log for later review
localhost:p luke$ parallel --progress --joblog jb.log sleep ::: 1 3 2 2 1 3 3 2 1

Computers / CPU cores / Max jobs to run
1:local / 8 / 8

Computer:jobs running/jobs completed/%of started jobs/Average seconds to complete
local:0/9/100%/0.3s 
localhost:p luke$ cat jb.log
SeqHostStarttimeJobRuntimeSendReceiveExitvalSignalCommand
5:1404971234.357    1.0400000sleep 1
1:1404971234.347    1.0550000sleep 1
9:1404971235.402    1.0650000sleep 1
8:1404971234.363    2.1050000sleep 2
4:1404971234.354    2.1130000sleep 2
3:1404971234.352    2.1150000sleep 2
2:1404971234.350    3.0090000sleep 3
7:1404971234.361    3.0820000sleep 3
6:1404971234.359    3.0850000sleep 3


Ec2 linux server setup: ArchLinux+ssh dynamic forward + l2tp/ipsec + dnscrypt-wrapper

$
0
0
1. Setup a free Ec2 free account

http://aws.amazon.com/free/

You need to provide a credit card number.  If you don't not pass the free tier usage limit, you won't be billed.  The basic limits are:

a. Bandwidth : 15GB/Month
b. Server instance:  1 Cpu, 1 Gig memory, 750 hours/month uptime. (up all the time for free if you run only one instance)
c. Storage:  25G SSD

This free account is only valid for one year.

You need to create a public/private key pair during account registration and save the private key in a safe place in your local machine. You will need this private key to log in your new server instance.

2. Create a Archlinux instance

a. login to ec2 console:
http://aws.amazon.com/ec2/

b. use your email/password you created in step 1 to login

c. click "instances", in the drop down menu, select "Tokyo" region.  Because server in Tokyo is in Asia and might has better network performance.


d. click "Launch Instance", select "community AMIs" and search for "archlinux". Select "archlinux-ami-hvm-2015.03.0.x86_64-gpg2"


e. select "t2.micro" instance type, which is the only one available for free.


f. accept all default in step 3/4/5/6/7, and save your new server instance.

g. Under "instances-->Action-->Instance State", click "Start" to start your new server instance


h. Now you can connect to your arch linux via your previously saved private key and public ip address displayed in server instance


In this example case, the command line is :

"ssh -i aws.pem  root@54.65.92.27"

the aws.pem is your private key file.

If you can login, then you are O.K.


3. enlarge the root partition: optional step

The default root partition is only 2GB in the original AMI image. For our simple purpose, it should be large enough. If you want to enlarge the root partition, say to 10GB, then:

a. click "Snapshots-->Public Snapshots" and search for "archlinux".


b. select snapshot "snap-e3ab40d8  archlinux-ami-hvm-2015.03.0.x86_64", click "Action", select "Create Volume", then create a Volume of 10GB with this snapshot.  This is the identical snapshot we used to create our server instance in step 2;

c. Attach this volume into our server instance, via "/dev/xvdb" path:


d. Now you can use fdisk+e2fsck+resize2fs  to resize the root partition to 10GB:

[root@ip-172-31-11-226 ~]# fdisk -l /dev/xvda

Disk /dev/xvda: 2 GiB, 2147483648 bytes, 4194304 sectors
Units: sectors of 1 * 512 = 512 bytes
Sector size (logical/physical): 512 bytes / 512 bytes
I/O size (minimum/optimal): 512 bytes / 512 bytes
Disklabel type: dos
Disk identifier: 0x746dfada

Device     Boot Start     End Sectors Size Id Type
/dev/xvda1       2048 4194303 4192256   2G 83 Linux

[root@ip-172-31-11-226 ~]# fdisk -l /dev/xvdb

Disk /dev/xvdb: 20 GiB, 21474836480 bytes, 41943040 sectors
Units: sectors of 1 * 512 = 512 bytes
Sector size (logical/physical): 512 bytes / 512 bytes
I/O size (minimum/optimal): 512 bytes / 512 bytes
Disklabel type: dos
Disk identifier: 0x746dfada

Device     Boot    Start      End  Sectors Size Id Type
/dev/xvdb1          2048 20973567 20971520  10G 83 Linux
/dev/xvdb2      20973568 41943039 20969472  10G 83 Linux

In my case, I use a 20GB volume. First I delete the first partition in xvdb, and I recreate the first partition from the same start sector (2048) and set the partition size to "+10G". Then I create another partition for my "home" directory (10G) also.  Be noticed that since our AMI image use "MBR" instead of "GPT" partition table, so we use use "fdisk" instead of "gdisk" to change our partition table. 

Next I resize the original ext4 file system on /dev/xvdb1 to 10G:

[root@ip-172-31-11-226 ~]# e2fsck -f  /dev/xvdb1
e2fsck 1.42.12 (29-Aug-2014)
Pass 1: Checking inodes, blocks, and sizes
Pass 2: Checking directory structure
Pass 3: Checking directory connectivity
Pass 4: Checking reference counts
Pass 5: Checking group summary information
/dev/xvdb1: 45206/655360 files (0.1% non-contiguous), 298879/2621440 blocks
[root@ip-172-31-11-226 ~]# resize2fs /dev/xvdb1
resize2fs 1.42.12 (29-Aug-2014)
The filesystem is already 2621440 (4k) blocks long.  Nothing to do!

Now our new volume is ready to be booted from. We now stop our instance, detach the original 2G volume and attach our new volume again via device path "/dev/xvda". Then we will reboot our machine, and we should have a 10G root partition. 

[root@ip-172-31-11-226 ~]# df -h
Filesystem      Size  Used Avail Use% Mounted on
/dev/xvda1      9.9G  975M  8.4G  11% /
dev             496M     0  496M   0% /dev
run             499M  216K  498M   1% /run
tmpfs           499M     0  499M   0% /dev/shm
tmpfs           499M     0  499M   0% /sys/fs/cgroup
tmpfs           499M  2.6M  496M   1% /tmp
/dev/xvda2      9.8G   50M  9.2G   1% /home
tmpfs           100M     0  100M   0% /run/user/0

I also mount my "home" partition. 

4. assign fixed ip for server instance. 

Before we assign fixed ip to our server instance, every time we restart it, it will be assigned a new public IP.  

Under "Elastic IPs", choose "Allocate New Address" and "Associate Address" to our server instance. 


5. ssh dynamic forward: Poor Man's VPN

Since we already can log into EC2 server, we can use ssh dynamic forward to create a Sock proxy so we can use it as a vpn tunnel. To create a ssh tunnel, you can:

[luke@rmbp .ssh]$ ssh -fN -D 8000 -i ~/.ssh/aws.pem root@54.65.92.27
        
[luke@rmbp .ssh]$ ss -ltn | grep 8000
LISTEN     0      128    127.0.0.1:8000                     *:*                  
LISTEN     0      128        ::1:8000                    :::*    

Now we have a sock5 proxy in port 8000.  To make thing more simple, you can create a config file under ~/.ssh/config:

[luke@rmbp .ssh]$ cat ~/.ssh/config 

Host awst
     HostName 54.65.92.27
     User root
     IdentityFile ~/.ssh/aws.pem
     DynamicForward 0.0.0.0:8000
     ServerAliveInterval 60
     ServerAliveCountMax 3

[luke@rmbp .ssh]$  ssh -fN awst

If you are using Google Chrome browser, you can download a proxy extension called "SwitchyOmega".  Before you can download this proxy, for well known reason, you need to force google-chrome to use your new proxy first:

[luke@rmbp .ssh]$ /usr/bin/man google-chrome
"
--proxy-server=host:port
              Specify the HTTP/SOCKS4/SOCKS5 proxy server to use for requests.  This overrides any environment variables or settings picked via the options dialog.  An individual  proxy
              server is specified using the format:

                [<proxy-scheme>://]<proxy-host>[:<proxy-port>]

              Where <proxy-scheme> is the protocol of the proxy server, and is one of:

                "http", "socks", "socks4", "socks5".

              If the <proxy-scheme> is omitted, it defaults to "http". Also note that "socks" is equivalent to "socks5".

              Examples:

                --proxy-server="foopy:99"
                    Use the HTTP proxy "foopy:99" to load all URLs.

                --proxy-server="socks://foobar:1080"
                    Use the SOCKS v5 proxy "foobar:1080" to load all URLs.

                --proxy-server="socks4://foobar:1080"
                    Use the SOCKS v4 proxy "foobar:1080" to load all URLs.

                --proxy-server="socks5://foobar:66"
                    Use the SOCKS v5 proxy "foobar:66" to load all URLs.
"

[luke@rmbp .ssh]$ google-chrome --proxy-server socks5://localhost:8000


6. l2tp/ipsec

L2tp/ipsec is widely supported on all platforms, especially on Windows, Mac, Android, IOS.  Next, we will setup a l2tp/ipsec server using softethervpn:

[root@ip-172-31-11-226 ~]# pacman -S base-devel
[root@ip-172-31-11-226 ~]# wget http://www.softether-download.com/files/softether/v4.14-9529-beta-2015.02.02-tree/Linux/SoftEther_VPN_Server/64bit_-_Intel_x64_or_AMD64/softether-vpnserver-v4.14-9529-beta-2015.02.02-linux-x64-64bit.tar.gz

[root@ip-172-31-11-226 ~]# tar xvf softether-vpnserver-v4.14-9529-beta-2015.02.02-linux-x64-64bit.tar.gz
[luke@ip-172-31-11-226 ~]$ cd softethervpn-git
[luke@ip-172-31-11-226 softethervpn-git]$ make

Now we create a service script for softether vpn server:

[luke@ip-172-31-11-226 softethervpn-git]$ cat /etc/systemd/system/softethervpn-server.service 
[Unit]
Description=SoftEther VPN Server daemon
After=network.target

[Service]
Type=forking
ExecStart=/home/luke/vpnserver/vpnserver start
ExecReload=/home/luke/vpnserver/vpnserver stop

[Install]
WantedBy=multi-user.target

Then we start softether vpn service:

[luke@ip-172-31-11-226 softethervpn-git]$ sudo systemctl start softethervpn-server.service

Next we config softether vpn to provide L2tp/ipsec service. Reference link:

https://www.digitalocean.com/community/tutorials/how-to-setup-a-multi-protocol-vpn-server-using-softether

[luke@ip-172-31-11-226 vpnserver]$ ./vpncmd
vpncmd command - SoftEther VPN Command Line Management Utility
SoftEther VPN Command Line Management Utility (vpncmd command)
Version 4.14 Build 9529   (English)
Compiled 2015/02/02 17:53:35 by yagi at pc30
Copyright (c) SoftEther VPN Project. All Rights Reserved.

By using vpncmd program, the following can be achieved. 

1. Management of VPN Server or VPN Bridge 
2. Management of VPN Client
3. Use of VPN Tools (certificate creation and Network Traffic Speed Test Tool)

Select 1, 2 or 3: 1

Specify the host name or IP address of the computer that the destination VPN Server or VPN Bridge is operating on. 
By specifying according to the format 'host name:port number', you can also specify the port number. 
(When the port number is unspecified, 443 is used.)
If nothing is input and the Enter key is pressed, the connection will be made to the port number 8888 of localhost (this computer).
Hostname of IP Address of Destination: 

If connecting to the server by Virtual Hub Admin Mode, please input the Virtual Hub name. 
If connecting by server admin mode, please press Enter without inputting anything.
Specify Virtual Hub Name: 
Connection has been established with VPN Server "localhost" (port 443).

You have administrator privileges for the entire VPN Server.
VPN Server>hublist
HubList command - Get List of Virtual Hubs
Item              |Value
------------------+-------------------
Virtual Hub Name  |DEFAULT
Status            |Online
Type              |Standalone
Users             |0
Groups            |0
Sessions          |0
MAC Tables        |0
IP Tables         |0
Num Logins        |0
Last Login        |2015-03-04 14:09:02
Last Communication|2015-03-04 14:09:02
Transfer Bytes    |0
Transfer Packets  |0
The command completed successfully.
VPN Server/default>usercreate vpn 
UserCreate command - Create User 
Assigned Group Name: 

User Full Name: 

User Description: 

The command completed successfully.
VPN Server/default>userpasswordset vpn
UserPasswordSet command - Set Password Authentication for User Auth Type and Set Password
Please enter the password. To cancel press the Ctrl+D key.

Password: ********
Confirm input: ********


The command completed successfully.
VPN Server>ipsecenable
IPsecEnable command - Enable or Disable IPsec VPN Server Function
Enable L2TP over IPsec Server Function (yes / no): yes

Enable Raw L2TP Server Function (yes / no): yes

Enable EtherIP / L2TPv3 over IPsec Server Function (yes / no): yes

Pre Shared Key for IPsec (Recommended: 9 letters at maximum): vpn

Default Virtual HUB in a case of omitting the HUB on the Username: default

The command completed successfully.

Here we enable l2tp/ipsec in vpn server. The username is "vpn", and I set a userpassword. The ipsec preshared key is set to "vpn" too. 

If you are behind a NAT proxy (as most of us do) , you also need enable "securenat"

VPN Server/default>securenatenable
SecureNatEnable command - Enable the Virtual NAT and DHCP Server Function (SecureNat Function)
The command completed successfully.

VPN Server/default>securenatstatusget
SecureNatStatusGet command - Get the Operating Status of the Virtual NAT and DHCP Server Function (SecureNat Function)
Item                     |Value
-------------------------+---------
Virtual Hub Name         |default
NAT TCP/IP Sessions      |0 Session
NAT UDP/IP Sessions      |0 Session
NAT ICMP Sessions        |0 Session
NAT DNS Sessions         |0 Session
Allocated DHCP Clients   |1 Client
Kernel-mode NAT is Active|No
The command completed successfully.
VPN Server/default>natenable
NatEnable command - Enable Virtual NAT Function of SecureNAT Function
The command completed successfully.

VPN Server/default>natget
NatGet command - Get Virtual NAT Function Setting of SecureNAT Function
Item                           |Value
-------------------------------+-----
Use Virtual NAT Function       |Yes
MTU Value                      |1500
TCP Session Timeout (Seconds)  |1800
UDP Session Timeout (Seconds)  |60
Save NAT and DHCP Operation Log|Yes

The command completed successfully.

7. create security group (firewall rules)

softether vpn by default needs you to open several ports in firewall. In EC2, it is set up via "security group". The most simple way is to open all ports.  Here is how to set it up:


I created a "free" security groups which allow all inbound and outbound ports. Then I associate this security group to my server instance.

If you are sensitive to network safety, set up a security group as follows:


It is time to connect your client to our l2tp/ipsec server:

a. Iphone:

Password is your user password, and "secret" is the preshared ipsec key "vpn". 

b. android

Select type "l2tp/ipsec", the "ipsec identifier" set "vpn", in "ipsec preshared key", set "vpn", in "advanced option-->forwarding routes" set "0.0.0.0/0". 


c. windows


8. private dnscrypt server.

If you want to have a encrypt dns server, you can use your dnscrypt-wrapper to create one.  Here is the server side git repository. 

https://github.com/Cofyc/dnscrypt-wrapper

In client side, you can use dnscrypt-proxy to connect to your encrypted dnscrypt-wrapper dns server. 

[luke@ip-172-31-11-226 ~]$ sudo pacman -S git libsodium libevent
[luke@ip-172-31-11-226 ~]$ git clone https://github.com/Cofyc/dnscrypt-wrapper
[luke@ip-172-31-11-226 ~]$ cd dnscrypt-wrapper
[luke@ip-172-31-11-226 dnscrypt-wrapper]$ make configure
  GEN configure
  GEN config.status
running CONFIG_SHELL=/bin/sh /bin/sh ./configure --no-create --no-recursion
checking for gcc... gcc
checking whether the C compiler works... yes
checking for C compiler default output file name... a.out
checking for suffix of executables... 
checking whether we are cross compiling... no
checking for suffix of object files... o
checking whether we are using the GNU C compiler... yes
checking whether gcc accepts -g... yes
checking for gcc option to accept ISO C89... none needed
checking for gar... no
checking for ar... ar
checking for gtar... no
checking for tar... tar
checking for event_base_new in -levent... yes
checking for sodium_init in -lsodium... yes
configure: creating ./config.status

Configuration summary:

    Support for event library: yes
    Support for sodium library: yes

  LINK config.mak.autogen
config.status: creating config.mak.autogen
config.status: executing config.mak.autogen commands
make: 'configure' is up to date.
[luke@ip-172-31-11-226 dnscrypt-wrapper]$ make
  CC dnscrypt.o
  CC udp_request.o
  CC tcp_request.o
  CC edns.o
  CC logger.o
  CC rfc1035.o
  CC safe_rw.o
  CC cert.o
  CC pidfile.o
  LINK dnscrypt-wrapper

[luke@ip-172-31-11-226 dnscrypt-wrapper]$ ./dnscrypt-wrapper --gen-provider-keypair
Generate provider key pair... ok.
Public key fingerprint: A12F:12C0:39C2:7E95:7D42:FD5F:6CD3:DA48:3898:B37B:51FC:82AB:7B2D:25D9:55FE:2331

This is the provider key you should give to users for your service.
(i.e. dnscrypt-proxy --provider-key=A12F:12C0:39C2:7E95:7D42:FD5F:6CD3:DA48:3898:B37B:51FC:82AB:7B2D:25D9:55FE:2331
                     --resolver-address=<your resolver public IP>
                     --resolver-address=2.dnscrypt-cert...)
[luke@ip-172-31-11-226 dnscrypt-wrapper]$ ./dnscrypt-wrapper --gen-crypt-keypair
Generate crypt key pair... ok.
Keys are stored in crypt_public.key & crypt_secret.key.
[luke@ip-172-31-11-226 dnscrypt-wrapper]$ ./dnscrypt-wrapper --crypt-secretkey-file crypt_secret.key --crypt-publickey-file=crypt_public.key --provider-publickey-file=public.key --provider-secretkey-file=secret.key --gen-cert-file
[7227] 05 Mar 00:15:54.678 [notice] Generating pre-signed certificate.
[7227] 05 Mar 00:15:54.678 [notice] TXT record for signed-certificate:
* Record for nsd:
2.dnscrypt-cert86400INTXT"DNSC\000\001\000\000\199\215c\028\197?S\241\009Q$\238O\246\236\017\151\180r\205\251\159\233\205\168\007\012\230\253o\1555G\242\221\162\134\158w\001fS\143C\180\215\226\171\211\233\005CQ\253\138=\208;\142\240\250\239Q\005\197\143\018\243\203A\247\218D\187$eM=\226\235z6zG\195\225\008j\233\243\175I\139\012\167W7PYqwfzt0001T\247!\170V\216U*"

* Record for tinydns:
'2.dnscrypt-cert:DNSC\000\001\000\000\307\327c\034\305?S\361\011Q$\356O\366\354\021\227\264r\315\373\237\351\315\250\007\014\346\375o\2335G\362\335\242\206\236w\001fS\217C\264\327\342\253\323\351\005CQ\375\212=\320;\216\360\372\357Q\005\305\217\022\363\313A\367\332D\273$eM=\342\353z6zG\303\341\010j\351\363\257I\213\014\247W7PYqwfzt0001T\367!\252V\330U*:86400

[7227] 05 Mar 00:15:54.679 [notice] Certificate stored in dnscrypt.cert.

[luke@ip-172-31-11-226 dnscrypt-wrapper]$ sudo ./dnscrypt-wrapper  -r 8.8.8.8:53 -a 0.0.0.0:53  --crypt-secretkey-file=crypt_secret.key --crypt-publickey-file=crypt_public.key --provider-cert-file=dnscrypt.cert --provider-name=2.dnscrypt-cert.yechengfu.com

We can create a systemd service file for it:

[luke@ip-172-31-11-226 ~]$ cat /etc/systemd/system/dnscrypt-wrapper.service 
[Unit]
Description=dnscrypt-wrapper
After=network.target

[Service]
Type=simple
Environment="WD=/home/luke/dnscrypt-wrapper"

ExecStart=/home/luke/dnscrypt-wrapper/dnscrypt-wrapper  -r 172.31.0.2:53 -a 0.0.0.0:53  --crypt-secretkey-file=${WD}/crypt_secret.key --crypt-publickey-file=${WD}/crypt_public.key --provider-cert-file=${WD}/dnscrypt.cert --provider-name=2.dnscrypt-cert.yechengfu.com
ExecStop=
Restart=always

[Install]
WantedBy=multi-user.target

[luke@ip-172-31-11-226 system]$ sudo systemctl enable dnscrypt-wrapper.service 
Created symlink from /etc/systemd/system/multi-user.target.wants/dnscrypt-wrapper.service to /etc/systemd/system/dnscrypt-wrapper.service.

[luke@ip-172-31-11-226 ~]$ sudo systemctl start dnscrypt-wrapper
[luke@ip-172-31-11-226 ~]$ ps -ef | grep dns
root      7468     1  0 00:56 ?        00:00:00 /home/luke/dnscrypt-wrapper/dnscrypt-wrapper -r 172.31.0.2:53 -a 0.0.0.0:53 --crypt-secretkey-file=/home/luke/dnscrypt-wrapper/crypt_secret.key --crypt-publickey-file=/home/luke/dnscrypt-wrapper/crypt_public.key --provider-cert-file=/home/luke/dnscrypt-wrapper/dnscrypt.cert --provider-name=2.dnscrypt-cert.yechengfu.com
luke      7470  6660  0 00:56 pts/0    00:00:00 grep dns
[luke@ip-172-31-11-226 ~]$ sudo ss -ltnp src :53
State      Recv-Q Send-Q                                                  Local Address:Port                                                                 Peer Address:Port              
LISTEN     0      128                                                                 *:53                                                                              *:*                   users:(("dnscrypt-wrappe",pid=7468,fd=9))

Now you have a working encrypted dns server.  Use "dnscrypt-proxy" in your client machine to act as dns client to prevent potential dns pollution. 


Viewing all 25 articles
Browse latest View live